# Account billing & invoices
Source: https://docs-v4.strapi.io/cloud/account/account-billing
# Account billing & invoices
Through the *Profile* page, accessible by clicking on your profile picture on the top right hand corner of the interface then clicking on **Profile**, you can access the [ *Billing*](#account-billing) and [ *Invoices*](#account-invoices) tabs.
## Account billing
The  *Billing* tab displays and enables you to modify the billing details and payment method set for the account.
The *Payment method* section of the  *Billing* tab allows you to manage the credit cards that can be used for the Strapi Cloud projects. The *Billing details* section requires to be filled in, at least for the mandatory fields, as this information will be the default billing details for all Strapi Cloud projects related to your account.
### Adding a new credit card
1. In the *Payment method* section of the  *Billing* tab, click on the **Add card** button.
2. Fill in the following fields:
| Field name | Description |
| --- | --- |
| Card Number | Write the number of the credit card to add as payment method. |
| Expires | Write the expiration date of the credit card. |
| CVC | Write the 3-numbers code displayed at the back of the credit card. |
3. Click on the **Save** button.
:::tip
The first credit card to be added as payment method for the account will by default be the primary one. It is however possible to define another credit card as primary by clicking on the  icon, then **Switch as primary**.
:::
### Deleting a credit card
To remove a credit card from the list of payment methods for the account:
1. Click on the  icon of the credit card you wish to delete.
2. Click **Remove card**. The card is immediately deleted.
:::note
You cannot delete the primary card as at least one credit card must be available as payment method, and the primary card is by default that one. If the credit card you wish to delete is currently the primary card, you must first define another credit card as primary, then delete it.
:::
## Account invoices
The  *Invoices* tab displays the complete list of invoices for all your Strapi Cloud projects.
:::strapi Invoices are also available per project.
In the *Settings > Invoices* tab of any project, you will find the invoices for that project only. Feel free to check the [dedicated documentation](/cloud/projects/settings#invoices).
:::
# Profile settings
Source: https://docs-v4.strapi.io/cloud/account/account-settings
# Profile settings
The *Profile* page enables you to manage your account details and preferences. It is accessible by clicking on your profile picture, on the top right hand corner of the interface, and **Profile**.
There are 3 tabs available in the *Profile* interface:  [*General*](#general),  [*Preferences*](#preferences),  *Billing* and  Invoices (the last 2 are documented in the [Account billing details](/cloud/account/account-billing) section of this documentation).
## General
The  *General* tab enables you to edit the following details for your account profile:
- Details: to see the name associated with your account.
- Connected accounts: to manage Google, GitHub and GitLab accounts connected with your Strapi Cloud account (see [Managing connected accounts](#managing-connected-accounts)).
- Delete account: to permanently delete your Strapi Cloud account (see [Deleting Strapi Cloud account](#deleting-strapi-cloud-account)).
### Managing connected accounts
You can connect a Google, GitLab and GitHub account to your Strapi Cloud account. The _Connected accounts_ section lists accounts that are currently connected to your Strapi Cloud account. From there you can also connect a new Google, GitLab and GitHub account if one is not already connected.
To connect a new Google, GitLab or GitHub account to your Strapi Cloud account, click on the **Connect account** button and follow the next steps on the corresponding website.
You can also click on the three dots button of a connected account and click on the "Manage on" button to manage your GitHub, GitLab or Google account directly on the corresponding website.
### Deleting Strapi Cloud account
You can delete your Strapi Cloud account, but it will be permanent and irreversible. All associated projects and their data will be deleted as well and the subscriptions for the projects will automatically be canceled.
1. In the *Delete account* section of the  *General* tab, click on the **Delete account** button.
2. In the dialog, type `DELETE` in the textbox.
3. Confirm the deletion of your account by clicking on the **Delete** button.
## Preferences
The  *Preferences* tab enables you to choose the appearance of your Strapi Cloud dashboard: either the Light or Dark theme.
# Database
Source: https://docs-v4.strapi.io/cloud/advanced/database
# Database
Strapi Cloud provides a pre-configured PostgreSQL database by default. However, you can also configure it to utilize an external SQL database, if needed.
:::prerequisites
- A local Strapi project running on `v4.8.2+`.
- Credentials for external database.
- If using an existing database, the schema must match the Strapi project schema.
:::
:::caution
While it's possible to use an external database with Strapi Cloud, you should do it while keeping in mind the following considerations:
- Strapi Cloud already provides a managed database that is optimized for Strapi.
- Using an external database may result in unexpected behavior and/or performance issues (e.g., network latency may impact performance). For performance reasons, it's recommended to host your external database close to the region where your Strapi Cloud project is hosted. You can find where your Strapi Cloud project is hosted in your Project Settings (see [Project Settings > General > Selected Region](/cloud/projects/settings#general)).
- Strapi can't provide security or support with external databases used with Strapi Cloud.
:::
## Configuration
The project `./config/database.js` or `./config/database.ts` file must match the configuration found in the [environment variables in database configurations](https://docs.strapi.io/dev-docs/configurations/database#environment-variables-in-database-configurations) section.
Before pushing changes, add environment variables to the Strapi Cloud project:
1. Log into Strapi Cloud and click on the corresponding project on the Projects page.
2. Click on the **Settings** tab and choose **Variables** in the left menu.
3. Add the following environment variables:
| Variable | Value |
| ---------------------------------- | ---------------- |
| `DATABASE_CLIENT` | your_db |
| `DATABASE_HOST` | your_db_host |
| `DATABASE_PORT` | your_db_port |
| `DATABASE_NAME` | your_db_name |
| `DATABASE_USERNAME` | your_db_username |
| `DATABASE_PASSWORD` | your_db_password |
| `DATABASE_SSL_REJECT_UNAUTHORIZED` | false |
| `DATABASE_SCHEMA` | public |
4. Click **Save**.
:::caution
To ensure a smooth deployment, it is recommended to not change the names of the environment variables.
:::
## Deployment
To deploy the project and utilize the external database, push the changes from earlier. This will trigger a rebuild and new deployment of the Strapi Cloud project.
Once the application finishes building, the project will use the external database.
## Reverting to the default database
To revert back to the default database, remove the previously added environment variables related to the external database from the Strapi Cloud project dashboard, and save. For the changes to take effect, you must redeploy the Strapi Cloud project.
# Email Provider
Source: https://docs-v4.strapi.io/cloud/advanced/email
# Email Provider
Strapi Cloud comes with a basic email provider out of the box. However, it can also be configured to utilize another email provider, if needed.
:::caution
Please be advised that Strapi are unable to provide support for third-party email providers.
:::
:::prerequisites
- A local Strapi project running on `v4.8.2+`.
- Credentials for another email provider (see [Strapi Market](https://market.strapi.io/providers)).
:::
## Configuration
Configuring another email provider for use with Strapi Cloud requires 3 steps:
1. Install the provider plugin in your local Strapi project.
2. Configure the provider in your local Strapi project.
3. Add environment variables to the Strapi Cloud project.
### Install the Provider Plugin
Using either `npm` or `yarn`, install the provider plugin in your local Strapi project as a package dependency by following the instructions in the respective entry for that provider in the [Marketplace](https://market.strapi.io/providers).
### Configure the Provider
In your Strapi project, create a `./config/env/production/plugins.js` or `./config/env/production/plugins.ts` file with the following content:
:::caution
The file structure must match the above path exactly, or the configuration will not be applied to Strapi Cloud.
:::
Each provider will have different configuration settings available. Review the respective entry for that provider in the [Marketplace](https://market.strapi.io/providers).
**Example:**
:::tip
Before pushing the above changes to GitHub, add environment variables to the Strapi Cloud project to prevent triggering a rebuild and new deployment of the project before the changes are complete.
:::
### Strapi Cloud Configuration
1. Log into Strapi Cloud and click on the corresponding project on the Projects page.
2. Click on the **Settings** tab and choose **Variables** in the left menu.
3. Add the required environment variables specific to the email provider.
4. Click **Save**.
**Example:**
## Deployment
To deploy the project and utilize another party email provider, push the changes from earlier. This will trigger a rebuild and new deployment of the Strapi Cloud project.
Once the application finishes building, the project will use the new email provider.
:::strapi Custom Provider
If you want to create a custom email provider, please refer to the [Providers](/dev-docs/providers#creating-providers) documentation in the Developer Documentation.
:::
# Upload Provider
Source: https://docs-v4.strapi.io/cloud/advanced/upload
# Upload Provider
Strapi Cloud comes with a local upload provider out of the box. However, it can also be configured to utilize a third-party upload provider, if needed.
:::caution
Please be advised that Strapi are unable to provide support for third-party upload providers.
:::
:::prerequisites
- A local Strapi project running on `v4.8.2+`.
- Credentials for a third-party upload provider (see [Strapi Market](https://market.strapi.io/providers)).
:::
## Configuration
Configuring a third-party upload provider for use with Strapi Cloud requires 4 steps:
1. Install the provider plugin in your local Strapi project.
2. Configure the provider in your local Strapi project.
3. Configure the Security Middleware in your local Strapi project.
4. Add environment variables to the Strapi Cloud project.
### Install the Provider Plugin
Using either `npm` or `yarn`, install the provider plugin in your local Strapi project as a package dependency by following the instructions in the respective entry for that provider in the [Marketplace](https://market.strapi.io/providers).
### Configure the Provider
To configure a 3rd-party upload provider in your Strapi project, create or edit the plugins configuration file for your production environment `./config/env/production/plugins.js|ts` by adding upload configuration options as follows:
:::caution
The file structure must match the above path exactly, or the configuration will not be applied to Strapi Cloud.
:::
Each provider will have different configuration settings available. Review the respective entry for that provider in the [Marketplace](https://market.strapi.io/providers).
**Example:**
### Configure the Security Middleware
Due to the default settings in the Strapi Security Middleware you will need to modify the `contentSecurityPolicy` settings to properly see thumbnail previews in the Media Library.
To do this in your Strapi project:
1. Navigate to `./config/middleware.js` or `./config/middleware.ts` in your Strapi project.
2. Replace the default `strapi::security` string with the object provided by the upload provider.
**Example:**
:::tip
Before pushing the above changes to GitHub, add environment variables to the Strapi Cloud project to prevent triggering a rebuild and new deployment of the project before the changes are complete.
:::
### Strapi Cloud Configuration
1. Log into Strapi Cloud and click on the corresponding project on the Projects page.
2. Click on the **Settings** tab and choose **Variables** in the left menu.
3. Add the required environment variables specific to the upload provider.
4. Click **Save**.
**Example:**
## Deployment
To deploy the project and utilize the third-party upload provider, push the changes from earlier. This will trigger a rebuild and new deployment of the Strapi Cloud project.
Once the application finishes building, the project will use the new upload provider.
:::strapi Custom Provider
If you want to create a custom upload provider, please refer to the [Providers](/dev-docs/providers#creating-providers) documentation in the Developer Documentation.
:::
# Command Line Interface (CLI)
Source: https://docs-v4.strapi.io/cloud/cli/cloud-cli
# Command Line Interface (CLI)
Strapi Cloud comes with a Command Line Interface (CLI) which allows you to log in and out, and to deploy a local project without it having to be hosted on a remote git repository. The CLI works with both the `yarn` and `npm` package managers.
:::note
It is recommended to install Strapi locally only, which requires prefixing all of the following `strapi` commands with the package manager used for the project setup (e.g `npm run strapi help` or `yarn strapi help`) or a dedicated node package executor (e.g. `npx strapi help`).
:::
## strapi login
**Alias:** `strapi cloud:login`
Log in Strapi Cloud.
```bash
strapi login
```
This command automatically opens a browser window to first ask you to confirm that the codes displayed in both the browser window and the terminal are the same. Then you will be able to log into Strapi Cloud via Google, GitHub or GitLab. Once the browser window confirms successful login, it can be safely closed.
If the browser window doesn't automatically open, the terminal will display a clickable link as well as the code to enter manually.
## strapi deploy
**Alias:** `strapi cloud:deploy`
Deploy a new local project (< 100MB) in Strapi Cloud.
```bash
strapi deploy
```
This command must be used after the `login` one. It deploys a local Strapi project on Strapi Cloud, without having to host it on a remote git repository beforehand. The terminal will inform you when the project is successfully deployed on Strapi Cloud.
Once the project is first deployed on Strapi Cloud with the CLI, the `deploy` command can be reused to trigger a new deployment of the same project.
:::note
Once you deployed your project, if you visit the Strapi Cloud dashboard, you may see some limitations as well as impacts due to creating a Strapi Cloud project that is not in a remote repository and which was deployed with the CLI.
- Some areas in the dashboard that are usually reserved to display information about the git provider will be blank.
- Some buttons, such as the **Trigger deploy** button, will be greyed out and unclickable since, unless you have [connected a git repository to your Strapi Cloud project](/cloud/getting-started/deployment-cli#automatically-deploying-subsequent-changes).
:::
## strapi link
**Alias:** `strapi cloud:link`
Links project in current folder to an existing project in Strapi Cloud.
```bash
strapi link
```
This command connects your local project in the current directory with an existing project on your Strapi Cloud account. You will be prompted to select the project you wish to link from a list of available projects hosted on Strapi Cloud.
## strapi projects
**Alias:** `strapi cloud:projects`
Lists all Strapi Cloud projects associated with your account.
```bash
strapi projects
```
This command retrieves and displays a list of all projects hosted on your Strapi Cloud account.
## strapi logout
**Alias:** `strapi cloud:logout`
Log out of Strapi Cloud.
```bash
strapi logout
```
This command logs you out of Strapi Cloud. Once the `logout` command is run, a browser page will open and the terminal will display a confirmation message that you were successfully logged out. You will not be able to use the `deploy` command anymore.
# Caching & Performance
Source: https://docs-v4.strapi.io/cloud/getting-started/caching
# Caching & Performance
For Strapi Cloud applications with large amounts of cacheable content, such as images, videos, and other static assets, enabling CDN (Content Delivery Network) caching via the [`Cache-control` header](https://developer.mozilla.org/en-US/docs/Web/HTTP/Headers/Cache-Control) can help improve application performance.
CDN caching can help improve application performance in a few ways:
* **Reducing Latency**: Caching frequently accessed content on edge servers located closer to the end-users can reduce the time it takes to load content.
* **Offloading Origin Server**: By caching content on edge servers it can offload the origin server, reducing the load and allowing it to focus on delivering more dynamic content.
* **Handling Traffic Spikes**: Help handle traffic spikes by distributing the load across multiple edge servers. This can prevent the origin server from becoming overwhelmed during peak traffic times and ensures a consistent user experience.
* **Minimizing Round-Trips**: By serving content directly from the edge servers, this can reduce the time it takes to load content.
* **Improving Scalability**: Distributing content across multiple edge servers can improve scalability, making the application more reliable and responsive.
## Cache-Control Header in Strapi Cloud
Static sites deployed on Strapi Cloud include, by default, a `Cache-Control` header set to cache for 24 hours on CDN edge servers and 10 seconds in web browsers. This is done to ensure that the latest version of the site is always served to users.
Responses from dynamic apps served by Strapi Cloud are not cached by default. To enable caching, you must set the `Cache-Control` header in the app’s `HTTP` response functions.
# Strapi Cloud fundamentals
Source: https://docs-v4.strapi.io/cloud/getting-started/cloud-fundamentals
# Strapi Cloud fundamentals
Before going any further into this Strapi Cloud documentation, we recommend you to acknowledge the main concepts below. They will help you to understand how Strapi Cloud works, and ensure a smooth Strapi Cloud experience.
- **Hosting Platform** Strapi Cloud is a hosting platform that allows to deploy already existing Strapi projects created with Strapi CMS (Content Management System). Strapi Cloud is *not* the SaaS (Software as a Service) version of Strapi CMS. Feel free to refer to the [Developer Documentation](https://docs.strapi.io/dev-docs/intro) and [User Guide](https://docs.strapi.io/user-docs/intro) to learn more about Strapi CMS.
- **Strapi Cloud Pricing Plans** As a Strapi Cloud user you have the choice between 3 tiers: Developer, Pro and Team. Depending on the tier, you have access to different functionalities, support and customization options (see [Pricing page](https://strapi.io/pricing-cloud) for more details). In this Strapi Cloud documentation, the , , and badges can be displayed beside a section's title to indicate for which tier the feature is available.
- **Strapi CMS Enterprise features** Some of Strapi features, usually accessible via the Enterprise Edition of Strapi CMS, are included in some Strapi Cloud tiers (see [Pricing page](https://strapi.io/pricing-cloud) and [Information on billing & usage](/cloud/getting-started/usage-billing) for more details). These features, highlighted with an badge, are documented in the [User Guide](https://docs.strapi.io/user-docs/intro) and the [Developer Documentation](https://docs.strapi.io/dev-docs/intro).
- **Types of Strapi Cloud users** There can be 2 types of users on a Strapi Cloud project: owners and maintainers. The owner is the one who has created the project and has therefore access to all features and options for the project. Maintainers are users who have been invited to contribute to an already created project by its owner. Maintainers, as documented in the [Collaboration](/cloud/projects/collaboration) page, cannot view and access all features and options from the Strapi Cloud dashboard.
- **Support** The level of support provided by the Strapi Support team depends on the Strapi Cloud tier you subscribed for. The Developer and Pro tiers include Basic support while the Team tier includes Standard support. Please refer to the [dedicated support article](https://support.strapi.io/support/solutions/articles/67000680833-what-is-supported-by-the-strapi-team#Not-Supported) for all details regarding support levels.
# with Cloud dashboard
Source: https://docs-v4.strapi.io/cloud/getting-started/deployment
# Project deployment with the Cloud dashboard
5. Set up your Strapi Cloud project.
5.a. Fill in the following information:
| Setting name | Instructions |
|--------------|---------------------------------------------------------------------------------------------------------|
| Display name | Write the name of your Strapi app, this is fetched from the repository name but can be edited. It is automatically converted to slug format (`my-strapi-app`). |
| Git branch | Choose from the drop-down the default branch to use for this deployment. This uses the default branch of the repository. |
| Deploy on push | Check the box to automatically deploy the latest changes from the selected branch. When disabled, you will need to manually deploy the latest changes. |
| Region | Choose the geographic location of the servers where your Strapi application is hosted. Selected region can either be New York in North America (default) or Amsterdam in Europe. |
:::note
The Git branch and "Deploy on push" settings can be modified afterwards through the project's setting, however the project name and hosting region setting can only be chosen during the creation of the project (see [Project Settings](/cloud/projects/settings)).
:::
5.b. (optional) Click on **Show advanced settings** to fill in the following options:
| Setting name | Instructions |
|--------------|---------------------------------------------------------------------------------------------------------|
| Base directory | Write the name of the directory where your Strapi app is located in the repository. This is useful if you have multiple Strapi apps in the same repository or if you have a monorepo. |
| Environment variables | Click on **Add variable** to add environment variables used to configure your Strapi app (see [Environment variables](/dev-docs/configurations/environment/) for more information). You can also add environment variables to your Strapi application by adding a `.env` file to the root of your Strapi app directory. The environment variables defined in the `.env` file will be used by Strapi Cloud. |
| Node version | Choose a Node version from the drop-down. Default Node version will automatically be chosen to best match the version of your Strapi project. If you manually choose a version that doesn't match with your Strapi project, the build will fail but the explanation will be displayed in the build logs. |
:::strapi Using Environment Variables
You can use environment variable to connect your project to an external database rather than the default one used by Strapi Cloud (see [database configuration](/dev-docs/configurations/database#environment-variables-in-database-configurations) for more details). If you would like to revert and use Strapi's default database again, you have to remove your `DATABASE_` environment variables (no automatic migration implied).
You can also set up here a custom email provider. Sendgrid is set as the default one for the Strapi applications hosted on Strapi Cloud (see [providers configuration](/dev-docs/providers#configuring-providers) for more details).
:::
## Setting up billing details
:::strapi No billing step for free trials
If you chose the free trial, this billing step will be skipped as you will not be asked to share your credit card details at the creation of the project.
During the free trial, will be kept informed of the number of remaining free days. You will then be notified by email and via the Strapi Cloud dashboard whenever it is time to fill in your billing information to move to a paid plan.
👉 Skip to step 5 of the section below to finalise the creation of your project.
:::
1. Click on the **Continue to billing** button. You will directly be redirected to the second and final project deployment interface. There you can review all your new project setup information, enter payment & billing details and receive your invoice.
2. Review your project: make sure the plan and setup information are correct. If needed, click the  **Edit** button to be redirected to the first interface of the project creation and fix any mistake.
3. In the Payment section, fill in at least all mandatory elements for *Payment method* and *Billing information*.
4. Check your invoice which informs you of what should be paid now and the following month. Optionally, you can enter a *Discount code* if you have one.
5. Click on the **Create project** button to finalize the deployment of your new Strapi Cloud project. An initial deployment will automatically be triggered and you will be redirected to the *Projects* page.
:::caution
Create your Admin user after the initial deployment is complete. Do not share your application URL with anyone until you have created your Admin user.
:::
## ⏩ What to do next?
Now that you have deployed your project via the Cloud dashboard, we encourage you to explore the following ideas to have an even more complete Strapi Cloud experience:
- If you chose the free trial during your first project deployment, make sure to fill in your [billing information](/cloud/account/account-billing) afterward to prevent your project from being suspended at the end of the trial period.
- Invite other users to [collaborate on your project](/cloud/projects/collaboration).
- Check out the [deployments management documentation](/cloud/projects/deploys) to learn how to trigger new deployments for your project.
# with Cloud CLI
Source: https://docs-v4.strapi.io/cloud/getting-started/deployment-cli
# Project deployment with the Command Line Interface (CLI)
This is a step-by-step guide for deploying your project on Strapi Cloud for the first time, using the Command Line Interface.
:::prerequisites
Before you can deploy your Strapi application on Strapi Cloud using the Command Line Interface, you need to have the following prerequisites:
- During your free Strapi Cloud trial, ensure you have at least 1 project slot available. Your free trial can only include up to 5 projects (see [Usage & billing](/cloud/getting-started/usage-billing)).
- Have a Google, GitHub or GitLab account.
- Have an already created Strapi project (see [Installing from CLI in the Developer Documentation](/dev-docs/installation/cli)), stored locally. The project must be less than 100MB.
- Have available storage in your hard drive where the temporary folder of your operating system is stored.
:::
## Logging in to Strapi Cloud
1. Open your terminal.
2. Navigate to the folder of your Strapi project, stored locally on your computer.
3. Enter the following command to log into Strapi Cloud:
4. In the browser window that opens automatically, confirm that the code displayed is the same as the one written in the terminal message.
5. Still in the browser window, choose whether to login via Google, GitHub or GitLab. The window should confirm the successful login soon after.
## Deploying your project
1. From your terminal, still from the folder of your Strapi project, enter the following command to deploy the project:
2. Follow the progression bar in the terminal until confirmation that the project was successfully deployed with Strapi Cloud.
### Automatically deploying subsequent changes
By default, when creating and deploying a project with the Cloud CLI, you need to manually deploy again all subsequent changes by running the corresponding `deploy` command everytime you make a change.
Another option is to enable automatic deployment through a git repository. To do so:
1. Host your code on a git repository, such as [GitHub](https://www.github.com) or [GitLab](https://www.gitlab.com).
2. Connect your Strapi Cloud project to the repository (see the _Connected repository_ setting in [Projects Settings > General](/cloud/projects/settings#general)).
3. Still in _Projects Settings > General_ tab, tick the box for the "Deploy the project on every commit pushed to this branch" setting. From now on, a new deployment to Strapi Cloud will be triggered any time a commit is pushed to the connected git repository.
:::note
Automatic deployment is compatible with all other deployment methods, so once a git repository is connected, you can trigger a new deployment to Strapi Cloud [from the Cloud dashboard](/cloud/projects/deploys), [from the CLI](/cloud/cli/cloud-cli#strapi-deploy), or by pushing new commits to your connected repository.
:::
## ⏩ What to do next?
Now that you have deployed your project via the Command Line Interface, we encourage you to explore the following ideas to have an even more complete Strapi Cloud experience:
- Fill in your [billing information](/cloud/account/account-billing) to prevent your project from being suspended at the end of the trial period.
- Visit the Cloud dashboard to follow [insightful metrics and information](/cloud/projects/overview) on your Strapi project.
- Check out the full [Command Line Interface documentation](/cloud/cli/cloud-cli) to learn about the other commands available.
# Welcome to the Strapi Cloud Docs!
Source: https://docs-v4.strapi.io/cloud/getting-started/intro
# Welcome to the Strapi Cloud Docs!
This documentation contains all technical documentation related to the setup, deployment, update and customization of your Strapi Cloud account and applications.
## What is Strapi Cloud
[Strapi Cloud](https://cloud.strapi.io) is a hosting platform that allows you to deploy your Strapi applications in a matter of minutes. It is a fully managed content platform built on top of Strapi, the leading open-source headless CMS.
Strapi Cloud enables you to increase your content velocity without having to compromise on customization needs and requirements. Development teams can rely on Strapi Cloud to abstract away the complexity of infrastructure management while keeping your development workflow and extending the core capabilities of Strapi. Content managers can use Strapi Cloud to autonomously manage all types of content and benefit from a complete set of content collaboration, security, and compliance features.
:::strapi Welcome to the Strapi community!
Strapi Cloud is built on top of Strapi, an open-source, community-oriented project. The Strapi team has at heart to share their vision and build the future of Strapi with the Strapi community. This is why the [roadmap](https://feedback.strapi.io) is open: as all insights are very important and will help steer the project in the right direction. Any community member is most welcome to share ideas and opinions there.
You can also join [GitHub](https://github.com/strapi/strapi), the [Forum](https://forum.strapi.io/), and the [Discord](https://discord.strapi.io) and benefit from the years of experience, knowledge, and contributions by the Strapi community as a whole.
:::
# Information on billing & usage
Source: https://docs-v4.strapi.io/cloud/getting-started/usage-billing
# Information on billing & usage
This page contains general information related to the usage and billing of your Strapi Cloud account and projects.
Strapi Cloud offers up to 5 free 14-day trial projects, which can be activated anytime, even if you have existing paid projects. Project trials do not need to run simultaneously. Strapi Cloud also offers 3 paid plans: Developer, Pro, and Team (see [Pricing page](https://strapi.io/pricing-cloud)). The table below summarises Strapi Cloud usage-based pricing tiers, for general features & usage, CMS features and Cloud specific features:
| Feature | Free Trial | Developer | Pro | Team |
| --- | --- | --- | --- | --- |
| **Seats** | 10 | 1 | 5 | 10 |
| **Database Entries** | 1,000 | 1,000 | 100,000 | 1,000,000 |
| **Assets Storage** | 5GB | 15GB | 150GB | 500GB |
| **Assets Bandwidth** | 50GB | 50GB per month | 500GB per month | 1,000GB per month |
| **API Requests** | 10,000 | 100,000 | 1,000,000 | 10,000,000 |
| | | | | |
| **Audit Logs** | 7 days retention | N/A | N/A | 7 days retention |
| **Releases** | 3 pending releases | N/A | N/A | 3 pending releases |
| **Review Workflows** | up to 2 | N/A | N/A | up to 2 |
| | | | | |
| **Backups** | N/A | N/A | Weekly | Weekly |
:::strapi Additional information on usage and features
- General features & usage:
- Seats are the maximum number of users that can access the Strapi admin panel.
- Database entries are the number of entries in your database.
- Assets storage is the amount of storage used by your assets.
- Assets bandwidth is the amount of bandwidth used by your assets.
- API requests are the number of requests made to your APIs. This includes requests to the GraphQL and REST APIs, excluding requests for file and media assets counted towards CDN bandwidth and storage.
- CMS features:
- Audit Logs refers to the maximum number of days for which the feature retains the activities that happened (see [Audit Logs in User Guide](/user-docs/settings/audit-logs) for more information).
- Releases refers to the maximum number of pending releases that can be created (see [Releases in User Guide](/user-docs/releases/introduction) for more information).
- Review Workflows refers to the maximum number of workflows that can be created and used (see [Review Workflows in User Guide](/user-docs/settings/review-workflows) for more information).
- Cloud specific feature: Backups refers to the automatic backups of Strapi Cloud projects (see [dedicated page in Cloud documentation](/cloud/projects/settings#backups) for more information).
:::
## Seats management
Seats represent the maximum number of users that can access the Strapi admin panel. Each plan comes with a default number of seats.
You can add more seats either by upgrading to a higher plan, or manually adding individual seats as desired. Seats can be added from the **Billing & Usage** tab of a project's settings (see [Managing project's number of seats](/cloud/projects/settings#managing-projects-number-of-seats)).
There is however a maximum number of seats that can be added per plan:
| Plan | Maximum Seats |
| --- | --- |
| **Free Trial** | 10 |
| **Developer** | 3 |
| **Pro** | 20 |
| **Team** | 50 |
## Billing
Billing is based on the usage of your Strapi Cloud account and projects. You will be billed monthly for the usage of your account and applications. You can view your usage and billing information in the [Billing](https://cloud.strapi.io/profile/billing) section of your Strapi Cloud account.
### Overages
If you exceed the limits of your plan for API Requests, Asset Bandwidth, or Asset Storage, you will be charged for the corresponding overages.
For example, if you exceed the 500GB limit in asset bandwidth of the Pro plan, you will be charged for the excess bandwidth at the end of the current billing period or on project deletion. Overages are not prorated and are charged in full.
Overages are charged according to the following rates:
| Feature | Rate |
| --- | --- |
| **API Requests** | $1.50 / 25k requests |
| **Asset Bandwidth** | $30.00 / 100GB |
| **Asset Storage** | $0.60 / GB per month |
### Project suspension
Projects may end up in a **Suspended** state for various reasons, including: not paying the invoice, exceeding the limits of your free trial plan, or violating the [terms of service](https://strapi.io/cloud-legal).
If your project is suspended, you will no longer be able to access the application or trigger new deployments. You will also be unable to access the Strapi admin panel.
You can view the status of your project in the [Projects](https://cloud.strapi.io/projects) section of your Strapi Cloud account and you will be notified by email.
:::warning
If you do not resolve the issue within 30 days, your suspended project will be deleted and all data will be permanently lost. To avoid this situation, you will be sent a first email when your project becomes suspended, then another email every 5 days until one week left, to remind you to solve the issue. The last week before the deletion of the project, you will be sent 3 more emails: 6 days, 3 days and 1 day before your project is finally deleted.
:::
#### Project suspension after subscription cancellation
If you don't pay the invoice, the subscription of your project will automatically be cancelled and the project will be suspended. You can reactivate the subscription through the billing modal (see [Edit subscription](/cloud/account/account-billing#edit-subscription)).
1. Log into the billing modal and go to the *Subscription details* of the subscription associated with the suspended project. You should see a warning message confirming that the subscription was canceled for the following reason: "Not Paid".
2. Go back to the homepage of the billing modal, listing subscriptions and billing options.
3. Go to *Payment methods* and add a new, working card to pay the invoice. As soon as the invoice is paid, your project will automatically be reactivated.
#### Project suspension for other reasons
If your project was suspended for reasons other than unpaid invoice leading to subscription cancellation, you may not have the possibility to reactivate your project yourself. You should receive an email with instructions on how to resolve the issue. If you do not receive the email notification, please contact [Strapi Support](mailto:support@strapi.io).
# Collaboration
Source: https://docs-v4.strapi.io/cloud/projects/collaboration
# Collaboration on projects
Projects are created by a user via their Strapi Cloud account. Strapi Cloud users can share their projects to anyone else, so these new users can have access to the project dashboard and collaborate on that project, without the project owner to ever have to share their credentials.
Users invited to collaborate on a project, called maintainers, do not have the same permissions as the project owner. Contrary to the project owner, maintainers:
- Cannot share the project themselves to someone else
- Cannot delete the project from the project settings
- Cannot access the *Billing* section of project settings
## Sharing a project
To invite a new maintainer to collaborate on a project:
1. From the *Projects* page, click on the project of your choice to be redirected to its dashboard.
2. Click on the **Share** button located in the dashboard's header.
3. In the *Share [project name]* dialog, type the email address of the person to invite in the textbox. A dropdown indicating "Invite [email address]" should appear.
4. Click on the dropdown: the email address should be displayed in a purple box right below the textbox.
5. (optional) Repeat steps 3 and 4 to invite more people. Email addresses can only entered one by one but invites can be sent to several email addresses at the same time.
6. Click on the **Send** button.
New maintainers will be sent an email containing a link to click on to join the project. Once a project is shared, avatars representing the maintainers will be displayed in the project dashboard's header, next to the **Share** button, to see how many maintainers collaborate on that project and who they are.
:::tip
Avatars use GitHub, Google or GitLab profile pictures, but for pending users only initials will be displayed until the activation of the maintainer account. You can hover over an avatar to display the full name of the maintainer.
:::
## Managing maintainers
From the *Share [project name]* dialog accessible by clicking on the **Share** button of a project dashboard, projects owners can view the full list of maintainers who have been invited to collaborate on the project. From there, it is possible to see the current status of each maintainer and to manage them.
Maintainers whose full name is displayed are users who did activate their account following the invitation email. If however there are maintainers in the list whose email address is displayed, it means they haven't activated their accounts and can't access the project dashboard yet. In that case, a status should be indicated right next to the email address to explain the issue:
- Pending: the invitation email has been sent but the maintainer hasn't acted on it yet.
- Expired: the email has been sent over 72 hours ago and the invitation expired.
For Expired statuses, it is possible to send another invitation email by clicking on the **Manage** button, then **Resend invite**.
### Revoking maintainers
To revoke a maintainer's access to the project dashboard:
1. Click on the **Share** button in the project dashboard's header.
2. In the list of *People with access*, find the maintainer whose access to revoke and click on the **Manage** button.
3. Click on the **Revoke** button.
4. In the confirmation dialog, click again on the **Revoke** button.
The revoked maintainer will completely stop having access to the project dashboard.
:::note
Maintainers whose access to the project has been revoked do not receive any email or notification.
:::
# Deployments management
Source: https://docs-v4.strapi.io/cloud/projects/deploys
# Deployments management
The creation of a new Strapi Cloud project automatically trigger the deployment of that project. After that, deployments can be:
- manually triggered whenever needed, [from the Cloud dashboard](#triggering-a-new-deployment) or [from the CLI](/cloud/cli/cloud-cli#strapi-deploy),
- or automatically triggered everytime a new commit is pushed to the branch, if the Strapi Cloud project is connected to a git repository and the "deploy on push" option is enabled (see [Project settings](/cloud/projects/settings#modifying-git-repository--branch)).
Ongoing deployments can also be [manually cancelled](#cancelling-a-deployment) if needed.
## Triggering a new deployment
To manually trigger a new deployment for your project, click on the **Trigger deploy** button always displayed in the right corner of a project dashboard's header. This action will add a new card in the *Deploys* tab, where you can monitor the status and view the deployment logs live (see [Deploy history and logs](/cloud/projects/deploys-history)).
## Cancelling a deployment
If for any reason you want to cancel an ongoing and unfinished deployment:
1. Go to the *Log details* page of the deployment (see [Accessing log details](/cloud/projects/deploys-history#accessing-deployment-details--logs)).
2. Click on the **Cancel deploy** button in the top right corner. The status of the deployment will automatically change to *Cancelled*.
:::tip
You can also cancel a deployment from the *Deploys* tab which lists the deployments history. The card of ongoing deployment with the *Building* status will display a **Cancel deploy** button.
:::
# Deploy history & logs
Source: https://docs-v4.strapi.io/cloud/projects/deploys-history
# Deploy history and logs
For each Strapi Cloud project, you can access the history of all deployments that occured and their details including build and deploy logs. This information is available in the *Deploys* tab, located in the header of any chosen project.
## Viewing deploy history
In the *Deploys* tab is displayed a chronological list of cards with the details of all historical deployments for your project.
, with a direct link to your git provider, and commit message
- Deployment status:
- *Deploying*
- *Done*
- *Cancelled*
- *Build failed*
- *Deploy failed*
- Last deployment time (when the deployment was triggered and the duration)
- Production branch
## Accessing deployment details & logs
From the *Deploys* tab, you can click on the  **See logs** button of any chosen deployment card to be redirected to the *Log details*. It contains the deployment's details logs.
, with a direct link to your git provider, and commit message used for this deployment
- *Branch*: the branch used for this deployment
In the *Logs* section of the *Log details* page you can click on the arrow buttons   to show or hide the build and deploy logs of the deployment.
:::tip
Click the  **Copy to clipboard** button to copy the log contents.
:::
# Notifications
Source: https://docs-v4.strapi.io/cloud/projects/notifications
# Notifications
The Notification center can be opened by clicking the bell icon  in the top navigation of the Cloud dashboard.
It displays a list of the latest notifications for all your existing projects. Clicking on a notification card from the list will redirect you to the *Log details* page of the corresponding deployment (more information in [Deploy history & logs](/cloud/projects/deploys-history#accessing-deployment-details--logs)).
The following notifications can be listed in the Notifications center:
- *Deploy completed*: when a deployment is successfully done.
- *Build failed*: when a deployment fails during the build stage.
- *Deploy failed*: when a deployment fails during the deployment stage.
- *Deploy triggered*: when a deployment is triggered by a new push to the connected repository. This notification is however not sent when the deployment is triggered manually.
:::note
All notifications older than 30 days are automatically removed from the Notification center.
:::
# Projects overview
Source: https://docs-v4.strapi.io/cloud/projects/overview
# Projects overview
The *Projects* page displays a list of all your Strapi Cloud projects. From here you can manage your projects and access the corresponding applications.
Each project card displays the following information:
* the project name
* the current status of the project:
* *Disconnected*, if the project repository is not connected to Strapi Cloud
* *Suspended*, if the project has been suspended (refer to [Project suspension](/cloud/getting-started/usage-billing#project-suspension) to reactivate the project)
* *Incompatible version*, if the project is using a Strapi version that is not compatible with Strapi Cloud
* the last deployment date
Each project card also displays a  menu icon to access the following options:
* **Visit App**: to be redirected to the application
* **Go to Deploys**: to be redirected to the [*Deploys*](/cloud/projects/deploys) page
* **Go to Settings**: to be redirected to the [*Settings*](/cloud/projects/settings) page
## Accessing a project's overview
From the *Projects* page, click on any project card to access the *Overview* of your project. It displays all details such as usage and status information and gives access to deployment history and available settings.
:::strapi Navigating Strapi Cloud projects dashboards
Once you click on a project page, you access the dedicated dashboard for your chosen project. It is by default that you land on the *Overview* tab, however the header of the project's dashboard doesn't change and always offers the following options:
- links to the other available tabs for the project: *Overview*, [*Deploys*](/cloud/projects/deploys), [*Runtime Logs*](/cloud/projects/runtime-logs) and [*Settings*](/cloud/projects/settings)
- the **Share** button to invite a new maintainer to collaborate on your project — and if the project is already shared: avatars of the maintainers (see [Collaboration](/cloud/projects/collaboration))
- the **Trigger deploy** button to trigger a new deployment of your project
- the **Visit app** button to access your application
:::
From the *Overview* tab, you can:
- view a recap of the main settings of your project, such as:
- the link to the source repository
- the name of the branch
- the name of the base directory
- the URL and link to the application
- view your project's usage (see [Usage](/cloud/getting-started/usage-billing) for more information)
- view your project's latest deploys (see [Deploys](/cloud/projects/deploys) for more information)
# Runtime logs
Source: https://docs-v4.strapi.io/cloud/projects/runtime-logs
# Runtime logs
From a chosen project's dashboard, the *Runtime logs* tab, located in the header, displays the live logs of the project.
:::note
The *Runtime logs* are only accessible once the project is successfully deployed.
:::
# Project settings
Source: https://docs-v4.strapi.io/cloud/projects/settings
# Project settings
From a chosen project's dashboard, the *Settings* tab, located in the header, enables you to manage the configurations and settings for your Strapi Cloud project.
There are 7 tabs available:
-  [*General*](#general),
-  [*Backups*](#backups),
-  [*Domains*](#domains),
-  [*Variables*](#variables),
-  [*Billing & Usage*](#billing--usage),
-  [Plans](#plans),
- and  [Invoices](#invoices).
## General
The  *General* tab enables you to check and update the following options for the project:
- *Details*: to see the name of your Strapi Cloud project, used to identify the project on the Cloud Dashboard, Strapi CLI, and deployment URLs. The project name is set at project creation (see [Project creation](/cloud/getting-started/deployment)) and cannot be modified afterwards.
- *Connected Git repository*: to change the branch of the GitHub repository used for your project (see [Modifying GitHub repository branch](#modifying-git-repository--branch)). Also allows to enable/disable the "deploy on push" option.
- *Selected region*: to see the hosting region of the project, meaning the geographical location of the servers where the project and its data and resources are stored. The hosting region is set at project creation (see [Project creation](/cloud/getting-started/deployment)) and cannot be modified afterwards.
- *Debug info*: to see the internal project name for the project. This is useful for support purposes.
- *Node version*: to change the Node version of the project (see [Modifying Node version](#modifying-node-version)).
- *Delete project*: to permanently delete your Strapi Cloud project (see [Deleting Strapi Cloud project](#deleting-strapi-cloud-project)).
### Modifying git repository & branch
The GitHub or Gitlab repository, branch and base directory for a Strapi Cloud project are by default chosen at the creation of the project (see [Creating a project](/cloud/getting-started/deployment)). After the project's creation, via the project's settings, it is possible to:
- update the project's repository or switch to another git provider (see [Updating repository](#updating-repository)),
- edit the project's branch, base directory and deploy on push setting (see [Editing branch](#editing-branch)).
:::caution
Updating the git repository could result in the loss of the project and its data, for instance if the wrong repository is selected or if the data schema between the old and new repository doesn't match.
:::
#### Updating repository
1. In the *Connected git repository* section of the  *General* tab, click on the **Update repository** button.
2. (optional) If you wish to not only update the repository but switch to another git provider, click on the **Switch to GitHub/GitLab** button at the bottom of the *Update repository* dialog. You will be redirected to the chosen git provider's authorization settings before getting back to the *Update repository dialog*.
3. In the *Update repository* dialog, fill in the 3 available settings:
| Setting name | Instructions |
| --------------- | ------------------------------------------------------------------------ |
| Account | Choose an account from the drop-down list. |
| Repository | Choose a repository from the drop-down list. |
| Git branch | Choose a branch from the drop-down list. |
| Deploy the project on every commit pushed to this branch | Tick the box to automatically trigger a new deployment whenever a new commit is pushed to the selected branch. Untick it to disable the option. |
4. Click on the **Save** button.
5. In the confirmation dialog, confirm your changes by clicking on the **Relink repository** button.
#### Editing branch
1. In the *Connected git repository* section of the  *General* tab, click on the **Edit branch** button.
2. In the *Edit branch* dialog, edit the settings below:
| Setting name | Instructions |
| --------------- | ------------------------------------------------------------------------ |
| Git branch | Choose a branch from the drop-down list. |
| Base directory | Write the path of the base directory in the textbox. |
| Deploy the project on every commit pushed to this branch | Tick the box to automatically trigger a new deployment whenever a new commit is pushed to the selected branch. Untick it to disable the option. |
3. Click on the **Save** button.
### Modifying Node version
The project's Node version is first chosen at the creation of the project (see [Creating a project](/cloud/getting-started/deployment)), through the advanced settings. It is possible to switch to another Node version afterwards.
1. In the *Node version* section of the  *General* tab, click on the **Edit** button.
2. Using the *Node version* drop-down in the dialog, click on the version of your choice.
3. Click on the **Save** button.
4. Click on the **Trigger deploy** button in the right corner of the project's header. If the deployment fails, it is because the Node version doesn't match the version of your Strapi project. You will have to switch to the other Node version and re-deploy your project again.
### Deleting Strapi Cloud project
You can delete any Strapi Cloud project, but it will be permanent and irreversible. Associated domains, deployments and data will be deleted as well and the subscription for the project will automatically be cancelled.
1. In the *Delete project* section of the  *General* tab, click on the **Delete project** button.
2. In the dialog, select the reason why you are deleting your project. If selecting "Other" or "Missing feature", a textbox will appear to let you write additional information.
3. Confirm the deletion of your project by clicking on the **Delete project** button at the bottom of the dialog.
## Backups {#backups}
The  *Backups* tab informs you of the status and date of the latest backup of your Strapi Cloud projects. The databases associated with all existing Strapi Cloud projects are indeed automatically backed up weekly and those backups are retained for a one-month period. Additionally, you can create a single manual backup.
:::note Notes
- The backup feature is not available for Strapi Cloud projects using the free trial or the Developer plan. You will need to upgrade to either the Pro or Team plan to have your project automatically backed up and to have access to manual backups.
- Only project owners can restore a backup. Maintainers have access to the  *Backups* tab but the **Restore backup** button won't be displayed for them. Refer to [Collaboration](/cloud/projects/collaboration) for more information.
- The manual backup option should become available shortly after project's first succesful deployment.
:::
:::tip
For projects created before the release of the Backup feature in October 2023, the first backup will automatically be triggered with the next deployment of the project.
:::
### Creating a manual backup
To create a manual backup, in the  *Backups* section, click on the **Create backup** button.
The manual backup should start immediately, and restoration or creation of other backups will be disabled until backup is complete.
:::caution
When creating a new manual backup, any existing manual backup will be deleted. You can only have one manual backup at a time.
:::
### Restoring a backup
If you need to restore a backup of your project:
1. In the  *Backups* section, click on the **Restore backup** button.
2. In the dialog, choose one of the available backups (automatic or manual) of your project in the *Choose backup* drop-down.
3. Click on the **Restore** button of the dialog. Once the restoration finished, your project will be back to the state it was at the time of the chosen backup.
## Domains
The  *Domains* tab enables you to manage domains and connect new ones.
All existing domains for your Strapi Cloud project are listed in the  *Domains* tab. For each domain, you can:
- see its current status:
-  Active: the domain is currently confirmed and active
-  Pending: the domain transfer is being processed, waiting for DNS changes to propagate
-  Failed: the domain change request did not complete as an error occured
- click the  edit button to access the settings of the domain
- click the  delete button to delete the domain
### Connecting a custom domain
Default domain names are made of 2 randomly generated words followed by a hash. They can be replaced by any custom domain of your choice.
1. Click the **Connect new domain** button.
2. In the window that opens, fill in the following fields:
| Setting name | Instructions |
| ------------------------- | ------------------------------------------------------------------------- |
| Domain name | Type the new domain name (e.g. *custom-domain-name.com*) |
| Hostname | Type the hostname (i.e. address end-users enter in web browser, or call through APIs). |
| Target | Type the target (i.e. actual address where users are redirected when entering hostname). |
| Set as default domain | Tick the box to make the new domain the default one. |
3. Click on the **Save** button.
## Variables
Environment variables (more information in the [Developer Documentation](../../dev-docs/configurations/environment)) are used to configure the environment of your Strapi application, such as the database connection.
In the  *Variables* tab, you can:
- click the **Add variable** button to create a new variable
- edit any variable, each being composed of a *Name* and a *Value*
- click the  delete button associated with any variable to delete it
- click the **Save** button to save any change made on the page
## Billing & Usage
The  *Billing & Usage* tab displays your next estimated payment, all information on the current subscription plan and a detailed summary of the project's usage. It also allows you to directly [manage the number of seats](#managing-projects-number-of-seats) for your project.
Through this tab, you also have the possibility to:
- click the **Change** button to be redirected to the  *Plans* tab, where you can change you subscription plan ([see related documentation](#plans)),
- click the **Edit** button to be redirected to the  *Billing* tab of your profile page, where you can edit the payment method ([see related documentation](/cloud/account/account-billing)).
:::tip
In the *Usage summary* section of the  *Billing & Usage* tab, you can see the current monthly usage of your project compared to the maximum usage allowed by your project's subscription. Use the arrows in the top right corner to see the project's usage for any chosen month.
Note also that if your usage indicates that another subscription plan would fit better for your project, a message will be displayed in the  *Billing & Usage* tab to advise which plan you could switch to.
:::
### Managing project's number of seats
You can manually add more seats or lower the number of seats for your project without necessarily upgrading or downgrading to another plan (see [more information on seats management](/cloud/getting-started/usage-billing#seats-management)).
#### Adding more seats for the project
1. In the  *Billing & Usage* tab of your project's settings, click on the **Manage** button next to the displayed number of seats.
2. In the window that opens, select with the drop-down the number of *Additional seats* of your choice. The cost of the additional seats is automatically calculated and displayed in the window.
3. (optional) Click **I have a discount code**, enter your discount code in the field, and click on the **Apply** button.
4. Click the **Save** button to confirm. You will automatically be billed with the payment method defined in your profile.
#### Removing seats from the project
1. In the  *Billing & Usage* tab of your project's settings, click on the **Manage** button next to the displayed number of seats.
2. In the window that opens, select with the drop-down the number of *Billed seats* you want to keep.
3. Click the **Save button** to confirm. The new, lower number of seats will not be effective until the next month.
## Plans
The  *Plans* tab displays an overview of the available Strapi Cloud plans and allows you to upgrade or downgrade from your current plan to another.
:::note
If you are using the free trial, the *Plan* tab shows a countdown of how many days you have left, as well as indications of the next steps. For more information about the free trial and project suspension, please refer to [Information on billing & usage](/cloud/getting-started/usage-billing).
:::
### Upgrading to another plan
Strapi Cloud plan upgrades to another, higher plan are immediate and can be managed for each project via the project settings.
:::note
When using the free trial, the buttons to upgrade to another plan are greyed out and unusable until you have filled in your billing information. Please refer to [Account billing details](/cloud/account/account-billing) for more information.
:::
To upgrade your current plan to a higher one:
1. In the  *Plans* tab of your project's settings, click on the **Upgrade** button of the plan you want to upgrade to.
2. In the window that opens, check the payment details that indicate how much you will have to pay immediately after confirming the upgrade, and the available options.
a. (optional) Click the **Edit** button to select another payment method.
b. (optional) Click **I have a discount code**, enter your discount code in the field, and click on the **Apply** button.
3. Click on the **Upgrade to [plan name]** button to confirm the upgrade of your Strapi project to another plan.
### Downgrading to another plan
Strapi Cloud plan downgrades can be managed for each project via the project settings. Downgrades are however not immediately effective: the higher plan will still remain active until the end of the current month (e.g. if you downgrade from the Team plan to the Pro plan on June 18th, your project will remain on the Team plan until the end of the month: on July 1st, the Pro plan will be effective for the project).
:::caution
Make sure to check the usage of your Strapi Cloud project before downgrading: if your current usage exceeds the limits of the lower plan, you are taking the risk of getting charged for the overages. Note also that you may lose access to some features: for example, downgrading to the Developer plan which doesn't include the Backups feature, would make you lose all your project's backups. Please refer to [Information on billing & usage](/cloud/getting-started/usage-billing) for more information.
:::
To downgrade your current plan to a lower one:
1. In the  *Plans* tab of your project's settings, click on the **Downgrade** button of the plan you want to downgrade to.
2. In the window that opens, check the information related to downgrading.
3. Click on the **Downgrade** button to confirm the downgrade of your Strapi project's plan.
## Invoices
The  *Invoices* tab displays the full list of invoices for your Strapi Cloud project as well as their status.
:::strapi Invoices are also available in your profile settings.
In the *Profile > Invoices* tab, you will find the complete list of invoices for all your projects. Feel free to check the [dedicated documentation](/cloud/account/account-billing#account-invoices).
:::
# Admin panel customization
Source: https://docs-v4.strapi.io/dev-docs/admin-panel-customization
const captionStyle = {fontSize: '12px'}
const imgStyle = {width: '100%', margin: '0' }
The admin panel is a React-based single-page application. It encapsulates all the installed plugins of a Strapi application. Some of its aspects can be [customized](#customization-options), and plugins can also [extend](#extension) it.
To start your strapi instance with hot reloading while developing, run the following command:
```bash
cd my-app # cd into the root directory of the Strapi application project
strapi develop --watch-admin
```
## Customization options
Customizing the admin panel is helpful to better reflect your brand identity or to modify some default Strapi behavior:
- The [access URL, host and port](#access-url) can be modified through the server configuration.
- The [configuration object](#configuration-options) allows replacing the logos and favicon, defining locales and extending translations, extending the theme, and disabling some Strapi default behaviors like displaying video tutorials or notifications about new Strapi releases.
- The [WYSIWYG editor](#wysiwyg-editor) can be replaced or customized.
- The [email templates](#email-templates) should be customized using the Users and Permissions plugin.
### Access URL
By default, the administration panel is exposed via [http://localhost:1337/admin](http://localhost:1337/admin). For security reasons, this path can be updated.
**Example:**
To make the admin panel accessible from `http://localhost:1337/dashboard`, use this in the [server configuration](/dev-docs/configurations/server) file:
:::strapi Advanced settings
For more advanced settings please see the [admin panel configuration](/dev-docs/configurations/admin-panel) documentation.
:::
#### Host and port
:::note
From 4.15.1 this is now deprecated. The strapi server now supports the live updating of the admin panel in development mode.
:::
By default, the front end development server runs on `localhost:8000` but this can be modified:
### Configuration options
:::prerequisites
Before configuring any admin panel customization option, make sure to:
- rename the default `app.example.js` file into `app.js`,
- and create a new `extensions` folder in `./src/admin/`. Strapi projects already contain by default another `extensions` folder in `./src/` but it is for plugins extensions only (see [Plugins extension](/dev-docs/plugins-extension)).
:::
The `config` object found at `./src/admin/app.js` stores the admin panel configuration.
Any file used by the `config` object (e.g. a custom logo) should be placed in a `./src/admin/extensions/` folder and imported inside `./src/admin/app.js`.
The `config` object accepts the following parameters:
| Parameter | Type | Description |
| ------------------------------ | ---------------- | --------------------------------------------------------------------------------------------------------------------- |
| `auth` | Object | Accepts a `logo` key to replace the default Strapi [logo](#logos) on login screen |
| `head` | Object | Accepts a `favicon` key to replace the default Strapi [favicon](#favicon) |
| `locales` | Array of Strings | Defines availables locales (see [updating locales](#locales)) |
| `translations` | Object | [Extends the translations](#extending-translations) |
| `menu` | Object | Accepts the `logo` key to change the [logo](#logos) in the main navigation |
| `theme.light` and `theme.dark` | Object | [Overwrite theme properties](#theme-extension) for Light and Dark modes |
| `tutorials` | Boolean | Toggles [displaying the video tutorials](#tutorial-videos) |
| `notifications` | Object | Accepts the `releases` key (Boolean) to toggle [displaying notifications about new releases](#releases-notifications) |
Example of a custom configuration for the admin panel
#### Locales
To update the list of available locales in the admin panel, use the `config.locales` array:
:::note NOTES
- The `en` locale cannot be removed from the build as it is both the fallback (i.e. if a translation is not found in a locale, the `en` will be used) and the default locale (i.e. used when a user opens the administration panel for the first time).
- The full list of available locales is accessible on [Strapi's Github repo](https://github.com/strapi/strapi/blob/v4.0.0/packages/plugins/i18n/server/constants/iso-locales.json).
:::
##### Extending translations
Translation key/value pairs are declared in `@strapi/admin/admin/src/translations/[language-name].json` files. These keys can be extended through the `config.translations` key:
A plugin's key/value pairs are declared independently in the plugin's files at `./admin/src/translations/[language-name].json`. These key/value pairs can similarly be extended in the `config.translations` key by prefixing the key with the plugin's name (i.e. `[plugin name].[key]: 'value'`) as in the following example:
If more translations files should be added, place them in `./src/admin/extensions/translations` folder.
#### Logos
The Strapi admin panel displays a logo in 2 different locations, represented by 2 different keys in the [admin panel configuration](#configuration-options):
| Location in the UI | Configuration key to update |
| ---------------------- | --------------------------- |
| On the login page | `config.auth.logo` |
| In the main navigation | `config.menu.logo` |
Logos location in the admin panel:The logo handled by config.auth.logo logo is only shown on the login screen. The logo handled by config.menu.logo logo is located in the main navigation at the top left corner of the admin panel.
To update the logos, put image files in the `./src/admin/extensions` folder and update the corresponding keys. There is no size limit for image files set through the configuration files.
:::note
Both logos can also be customized directly via the admin panel (see [User Guide](/user-docs/settings/admin-panel.md)).
Logos uploaded via the admin panel supersede any logo set through the configuration files.
:::
#### Favicon
To replace the favicon, use the following procedure:
1. (_optional_) Create a `./src/admin/extensions/` folder if the folder does not already exist.
2. Upload your favicon into `./src/admin/extensions/`.
3. Replace the existing **favicon.png|ico** file at the Strapi application root with a custom `favicon.png|ico` file.
4. Update `./src/admin/app.js` with the following:
```js title="./src/admin/app.js"
import favicon from "./extensions/favicon.png";
export default {
config: {
// replace favicon with a custom icon
head: {
favicon: favicon,
},
},
};
```
5. Rebuild, launch and revisit your Strapi app by running `yarn build && yarn develop` in the terminal.
:::tip
This same process may be used to replace the login logo (i.e. `AuthLogo`) and menu logo (i.e. `MenuLogo`) (see [logos customization documentation](#logos)).
:::
:::caution
Make sure that the cached favicon is cleared. It can be cached in your web browser and also with your domain management tool like Cloudflare's CDN.
:::
#### Tutorial videos
To disable the information box containing the tutorial videos, set the `config.tutorials` key to `false`.
#### Releases notifications
To disable notifications about new Strapi releases, set the `config.notifications.releases` key to `false`.
#### Theme extension
Strapi applications can be displayed either in Light or Dark mode (see [administrator profile setup in the User Guide](/user-docs/intro#setting-up-your-administrator-profile)), and both can be extended through custom theme settings.
To extend the theme, use either:
- the `config.theme.light` key for the Light mode
- the `config.theme.dark` key for the Dark mode
:::strapi Strapi Design System
The default [Strapi theme](https://github.com/strapi/design-system/tree/main/packages/strapi-design-system/src/themes) defines various theme-related keys (shadows, colors…) that can be updated through the `config.theme.light` and `config.theme.dark` keys in `./admin/src/app.js`. The [Strapi Design System](https://design-system.strapi.io/) is fully customizable and has a dedicated [StoryBook](https://design-system-git-main-strapijs.vercel.app) documentation.
:::
:::caution
The former syntax for `config.theme` without `light` or `dark` keys is deprecated and will be removed in the next major release. We encourage you to update your custom theme to use the new syntax that supports light and dark modes.
:::
### WYSIWYG editor
To change the current WYSIWYG, you can install a [third-party plugin](https://market.strapi.io/), create your own plugin (see [creating a new field in the admin panel](/dev-docs/custom-fields)) or take advantage of the [bootstrap lifecycle](/dev-docs/api/plugins/admin-panel-api#bootstrap) and the [extensions](#extension) system:
### Email templates
Email templates should be edited through the admin panel, using the [Users and Permissions plugin settings](/user-docs/settings/configuring-users-permissions-plugin-settings#configuring-email-templates).
## Bundlers (experimental)
2 different bundlers can be used with your Strapi application, [webpack](#webpack) and [vite](#vite).
### Webpack
In v4 this is the defacto bundler that Strapi uses to build the admin panel.
:::prerequisites
Make sure to rename the default `webpack.config.example.js` file into `webpack.config.[js|ts]` before customizing webpack.
:::
In order to extend the usage of webpack v5, define a function that extends its configuration inside `./my-app/src/admin/webpack.config.[js|ts]`:
### Vite
:::caution
This is considered experimental. Please report any issues you encounter.
:::
To use `vite` as a bundler you will need to pass it as an option to the `strapi develop` command:
```bash
strapi develop --watch-admin --bundler=vite
```
To extend the usage of `vite`, define a function that extends its configuration inside `./my-app/src/admin/vite.config.[js|ts]`:
## Extension
There are 2 use cases to extend the admin panel:
- A plugin developer wants to develop a Strapi plugin that extends the admin panel everytime it's installed in any Strapi application. This can be done by taking advantage of the [Admin Panel API](/dev-docs/api/plugins/admin-panel-api).
- A Strapi user only needs to extend a specific instance of a Strapi application. This can be done by directly updating the `./src/admin/app.js` file, which can import any file located in `./src/admin/extensions`.
## Deployment
The administration is a React front-end application calling an API. The front end and the back end are independent and can be deployed on different servers, which brings us to different scenarios:
- Deploy the entire project on the same server.
- Deploy the administration panel on a server (AWS S3, Azure, etc) different from the API server.
Build configurations differ for each case.
Before deployment, the admin panel needs to be built, by running the following command from the project's root directory:
This will replace the folder's content located at `./build`. Visit [http://localhost:1337/admin](http://localhost:1337/admin) to make sure customizations have been taken into account.
### Same server
Deploying the admin panel and the API on the same server is the default behavior. The build configuration will be automatically set. The server will start on the defined port and the administration panel will be accessible through `http://yourdomain.com:1337/admin`.
:::tip
You might want to [change the path to access the administration panel](#access-url).
:::
### Different servers
To deploy the front end and the back end on different servers, use the following configuration:
After running `yarn build` with this configuration, the `build` folder will be created/overwritten. Use this folder to serve it from another server with the domain of your choice (e.g. `http://yourfrontend.com`).
The administration URL will then be `http://yourfrontend.com` and every request from the panel will hit the backend at `http://yourbackend.com`.
:::note
If you add a path to the `url` option, it won't prefix your app. To do so, use a proxy server like Nginx (see [optional software guides](/dev-docs/deployment#optional-software-guides)).
:::
# Strapi Content API
Source: https://docs-v4.strapi.io/dev-docs/api/content-api
# Strapi APIs to access your content
Once you've created and configured a Strapi project, created a data structure with the [Content-Type Builder](/user-docs/content-type-builder) and started adding data through the [Content Manager](/user-docs/content-manager), you likely would like to access your content.
From a front-end application, your content can be accessed through Strapi's Content API, which is exposed:
- by default through the [REST API](/dev-docs/api/rest)
- and also through the [GraphQL API](/dev-docs/api/graphql) if you installed the Strapi built-in [GraphQL plugin](/dev-docs/plugins/graphql).
REST and GraphQL APIs represent the top-level layers of the Content API exposed to external applications. Strapi also provides 2 lower-level APIs:
- The [Entity Service API](/dev-docs/api/entity-service) is the recommended API to interact with your application's database within the [backend server](/dev-docs/customization) or through [plugins](/dev-docs/plugins). The Entity Service is the layer that handles Strapi's complex data structures like components and dynamic zones, which the lower-level layers are not aware of.
- The [Query Engine API](/dev-docs/api/query-engine) interacts with the database layer at a lower level and is used under the hood to execute database queries. It gives unrestricted internal access to the database layer, but should be used only if the Entity Service API does not cover your use case.
```mermaid
flowchart BT
database[(Database)] <--> queryEngine[Query Engine API]
subgraph Strapi backend
direction BT
queryEngine <--> entityService[Entity Service API]
entityService <--> content([Your content])
content <--> rest[REST API]
content <--> graphql[GraphQL API]
end
rest <==> frontend{{Your frontend application}}
graphql <==> frontend
click rest "/dev-docs/api/rest"
click graphql "/dev-docs/api/graphql"
click entityService "/dev-docs/api/entity-service"
click queryEngine "/dev-docs/api/query-engine"
```
This documentation section includes reference information about the following Strapi APIs and some integration guides with 3rd party technologies:
:::note Plugin APIs
[Plugins](/dev-docs/plugins) also have their dedicated APIs: the Server API and the Admin Panel API. These plugin-related APIs are offered to develop plugins and allow a plugin to interact either with the back-end server of Strapi ([Server API](/dev-docs/api/plugins/server-api)) or with the admin panel of Strapi ([Admin Panel API](/dev-docs/api/plugins/admin-panel-api)).
:::
# Entity Service API
Source: https://docs-v4.strapi.io/dev-docs/api/entity-service
# Entity Service API
:::prerequisites
Before diving deeper into the Entity Service API documentation, it is recommended that you read the following introductions:
- the [backend customization introduction](/dev-docs/backend-customization),
- and the [Content API introduction](/dev-docs/api/content-api).
:::
The Strapi backend provides an Entity Service API, built on top of the [Query Engine API](/dev-docs/api/query-engine/). The Entity Service is the layer that handles Strapi's complex data structures like [components](/dev-docs/backend-customization/models#components) and [dynamic zones](/dev-docs/backend-customization/models#dynamic-zones), and uses the Query Engine API under the hood to execute database queries.
:::strapi Entity Service API vs. Query Engine API
# Components and Dynamic Zones
Source: https://docs-v4.strapi.io/dev-docs/api/entity-service/components-dynamic-zones
# Components and dynamic zones
The [Entity Service](/dev-docs/api/entity-service) is the layer that handles [components](/dev-docs/backend-customization/models#components) and [dynamic zones](/dev-docs/backend-customization/models#dynamic-zones) logic. With the Entity Service API, components and dynamic zones can be [created](#creation) and [updated](#update) while creating or updating entries.
## Creation
A [component](/dev-docs/backend-customization/models#components) can be created while creating an entry with the Entity Service API:
```js
strapi.entityService.create('api::article.article', {
data: {
myComponent: {
foo: 'bar',
},
},
});
```
A [dynamic zone](/dev-docs/backend-customization/models#dynamic-zones) (i.e. a list of components) can be created while creating an entry with the Entity Service API:
```js
strapi.entityService.create('api::article.article', {
data: {
myDynamicZone: [
{
__component: 'compo.type',
foo: 'bar',
},
{
__component: 'compo.type2',
foo: 'bar',
},
],
},
});
```
## Update
A [component](/dev-docs/backend-customization/models#components) can be updated while updating an entry with the Entity Service API. If a component `id` is specified, the component is updated, otherwise the old one is deleted and a new one is created:
```js
strapi.entityService.update('api::article.article', 1, {
data: {
myComponent: {
id: 1, // will update component with id: 1 (if not specified, would have deleted it and created a new one)
foo: 'bar',
},
},
});
```
A [dynamic zone](/dev-docs/backend-customization/models#dynamic-zones) (i.e. a list of components) can be updated while updating an entry with the Entity Service API. If a component `id` is specified, the component is updated, otherwise the old one is deleted and a new one is created:
```js
strapi.entityService.update('api::article.article', 1, {
data: {
myDynamicZone: [
{
// will update
id: 2,
__component: 'compo.type',
foo: 'bar',
},
{
// will add a new & delete old ones
__component: 'compo.type2',
foo: 'bar2',
},
],
},
});
```
# CRUD operations
Source: https://docs-v4.strapi.io/dev-docs/api/entity-service/crud
# CRUD operations
The [Entity Service API](/dev-docs/api/entity-service) is built on top of the the [Query Engine API](/dev-docs/api/query-engine) and uses it to perform CRUD operations on entities.
The `uid` parameter used in function calls for this API is a `string` built with the following format: `[category]::[content-type]` where `category` is one of: `admin`, `plugin` or `api`.
Examples:
- A correct `uid` to get users of the Strapi admin panel is `admin::user`.
- A possible `uid` for the Upload plugin could be `plugin::upload.file`.
- As the `uid`s for user-defined custom content-types follow the `api::[content-type]` syntax, if a content-type `article` exists, it is referenced by `api::article.article`.
:::tip
Run the [`strapi content-types:list`](/dev-docs/cli#strapi-content-types-list) command in a terminal to display all possible content-types' `uid`s for a specific Strapi instance.
:::
## findOne()
Finds the first entry matching the parameters.
Syntax: `findOne(uid: string, id: ID, parameters: Params)` ⇒ `Entry`
### Parameters
| Parameter | Description | Type |
| ---------- | --------------- | --------------- |
| `fields` | Attributes to return | `String[]` |
| `populate` | Relations, components and dynamic zones to [populate](/dev-docs/api/entity-service/populate) | [`PopulateParameter`](/dev-docs/api/entity-service/populate) |
### Example
```js
const entry = await strapi.entityService.findOne('api::article.article', 1, {
fields: ['title', 'description'],
populate: { category: true },
});
```
## findMany()
Finds entries matching the parameters.
Syntax: `findMany(uid: string, parameters: Params)` ⇒ `Entry[]`
### Parameters
| Parameter | Description | Type |
| ----------- | ------ | -------------- |
| `fields` | Attributes to return | `String[]` |
| `filters` | [Filters](/dev-docs/api/entity-service/filter) to use | [`FiltersParameters`](/dev-docs/api/entity-service/filter) |
| `start` | Number of entries to skip (see [pagination](/dev-docs/api/entity-service/order-pagination#pagination)) | `Number` |
| `limit` | Number of entries to return (see [pagination](/dev-docs/api/entity-service/order-pagination#pagination)) | `Number` |
| `sort` | [Order](/dev-docs/api/entity-service/order-pagination) definition | [`OrderByParameter`](/dev-docs/api/entity-service/order-pagination) |
| `populate` | Relations, components and dynamic zones to [populate](/dev-docs/api/entity-service/populate) | [`PopulateParameter`](/dev-docs/api/entity-service/populate) |
| `publicationState` | Publication state, can be:
`live` to return only published entries
`preview` to return both draft entries & published entries (default)
| `PublicationStateParameter` |
:::note
For single types, "findMany" returns the entry data as an object instead of an array of entries.
:::
### Example
```js
const entries = await strapi.entityService.findMany('api::article.article', {
fields: ['title', 'description'],
filters: { title: 'Hello World' },
sort: { createdAt: 'DESC' },
populate: { category: true },
});
```
:::tip
To retrieve only draft entries, combine the `preview` publication state and the `publishedAt` fields:
```js
const entries = await strapi.entityService.findMany('api::article.article', {
publicationState: 'preview',
filters: {
publishedAt: {
$null: true,
},
},
});
:::
## create()
Creates one entry and returns it
Syntax: `create(uid: string, parameters: Params)` ⇒ `Entry`
### Parameters
| Parameter | Description | Type |
| ---------- | ----------- | ---------- |
| `fields` | Attributes to return | `String[]` |
| `populate` | Relations, components and dynamic zones to [populate](/dev-docs/api/entity-service/populate) | [`PopulateParameter`](/dev-docs/api/entity-service/populate) |
| `data` | Input data | `Object` |
### Example
```js
const entry = await strapi.entityService.create('api::article.article', {
data: {
title: 'My Article',
},
});
```
## update()
Updates one entry and returns it.
:::note
`update()` only performs a partial update, so existing fields that are not included won't be replaced.
:::
Syntax: `update(uid: string, id: ID, parameters: Params)` ⇒ `Entry`
### Parameters
| Parameter | Description | Type |
| ---------- | ------------- | ---------- |
| `fields` | Attributes to return | `String[]` |
| `populate` | Relations, components and dynamic zones to [populate](/dev-docs/api/entity-service/populate) | [`PopulateParameter`](/dev-docs/api/entity-service/populate) |
| `data` | Input data | `object` |
### Example
```js
const entry = await strapi.entityService.update('api::article.article', 1, {
data: {
title: 'xxx',
},
});
```
## delete()
Deletes one entry and returns it.
Syntax: `delete(uid: string, id: ID, parameters: Params)` ⇒ `Entry`
### Parameters
| Parameter | Description | Type |
| ---------- | --------- | -------- |
| `fields` | Attributes to return | `String[]` |
| `populate` | Relations, components and dynamic zones to [populate](/dev-docs/api/entity-service/populate) | [`PopulateParameter`](/dev-docs/api/entity-service/populate) |
### Example
```js
const entry = await strapi.entityService.delete('api::article.article', 1);
```
# Filtering
Source: https://docs-v4.strapi.io/dev-docs/api/entity-service/filter
# Filtering
The [Entity Service API](/dev-docs/api/entity-service) offers the ability to filter results found with its [findMany()](/dev-docs/api/entity-service/crud#findmany) method.
Results are filtered with the `filters` parameter that accepts [logical operators](#logical-operators) and [attribute operators](#attribute-operators). Every operator should be prefixed with `$`.
## Logical operators
### `$and`
All nested conditions must be `true`.
**Example**
```js
const entries = await strapi.entityService.findMany('api::article.article', {
filters: {
$and: [
{
title: 'Hello World',
},
{
createdAt: { $gt: '2021-11-17T14:28:25.843Z' },
},
],
},
});
```
`$and` will be used implicitly when passing an object with nested conditions:
```js
const entries = await strapi.entityService.findMany('api::article.article', {
filters: {
title: 'Hello World',
createdAt: { $gt: '2021-11-17T14:28:25.843Z' },
},
});
```
### `$or`
One or many nested conditions must be `true`.
**Example**
```js
const entries = await strapi.entityService.findMany('api::article.article', {
filters: {
$or: [
{
title: 'Hello World',
},
{
createdAt: { $gt: '2021-11-17T14:28:25.843Z' },
},
],
},
});
```
### `$not`
Negates the nested conditions.
**Example**
```js
const entries = await strapi.entityService.findMany('api::article.article', {
filters: {
$not: {
title: 'Hello World',
},
},
});
```
:::note
`$not` can be used as:
- a logical operator (e.g. in `filters: { $not: { // conditions… }}`)
- [an attribute operator](#not-2) (e.g. in `filters: { attribute-name: $not: { … } }`).
:::
:::tip
`$and`, `$or` and `$not` operators are nestable inside of another `$and`, `$or` or `$not` operator.
:::
## Attribute Operators
:::caution
Using these operators may give different results depending on the database's implementation, as the comparison is handled by the database and not by Strapi.
:::
### `$not`
Negates the nested condition(s).
**Example**
```js
const entries = await strapi.entityService.findMany('api::article.article', {
filters: {
title: {
$not: {
$contains: 'Hello World',
},
},
},
});
```
### `$eq`
Attribute equals input value.
**Example**
```js
const entries = await strapi.entityService.findMany('api::article.article', {
filters: {
title: {
$eq: 'Hello World',
},
},
});
```
`$eq` can be omitted:
```js
const entries = await strapi.entityService.findMany('api::article.article', {
filters: {
title: 'Hello World',
},
});
```
### `$eqi`
Attribute equals input value (case-insensitive).
**Example**
```js
const entries = await strapi.entityService.findMany('api::article.article', {
filters: {
title: {
$eqi: 'HELLO World',
},
},
});
```
### `$ne`
Attribute does not equal input value.
**Example**
```js
const entries = await strapi.entityService.findMany('api::article.article', {
filters: {
title: {
$ne: 'ABCD',
},
},
});
```
### `$nei`
Attribute does not equal input value (case-insensitive).
**Example**
```js
const entries = await strapi.entityService.findMany('api::article.article', {
filters: {
title: {
$nei: 'abcd',
},
},
});
```
### `$in`
Attribute is contained in the input list.
**Example**
```js
const entries = await strapi.entityService.findMany('api::article.article', {
filters: {
title: {
$in: ['Hello', 'Hola', 'Bonjour'],
},
},
});
```
`$in` can be omitted when passing an array of values:
```js
const entries = await strapi.entityService.findMany('api::article.article', {
filters: {
title: ['Hello', 'Hola', 'Bonjour'],
},
});
```
### `$notIn`
Attribute is not contained in the input list.
**Example**
```js
const entries = await strapi.entityService.findMany('api::article.article', {
filters: {
title: {
$notIn: ['Hello', 'Hola', 'Bonjour'],
},
},
});
```
### `$lt`
Attribute is less than the input value.
**Example**
```js
const entries = await strapi.entityService.findMany('api::article.article', {
filters: {
rating: {
$lt: 10,
},
},
});
```
### `$lte`
Attribute is less than or equal to the input value.
**Example**
```js
const entries = await strapi.entityService.findMany('api::article.article', {
filters: {
rating: {
$lte: 10,
},
},
});
```
### `$gt`
Attribute is greater than the input value.
**Example**
```js
const entries = await strapi.entityService.findMany('api::article.article', {
filters: {
rating: {
$gt: 5,
},
},
});
```
### `$gte`
Attribute is greater than or equal to the input value.
**Example**
```js
const entries = await strapi.entityService.findMany('api::article.article', {
filters: {
rating: {
$gte: 5,
},
},
});
```
### `$between`
Attribute is between the 2 input values, boundaries included (e.g., `$between[1, 3]` will also return `1` and `3`).
**Example**
```js
const entries = await strapi.entityService.findMany('api::article.article', {
filters: {
rating: {
$between: [1, 20],
},
},
});
```
### `$contains`
Attribute contains the input value (case-sensitive).
**Example**
```js
const entries = await strapi.entityService.findMany('api::article.article', {
filters: {
title: {
$contains: 'Hello',
},
},
});
```
### `$notContains`
Attribute does not contain the input value (case-sensitive).
**Example**
```js
const entries = await strapi.entityService.findMany('api::article.article', {
filters: {
title: {
$notContains: 'Hello',
},
},
});
```
### `$containsi`
Attribute contains the input value. `$containsi` is not case-sensitive, while [$contains](#contains) is.
**Example**
```js
const entries = await strapi.entityService.findMany('api::article.article', {
filters: {
title: {
$containsi: 'hello',
},
},
});
```
### `$notContainsi`
Attribute does not contain the input value. `$notContainsi` is not case-sensitive, while [$notContains](#notcontains) is.
**Example**
```js
const entries = await strapi.entityService.findMany('api::article.article', {
filters: {
title: {
$notContainsi: 'hello',
},
},
});
```
### `$startsWith`
Attribute starts with input value.
**Example**
```js
const entries = await strapi.entityService.findMany('api::article.article', {
filters: {
title: {
$startsWith: 'ABCD',
},
},
});
```
### `$endsWith`
Attribute ends with input value.
**Example**
```js
const entries = await strapi.entityService.findMany('api::article.article', {
filters: {
title: {
$endsWith: 'ABCD',
},
},
});
```
### `$null`
Attribute is `null`.
**Example**
```js
const entries = await strapi.entityService.findMany('api::article.article', {
filters: {
title: {
$null: true,
},
},
});
```
### `$notNull`
Attribute is not `null`.
**Example**
```js
const entries = await strapi.entityService.findMany('api::article.article', {
filters: {
title: {
$notNull: true,
},
},
});
```
# Ordering & Pagination
Source: https://docs-v4.strapi.io/dev-docs/api/entity-service/order-pagination
# Ordering & Pagination
The [Entity Service API](/dev-docs/api/entity-service) offers the ability to [order](#ordering) and [paginate](#pagination) results found with its [findMany()](/dev-docs/api/entity-service/crud#findmany) method.
## Ordering
To order results returned by the Entity Service API, use the `sort` parameter. Results can be ordered based on a [single](#single) or on [multiple](#multiple) attribute(s) and can also use [relational ordering](#relational-ordering).
### Single
To order results by a single field, pass it to the `sort` parameter either:
- as a `string` to sort with the default ascending order, or
- as an `object` to define both the field name and the order (i.e. `'asc'` for ascending order or `'desc'` for descending order)
```js
strapi.entityService.findMany('api::article.article', {
sort: 'id',
});
// single with direction
strapi.entityService.findMany('api::article.article', {
sort: { id: 'desc' },
});
```
### Multiple
To order results by multiple fields, pass the fields as an array to the `sort` parameter either:
- as an array of strings to sort multiple fields using the default ascending order, or
- as an array of objects to define both the field name and the order (i.e. `'asc'` for ascending order or `'desc'` for descending order)
```js
strapi.entityService.findMany('api::article.article', {
sort: ['publishDate', 'name'],
});
// multiple with direction
strapi.entityService.findMany('api::article.article', {
sort: [{ title: 'asc' }, { publishedAt: 'desc' }],
});
```
### Relational ordering
Fields can also be sorted based on fields from relations:
```js
strapi.entityService.findMany('api::article.article', {
sort: {
author: {
name: 'asc',
},
},
});
```
## Pagination
Results can be paginated using 2 different strategies (see [REST API documentation](/dev-docs/api/rest/sort-pagination#pagination) for more details):
- pagination by page, when defining the `page` and `pageSize` parameters,
- and pagination by offset, when defining the `start` and `limit` parameters.
2 different functions can be used to paginate results with the Entity Service API and accept different pagination strategies:
| Function name | Possible pagination method(s) |
| ------------- | ----------------------------------------------------------- |
| `findMany()` | Offset pagination only |
| `findPage()` |
Offset pagination
Page pagination
|
# Populating
Source: https://docs-v4.strapi.io/dev-docs/api/entity-service/populate
# Populating
The [Entity Service API](/dev-docs/api/entity-service) does not populate relations, components or dynamic zones by default.
## Basic populating
To populate all the root level relations, use `populate: '*'`:
```js
const entries = await strapi.entityService.findMany('api::article.article', {
populate: '*',
});
```
Populate various component or relation fields by passing an array of attribute names:
```js
const entries = await strapi.entityService.findMany('api::article.article', {
populate: ['componentA', 'relationA'],
});
```
## Advanced populating
An object can be passed for more advanced populating:
```js
const entries = await strapi.entityService.findMany('api::article.article', {
populate: {
relationA: true,
repeatableComponent: {
fields: ['fieldA'],
filters: {},
sort: 'fieldA:asc',
populate: {
relationB: true,
},
},
},
});
```
Complex populating can be achieved by using the [`filters` parameter](/dev-docs/api/entity-service/filter) and select or populate nested relations or components:
```js
const entries = await strapi.entityService.findMany('api::article.article', {
populate: {
relationA: {
filters: {
name: {
$contains: 'Strapi',
},
},
},
repeatableComponent: {
fields: ['someAttributeName'],
sort: ['someAttributeName'],
populate: {
componentRelationA: true,
},
},
},
});
```
## Populate fragments
When dealing with polymorphic data structures (dynamic zones, polymorphic relations, etc...), it is possible to use populate fragments to have a better granularity on the populate strategy.
```js
const entries = await strapi.entityService.findMany('api::article.article', {
populate: {
dynamicZone: {
on: {
'components.foo': {
fields: ['title'],
filters: { title: { $contains: 'strapi' } },
},
'components.bar': {
fields: ['name'],
},
},
},
morphAuthor: {
on: {
'plugin::users-permissions.user': {
fields: ['username'],
},
'api::author.author': {
fields: ['name'],
},
},
},
},
});
```
# GraphQL API
Source: https://docs-v4.strapi.io/dev-docs/api/graphql
# GraphQL API
:::prerequisites
To use the GraphQL API, install the [GraphQL](/dev-docs/plugins/graphql.md) plugin.
:::
The GraphQL API allows performing queries and mutations to interact with the [content-types](/dev-docs/backend-customization/models#content-types) through Strapi's [GraphQL plugin](/dev-docs/plugins/graphql.md). Results can be [filtered](#filters), [sorted](#sorting) and [paginated](#pagination).
## Unified response format
Responses are unified with the GraphQL API in that:
- queries and mutations that return information for a single entry mainly use a `XxxEntityResponse` type
- queries and mutations that return i️nformation for multiple entries mainly use a `XxxEntityResponseCollection` type, which includes `meta` information (with [pagination](#pagination)) in addition to the data itself
Responses can also include an `error` (see [error handling documentation](/dev-docs/error-handling.md)).
```graphql title="Example: Response formats for queries and mutations with an example 'Article' content-type"
type ArticleEntityResponse {
data: ArticleEntity
}
type ArticleEntityResponseCollection {
data: [ArticleEntityResponse!]!
meta: ResponseCollectionMeta!
}
query {
article(...): ArticleEntityResponse # find one
articles(...): ArticleEntityResponseCollection # find many
}
mutation {
createArticle(...): ArticleEntityResponse # create
updateArticle(...): ArticleEntityResponse # update
deleteArticle(...): ArticleEntityResponse # delete
}
```
## Queries
Queries in GraphQL are used to fetch data without modifying it.
We assume that the [Shadow CRUD](/dev-docs/plugins/graphql#shadow-crud) feature is enabled. For each model, the GraphQL plugin auto-generates queries and mutations that mimics basic CRUD operations (findMany, findOne, create, update, delete).
### Fetch a single entry
Single entries can be found by their `id`.
```graphql title="Example query: Find the entry with id 1"
query {
document(id: 1) {
data {
id
attributes {
title
categories {
data {
id
attributes {
name
}
}
}
}
}
}
}
```
### Fetch multiple entries
```graphql title="Example query: Find all documents and populate 'categories' relation with the 'name' attribute"
query {
documents {
data {
id
attributes {
title
categories {
data {
id
attributes {
name
}
}
}
}
}
meta {
pagination {
page
pageSize
total
pageCount
}
}
}
}
```
### Fetch dynamic zone data
Dynamic zones are union types in graphql so you need to use fragments to query the fields.
```graphql
query {
restaurants {
data {
attributes {
dynamiczone {
__typename
...on ComponentDefaultClosingperiod {
label
}
}
}
}
}
}
```
## Mutations
Mutations in GraphQL are used to modify data (e.g. create, update, delete data).
### Create a new entry
```graphql
mutation createArticle {
createArticle(data: { title: "Hello"}) {
data {
id
attributes {
title
}
}
}
}
```
The implementation of the mutations also supports relational attributes. For example, you can create a new `User` and attach many `Restaurant` to it by writing your query like this:
```graphql
mutation {
createUser(
data: {
username: "John"
email: "john@doe.com"
restaurants: ["1", "2"]
}
) {
data {
id
attributes {
username
email
restaurants {
data {
id
attributes {
name
description
price
}
}
}
}
}
}
}
```
### Update an existing entry
```graphql
mutation updateArticle {
updateArticle(id: "1", data: { title: "Hello" }) {
data {
id
attributes {
title
}
}
}
}
```
You can also update relational attributes by passing an ID or an array of IDs (depending on the relationship).
```graphql
mutation {
updateRestaurant(
id: "5b5b27f8164f75c29c728110"
data: {
chef: "1" // User ID
}
}) {
data {
id
attributes {
chef {
data {
attributes {
username
email
}
}
}
}
}
}
}
```
### Delete an entry
```graphql
mutation deleteArticle {
deleteArticle(id: 1) {
data {
id
attributes {
title
}
}
}
}
```
## Filters
Queries can accept a `filters` parameter with the following syntax:
`filters: { field: { operator: value } }`
Logical operators (`and`, `or`, `not`) can also be used and accept arrays of objects.
The following operators are available:
| Operator | Description |
| -------------- | ---------------------------------- |
| `eq` | Equal |
| `ne` | Not equal |
| `lt` | Less than |
| `lte` | Less than or equal to |
| `gt` | Greater than |
| `gte` | Greater than or equal to |
| `in` | Included in an array |
| `notIn` | Not included in an array |
| `contains` | Contains, case sensitive |
| `notContains` | Does not contain, case sensitive |
| `containsi` | Contains, case insensitive |
| `notContainsi` | Does not contain, case insensitive |
| `null` | Is null |
| `notNull` | Is not null |
| `between` | Is between |
| `startsWith` | Starts with |
| `endsWith` | Ends with |
| `and` | Logical `and` |
| `or` | Logical `or` |
| `not` | Logical `not` |
```graphql title="Example query with filters"
{
documents(filters: { name: { eq: "test" }, or: [{ price: { gt: 10 }}, { title: { startsWith: "Book" }}] }) {
data {
id
}
}
}
```
## Sorting
Queries can accept a `sort` parameter with the following syntax:
- to sort based on a single value: `sort: "value"`
- to sort based on multiple values: `sort: ["value1", "value2"]`
The sorting order can be defined with `:asc` (ascending order, default, can be omitted) or `:desc` (for descending order).
```graphql title="Example request: Sorting on title by ascending order"
{
documents(sort: "title") {
data {
id
}
}
}
```
```graphql title="Example request: Sorting on title by descending order"
{
documents(sort: "title:desc") {
data {
id
}
}
}
```
```graphql title="Example request: Sorting on title by ascending order, then on price by descending order"
{
documents(sort: ["title:asc", "price:desc"]) {
data {
id
}
}
}
```
## Pagination
Queries can accept a `pagination` parameter. Results can be paginated either by page or by offset.
:::note
Pagination methods can not be mixed. Always use either `page` with `pageSize` **or** `start` with `limit`.
:::
### Pagination by page
| Parameter | Description | Default |
| ---------------------- | ----------- | ------- |
| `pagination[page]` | Page number | 1 |
| `pagination[pageSize]` | Page size | 10 |
```graphql title="Example query: Pagination by page"
{
documents(pagination: { page: 1, pageSize: 10 }) {
data {
id
}
meta {
pagination {
page
pageSize
pageCount
total
}
}
}
}
```
### Pagination by offset
| Parameter | Description | Default | Maximum |
| ------------------- | ---------------------------- | ------- | ------- |
| `pagination[start]` | Start value | 0 | - |
| `pagination[limit]` | Number of entities to return | 10 | -1 |
```graphql title="Example query: Pagination by offset"
{
documents(pagination: { start: 20, limit: 30 }) {
data {
id
}
meta {
pagination {
start
limit
}
}
}
}
```
:::tip
The default and maximum values for `pagination[limit]` can be [configured in the `./config/plugins.js`](/dev-docs/configurations/plugins#graphql-configuration) file with the `graphql.config.defaultLimit` and `graphql.config.maxLimit` keys.
:::
# Admin Panel API for plugins
Source: https://docs-v4.strapi.io/dev-docs/api/plugins/admin-panel-api
# Admin Panel API for plugins
A Strapi [plugin](/dev-docs/plugins) can interact with both the [back end](/dev-docs/api/plugins/server-api) and the front end of a Strapi application. The Admin Panel API is about the front end part, i.e. it allows a plugin to customize Strapi's [admin panel](/user-docs/intro).
The admin panel is a [React](https://reactjs.org/) application that can embed other React applications. These other React applications are the admin parts of each Strapi plugin.
:::prerequisites
You have [created a Strapi plugin](/dev-docs/plugins/development/create-a-plugin).
:::
The Admin Panel API includes:
- an [entry file](#entry-file) which exports the required interface,
- [lifecycle functions](#lifecycle-functions) and the `registerTrad()` [async function](#async-function),
- and several [specific APIs](#available-actions) for your plugin to interact with the admin panel.
:::note
The whole code for the admin panel part of your plugin could live in the `/strapi-admin.js|ts` or `/admin/src/index.js|ts` file. However, it's recommended to split the code into different folders, just like the [structure](/dev-docs/plugins/development/plugin-structure) created by the `strapi generate plugin` CLI generator command.
:::
## Entry file
The entry file for the Admin Panel API is `[plugin-name]/admin/src/index.js`. This file exports the required interface, with the following functions available:
| Function type | Available functions |
| ------------------- | ------------------------------------------------------------------------ |
| Lifecycle functions |
[register](#register)
[bootstrap](#bootstrap)
|
| Async function | [registerTrads](#registertrads) |
## Lifecycle functions
### register()
**Type:** `Function`
This function is called to load the plugin, even before the app is actually [bootstrapped](#bootstrap). It takes the running Strapi application as an argument (`app`).
Within the register function, a plugin can:
* [register itself](#registerplugin) so it's available to the admin panel
* add a new link to the main navigation (see [Menu API](#menu-api))
* [create a new settings section](#createsettingsection)
* define [injection zones](#injection-zones-api)
* [add reducers](#reducers-api)
#### registerPlugin()
**Type:** `Function`
Registers the plugin to make it available in the admin panel.
This function returns an object with the following parameters:
| Parameter | Type | Description |
| ---------------- | ------------------------ | -------------------------------------------------------------------------------------------------- |
| `id` | String | Plugin id |
| `name` | String | Plugin name |
| `injectionZones` | Object | Declaration of available [injection zones](#injection-zones-api) |
:::note
Some parameters can be imported from the `package.json` file.
:::
**Example:**
```js title="my-plugin/admin/src/index.js"
// Auto-generated component
register(app) {
app.addMenuLink({
to: `/plugins/${pluginId}`,
icon: PluginIcon,
intlLabel: {
id: `${pluginId}.plugin.name`,
defaultMessage: 'My plugin',
},
Component: async () => {
const component = await import(/* webpackChunkName: "my-plugin" */ './pages/App');
return component;
},
permissions: [], // array of permissions (object), allow a user to access a plugin depending on its permissions
});
app.registerPlugin({
id: pluginId,
name,
});
},
};
```
### bootstrap()
**Type**: `Function`
Exposes the bootstrap function, executed after all the plugins are [registered](#register).
Within the bootstrap function, a plugin can:
* extend another plugin, using `getPlugin('plugin-name')`,
* register hooks (see [Hooks API](#hooks-api))
* [add links to a settings section](#settings-api)
**Example:**
```js
module.exports = () => {
return {
// ...
bootstrap(app) {
// execute some bootstrap code
app.injectContentManagerComponent('editView', 'right-links', { name: 'my-compo', Component: () => 'my-compo' })
},
};
};
```
## Async function
While [`register()`](#register) and [`bootstrap()`](#bootstrap) are lifecycle functions, `registerTrads()` is an async function.
### registerTrads()
**Type**: `Function`
To reduce the build size, the admin panel is only shipped with 2 locales by default (`en` and `fr`). The `registerTrads()` function is used to register a plugin's translations files and to create separate chunks for the application translations. It does not need to be modified.
Example: Register a plugin's translation files
```jsx
async registerTrads({ locales }) {
const importedTrads = await Promise.all(
locales.map(locale => {
return import(
/* webpackChunkName: "[pluginId]-[request]" */ `./translations/${locale}.json`
)
.then(({ default: data }) => {
return {
data: prefixPluginTranslations(data, pluginId),
locale,
};
})
.catch(() => {
return {
data: {},
locale,
};
});
})
);
return Promise.resolve(importedTrads);
},
};
```
## Available actions
The Admin Panel API allows a plugin to take advantage of several small APIs to perform actions. Use this table as a reference:
| Action | API to use | Function to use | Related lifecycle function |
| ---------------------------------------- | --------------------------------------- | ------------------------------------------------- | --------------------------- |
| Add a new link to the main navigation | [Menu API](#menu-api) | [`addMenuLink()`](#menu-api) | [`register()`](#register) |
| Create a new settings section | [Settings API](#settings-api) | [`createSettingSection()`](#createsettingsection) | [`register()`](#register) |
| Declare an injection zone | [Injection Zones API](#injection-zones-api) | [`registerPlugin()`](#registerplugin) | [`register()`](#register) |
| Add a reducer | [Reducers API](#reducers-api) | [`addReducers()`](#reducers-api) | [`register()`](#register) |
| Create a hook | [Hooks API](#hooks-api) | [`createHook()`](#hooks-api) | [`register()`](#register) |
| Add a single link to a settings section | [Settings API](#settings-api) | [`addSettingsLink()`](#addsettingslink) | [`bootstrap()`](#bootstrap) |
| Add multiple links to a settings section | [Settings API](#settings-api) | [`addSettingsLinks()`](#addsettingslinks) | [`bootstrap()`](#bootstrap) |
| Inject a Component in an injection zone | [Injection Zones API](#injection-zones-api) | [`injectComponent()`](#injection-zones-api) | [`bootstrap()`](#register) |
| Register a hook | [Hooks API](#hooks-api) | [`registerHook()`](#hooks-api) | [`bootstrap()`](#bootstrap) |
:::tip Replacing the WYSIWYG
The WYSIWYG editor can be replaced by taking advantage of [custom fields](/dev-docs/custom-fields), for instance using the [CKEditor custom field plugin](https://market.strapi.io/plugins/@ckeditor-strapi-plugin-ckeditor).
:::
:::info
The admin panel supports dotenv variables.
All variables defined in a `.env` file and prefixed by `STRAPI_ADMIN_` are available while customizing the admin panel through `process.env`.
:::
### Menu API
The Menu API allows a plugin to add a new link to the main navigation through the `addMenuLink()` function with the following parameters:
| Parameter | Type | Description |
| ------------- | ---------------- | ------------------------------------------------------------------------------------------------------------------------------------------------------------------------------------------------------------------------ |
| `to` | String | Path the link should point to |
| `icon` | React Component | Icon to display in the main navigation |
| `intlLabel` | Object | Label for the link, following the [React Int'l](https://formatjs.io/docs/react-intl) convention, with:
`id`: id used to insert the localized label
`defaultMessage`: default label for the link
|
| `Component` | Async function | Returns a dynamic import of the plugin entry point |
| `permissions` | Array of Objects | Permissions declared in the `permissions.js` file of the plugin |
:::note
`intlLabel.id` are ids used in translation files (`[plugin-name]/admin/src/translations/[language].json`)
:::
**Example:**
```jsx title="my-plugin/admin/src/index.js"
register(app) {
app.addMenuLink({
to: '/plugins/my-plugin',
icon: PluginIcon,
intlLabel: {
id: 'my-plugin.plugin.name',
defaultMessage: 'My plugin',
},
Component: () => 'My plugin',
permissions: [], // permissions to apply to the link
});
app.registerPlugin({ ... });
},
bootstrap() {},
};
```
### Settings API
The Settings API allows:
* [creating a new setting section](#createsettingsection)
* adding [a single link](#addsettingslink) or [multiple links at once](#addsettingslinks) to existing settings sections
:::note
Adding a new section happens in the [register](#register) lifecycle while adding links happens during the [bootstrap](#bootstrap) lifecycle.
:::
All functions accept links as objects with the following parameters:
| Parameter | Type | Description |
| ------------- | ---------------- | ------------------------------------------------------------------------------------------------------------------------------------------------------------------------------------------------------------------------ |
| `id` | String | React id |
| `to` | String | Path the link should point to |
| `intlLabel` | Object | Label for the link, following the [React Int'l](https://formatjs.io/docs/react-intl) convention, with:
`id`: id used to insert the localized label
`defaultMessage`: default label for the link
|
| `Component` | Async function | Returns a dynamic import of the plugin entry point |
| `permissions` | Array of Objects | Permissions declared in the `permissions.js` file of the plugin |
#### createSettingSection()
**Type**: `Function`
Create a new settings section.
The function takes 2 arguments:
| Argument | Type | Description |
| --------------- | ---------------- | ----------------------------------------------------------------------------------------------------------------------------------------------------------------------------------------------------------------------------------------------------------------------------------------------------------------------------- |
| first argument | Object | Section label:
`id` (String): section id
`intlLabel` (Object): localized label for the section, following the [React Int'l](https://formatjs.io/docs/react-intl) convention, with:
`id`: id used to insert the localized label
`defaultMessage`: default label for the section
|
| second argument | Array of Objects | Links included in the section |
:::note
`intlLabel.id` are ids used in translation files (`[plugin-name]/admin/src/translations/[language].json`)
:::
**Example:**
```jsx title="my-plugin/admin/src/index.js"
const myComponent = async () => {
const component = await import(
/* webpackChunkName: "users-providers-settings-page" */ './pages/Providers'
);
return component;
};
register(app) {
app.createSettingSection(
{ id: String, intlLabel: { id: String, defaultMessage: String } }, // Section to create
[
// links
{
intlLabel: { id: String, defaultMessage: String },
id: String,
to: String,
Component: myComponent,
permissions: Object[],
},
]
);
},
};
```
#### addSettingsLink()
**Type**: `Function`
Add a unique link to an existing settings section.
**Example:**
```jsx title="my-plugin/admin/src/index.js"
const myComponent = async () => {
const component = await import(
/* webpackChunkName: "users-providers-settings-page" */ './pages/Providers'
);
return component;
};
bootstrap(app) {
// Adding a single link
app.addSettingsLink(
'global', // id of the section to add the link to
{
intlLabel: { id: String, defaultMessage: String },
id: String,
to: String,
Component: myComponent,
permissions: Object[]
}
)
}
}
```
#### addSettingsLinks()
**Type**: `Function`
Add multiple links to an existing settings section.
**Example:**
```jsx title="my-plugin/admin/src/index.js"
const myComponent = async () => {
const component = await import(
/* webpackChunkName: "users-providers-settings-page" */ './pages/Providers'
);
return component;
};
bootstrap(app) {
// Adding several links at once
app.addSettingsLinks(
'global', // id of the section to add the link in
[{
intlLabel: { id: String, defaultMessage: String },
id: String,
to: String,
Component: myComponent,
permissions: Object[]
}]
)
}
}
```
### Injection Zones API
Injection zones refer to areas of a view's layout where a plugin allows another to inject a custom React component (e.g. a UI element like a button).
Plugins can use:
* Strapi's [predefined injection zones](#using-predefined-injection-zones) for the Content Manager,
* or custom injection zones, created by a plugin
:::note
Injection zones are defined in the [register()](#register) lifecycle but components are injected in the [bootstrap()](#bootstrap) lifecycle.
:::
#### Using predefined injection zones
Strapi admin panel comes with predefined injection zones so components can be added to the UI of the [Content Manager](/user-docs/intro):
| View | Injection zone name & Location |
| --------- | ------------------------------------------------------------------------------------------------------------------------------------------------------------------------- |
| List view |
`actions`: sits between Filters and the cogs icon
`deleteModalAdditionalInfos()`: sits at the bottom of the modal displayed when deleting items
|
| Edit view |
`informations`: sits at the top right of the edit view
`right-links`: sits between "Configure the view" and "Edit" buttons
|
#### Creating a custom injection zone
To create a custom injection zone, declare it as a `` React component with an `area` prop that takes a string with the following naming convention: `plugin-name.viewName.injectionZoneName`.
#### Injecting components
A plugin has 2 different ways of injecting a component:
* to inject a component from a plugin into another plugin's injection zones, use the `injectComponent()` function
* to specifically inject a component into one of the Content Manager's [predefined injection zones](#using-predefined-injection-zones), use the `injectContentManagerComponent()` function instead
Both the `injectComponent()` and `injectContentManagerComponent()` methods accept the following arguments:
| Argument | Type | Description |
| --------------- | ------ | ----------------------------------------------------------------------------------------------------------------------------------------------------------------------------- |
| first argument | String | The view where the component is injected
| second argument | String | The zone where the component is injected
| third argument | Object | An object with the following keys:
`name` (string): the name of the component
`Component` (function or class): the React component to be injected
|
Example: Inject a component in the informations box of the Edit View of the Content Manager:
```jsx title="my-plugin/admin/src/index.js"
bootstrap(app) {
app.injectContentManagerComponent('editView', 'informations', {
name: 'my-plugin-my-compo',
Component: () => 'my-compo',
});
}
}
```
Example: Creating a new injection zone and injecting it from a plugin to another one:
```jsx title="my-plugin/admin/src/injectionZones.js"
// Use the injection zone in a view
const HomePage = () => {
return (
This is the homepage
);
};
```
```jsx title="my-plugin/admin/src/index.js"
// Declare this injection zone in the register lifecycle of the plugin
register() {
app.registerPlugin({
// ...
injectionZones: {
homePage: {
right: []
}
}
});
},
}
```
```jsx title="my-other-plugin/admin/src/index.js"
// Inject the component from a plugin in another plugin
register() {
// ...
},
bootstrap(app) {
app.getPlugin('my-plugin').injectComponent('homePage', 'right', {
name: 'my-other-plugin-component',
Component: () => 'This component is injected',
});
}
};
```
#### Accessing data with the `useCMEditViewDataManager` React hook
Once an injection zone is defined, the component to be injected in the Content Manager can have access to all the data of the Edit View through the `useCMEditViewDataManager` React hook.
Example of a basic component using the 'useCMEditViewDataManager' hook
```js
const MyCompo = () => {
const {
createActionAllowedFields: [], // Array of fields that the user is allowed to edit
formErrors: {}, // Object errors
readActionAllowedFields: [], // Array of field that the user is allowed to edit
slug: 'api::address.address', // Slug of the content-type
updateActionAllowedFields: [],
allLayoutData: {
components: {}, // components layout
contentType: {}, // content-type layout
},
initialData: {},
isCreatingEntry: true,
isSingleType: true,
status: 'resolved',
layout: {}, // Current content-type layout
hasDraftAndPublish: true,
modifiedData: {},
onPublish: () => {},
onUnpublish: () => {},
addComponentToDynamicZone: () => {},
addNonRepeatableComponentToField: () => {},
addRelation: () => {},
addRepeatableComponentToField: () => {},
moveComponentDown: () => {},
moveComponentField: () => {},
moveComponentUp: () => {},
moveRelation: () => {},
onChange: () => {},
onRemoveRelation: () => {},
removeComponentFromDynamicZone: () => {},
removeComponentFromField: () => {},
removeRepeatableField: () => {},
} = useCMEditViewDataManager()
return null
}
```
### Reducers API
Reducers are [Redux](https://redux.js.org/) reducers that can be used to share state between components. Reducers can be useful when:
* Large amounts of application state are needed in many places in the application.
* The application state is updated frequently.
* The logic to update that state may be complex.
Reducers can be added to a plugin interface with the `addReducers()` function during the [`register`](#register) lifecycle.
A reducer is declared as an object with this syntax:
**Example:**
```js title="my-plugin/admin/src/index.js"
const reducers = {
// Reducer Syntax
[`${pluginId}_exampleReducer`]: exampleReducer
}
register(app) {
app.addReducers(reducers)
},
bootstrap() {},
};
```
### Hooks API
The Hooks API allows a plugin to create and register hooks, i.e. places in the application where plugins can add personalized behavior.
Hooks should be registered during the [bootstrap](#bootstrap) lifecycle of a plugin.
Hooks can then be run in series, in waterfall or in parallel:
* `runHookSeries` returns an array corresponding to the result of each function executed, ordered
* `runHookParallel` returns an array corresponding to the result of the promise resolved by the function executed, ordered
* `runHookWaterfall` returns a single value corresponding to all the transformations applied by the different functions starting with the initial value `args`.
Example: Create a hook in a plugin and use it in another plugin
```jsx title="my-plugin/admin/src/index.js"
// Create a hook in a plugin
register(app) {
app.createHook('My-PLUGIN/MY_HOOK');
}
}
```
```jsx title="my-other-plugin/admin/src/index.js"
// Use the hook in another plugin
bootstrap(app) {
app.registerHook('My-PLUGIN/MY_HOOK', (...args) => {
console.log(args)
// important: return the mutated data
return args
});
app.registerPlugin({...})
}
}
```
#### Predefined hook
Strapi includes a predefined `Admin/CM/pages/ListView/inject-column-in-table` hook that can be used to add or mutate a column of the List View of the [Content Manager](/user-docs/intro).
Example: 'Admin/CM/pages/ListView/inject-column-in-table' hook, as used by the Internationalization plugin to add the 'Content available in' column
```jsx title="./plugins/my-plugin/admin/src/index.js"
bootstrap(app) {
app.registerHook(
'Admin/CM/pages/ListView/inject-column-in-table',
({ displayedHeaders, layout }) => {
const isFieldLocalized = get(
layout,
'contentType.pluginOptions.i18n.localized',
false
);
if (!isFieldLocalized) {
return { displayedHeaders, layout };
}
return {
layout,
displayedHeaders: [
...displayedHeaders,
{
key: '__locale_key__', // Needed for the table
fieldSchema: { type: 'string' }, // Schema of the attribute
metadatas: {
label: 'Content available in', // Label of the header,
sortable: true | false, // Define if the column is sortable
}, // Metadatas for the label
// Name of the key in the data we will display
name: 'locales',
// Custom renderer: props => Object.keys(props).map(key =>
key
)
cellFormatter,
},
],
};
}
);
},
}
```
# Server API for plugins
Source: https://docs-v4.strapi.io/dev-docs/api/plugins/server-api
# Server API for plugins
A Strapi [plugin](/dev-docs/plugins) can interact with both the back end and the [front end](/dev-docs/api/plugins/admin-panel-api) of a Strapi application. The Server API is about the back-end part, i.e. how the plugin interacts with the server part of a Strapi application.
:::prerequisites
You have [created a Strapi plugin](/dev-docs/plugins/development/create-a-plugin).
:::
The Server API includes:
- an [entry file](#entry-file) which export the required interface,
- [lifecycle functions](#lifecycle-functions),
- a [configuration](#configuration) API,
- the ability to add [cron](#cron) jobs,
- and the ability to [customize all elements of the back-end server](#backend-customization).
Once you have declared and exported the plugin interface, you will be able to [use the plugin interface](#usage).
:::note
The whole code for the server part of your plugin could live in the `/strapi-server.js|ts` or `/server/index.js|ts` file. However, it's recommended to split the code into different folders, just like the [structure](/dev-docs/plugins/development/plugin-structure) created by the `strapi generate plugin` CLI generator command.
:::
## Entry file
To tap into the Server API, create a `strapi-server.js` file at the root of the plugin package folder. This file exports the required interface, with the following parameters available:
| Parameter type | Available parameters |
| ---------------------- | -------------------------------------------------------------------------------------------------------------------------------------------------------------------------------------------------------------- |
| Lifecycle functions |
[register](#register)
[bootstrap](#bootstrap)
[destroy](#destroy)
|
| Configuration |
[config](#configuration) object
[Cron](#cron)
|
| Backend customizations |
[contentTypes](#content-types)
[routes](#routes)
[controllers](#controllers)
[services](#services)
[policies](#policies)
[middlewares](#middlewares)
|
## Lifecycle functions
### register()
This function is called to load the plugin, before the application is [bootstrapped](#bootstrap), in order to register [permissions](/dev-docs/plugins/users-permissions), the server part of [custom fields](/dev-docs/custom-fields#registering-a-custom-field-on-the-server), or database migrations.
**Type**: `Function`
**Example:**
```js title="./src/plugins/my-plugin/strapi-server.js"
module.exports = () => ({
register({ strapi }) {
// execute some register code
},
});
```
### bootstrap()
The [bootstrap](/dev-docs/configurations/functions#bootstrap) function is called right after the plugin has [registered](#register).
**Type**: `Function`
**Example:**
```js title="./src/plugins/my-plugin/strapi-server.js"
module.exports = () => ({
bootstrap({ strapi }) {
// execute some bootstrap code
},
});
```
### destroy()
The [destroy](/dev-docs/configurations/functions#destroy) lifecycle function is called to cleanup the plugin (close connections, remove listeners, etc.) when the Strapi instance is destroyed.
**Type**: `Function`
**Example:**
```js title="./src/plugins/my-plugin/strapi-server.js"
module.exports = () => ({
destroy({ strapi }) {
// execute some destroy code
},
});
```
## Configuration
`config` stores the default plugin configuration. It loads and validates the configuration inputted from the user within the [`./config/plugins.js` configuration file](/dev-docs/configurations/plugins).
**Type**: `Object`
| Parameter | Type | Description |
| ----------- | ---------------------------------------------- | -------------------------------------------------------------------------------------------------------------------------------------------------------- |
| `default` | Object, or Function that returns an Object | Default plugin configuration, merged with the user configuration |
| `validator` | Function |
Checks if the results of merging the default plugin configuration with the user configuration is valid
Throws errors when the resulting configuration is invalid
|
**Example:**
```js title="./src/plugins/my-plugin/strapi-server.js or ./src/plugins/my-plugin/server/index.js"
const config = require('./config');
module.exports = () => ({
config: {
default: ({ env }) => ({ optionA: true }),
validator: (config) => {
if (typeof config.optionA !== 'boolean') {
throw new Error('optionA has to be a boolean');
}
},
},
});
```
Once defined, the configuration can be accessed:
- with `strapi.plugin('plugin-name').config('some-key')` for a specific configuration property,
- or with `strapi.config.get('plugin.plugin-name')` for the whole configuration object.
:::tip
Run `yarn strapi console` or `npm run strapi console` to access the strapi object in a live console.
:::
## Cron
The `cron` object allows you to add cron jobs to the Strapi instance.
```js title="./src/plugins/my-plugin/strapi-server.js"
module.exports = () => ({
bootstrap({ strapi }) {
strapi.cron.add({
// runs every second
myJob: {
task: ({ strapi }) => {
console.log("hello from plugin");
},
options: {
rule: "* * * * * *",
},
},
});
},
});
```
To remove a CRON job you can call the remove function on the `strapi.cron` object and pass in the key corresponding to the CRON job you want to remove.
:::note
Cron jobs that are using the key as the rule can not be removed.
:::
```js
strapi.cron.remove("myJob");
```
### List cron jobs
To list all the cron jobs that are currently running you can call the `jobs` array on the `strapi.cron` object.
```js
strapi.cron.jobs
```
## Backend customization
All elements of the back-end server of Strapi can be customized through a plugin using the Server API.
:::prerequisites
To better understand this section, ensure you have read through the [back-end customization](/dev-docs/backend-customization) documentation of a Strapi application.
:::
### Content-types
An object with the [content-types](/dev-docs/backend-customization/models) the plugin provides.
**Type**: `Object`
:::note
Content-Types keys in the `contentTypes` object should re-use the `singularName` defined in the [`info`](/dev-docs/backend-customization/models#model-information) key of the schema.
:::
**Example:**
```js title="./src/plugins/my-plugin/strapi-server.js"
"use strict";
module.exports = require('./server');
```
```js title="path: ./src/plugins/my-plugin/server/index.js"
const contentTypes = require('./content-types');
module.exports = () => ({
contentTypes,
});
```
```js title="path: ./src/plugins/my-plugin/server/content-types/index.js"
const contentTypeA = require('./content-type-a');
const contentTypeB = require('./content-type-b');
module.exports = {
'content-type-a': { schema: contentTypeA }, // should re-use the singularName of the content-type
'content-type-b': { schema: contentTypeB },
};
```
```js title="path: ./src/plugins/my-plugin/server/content-types/content-type-a.js"
module.exports = {
kind: 'collectionType',
collectionName: 'content-type',
info: {
singularName: 'content-type-a', // kebab-case mandatory
pluralName: 'content-type-as', // kebab-case mandatory
displayName: 'Content Type A',
description: 'A regular content-type',
},
options: {
draftAndPublish: true,
},
pluginOptions: {
'content-manager': {
visible: false,
},
'content-type-builder': {
visible: false,
}
},
attributes: {
name: {
type: 'string',
min: 1,
max: 50,
configurable: false,
},
}
};
```
### Routes
An array of [routes](/dev-docs/backend-customization/routes) configuration.
**Type**: `Object[]`
**Examples:**
### Controllers
An object with the [controllers](/dev-docs/backend-customization/controllers) the plugin provides.
**Type**: `Object`
**Example:**
```js title="./src/plugins/my-plugin/strapi-server.js"
"use strict";
module.exports = require('./server');
```
```js title="./src/plugins/my-plugin/server/index.js"
const controllers = require('./controllers');
module.exports = () => ({
controllers,
});
```
```js title="./src/plugins/my-plugin/server/controllers/index.js"
const controllerA = require('./controller-a');
const controllerB = require('./controller-b');
module.exports = {
controllerA,
controllerB,
};
```
```js title="./src/plugins/my-plugin/server/controllers/controller-a.js"
module.exports = ({ strapi }) => ({
doSomething(ctx) {
ctx.body = { message: 'HelloWorld' };
},
});
```
### Services
An object with the [services](/dev-docs/backend-customization/services) the plugin provides.
Services should be functions taking `strapi` as a parameter.
**Type**: `Object`
**Example:**
```js title="./src/plugins/my-plugin/strapi-server.js"
"use strict";
module.exports = require('./server');
```
```js title="./src/plugins/my-plugin/server/index.js"
const services = require('./services');
module.exports = () => ({
services,
});
```
```js title="./src/plugins/my-plugin/server/services/index.js"
const serviceA = require('./service-a');
const serviceB = require('./service-b');
module.exports = {
serviceA,
serviceB,
};
```
```js title="./src/plugins/my-plugin/server/services/service-a.js"
module.exports = ({ strapi }) => ({
someFunction() {
return [1, 2, 3];
},
});
```
### Policies
An object with the [policies](/dev-docs/backend-customization/policies) the plugin provides.
**Type**: `Object`
**Example:**
```js title="./src/plugins/my-plugin/strapi-server.js"
"use strict";
module.exports = require('./server');
```
```js title="./src/plugins/my-plugin/server/index.js"
const policies = require('./policies');
module.exports = () => ({
policies,
});
```
```js title="./src/plugins/my-plugin/server/policies/index.js"
const policyA = require('./policy-a');
const policyB = require('./policy-b');
module.exports = {
policyA,
policyB,
};
```
```js title="./src/plugins/my-plugin/server/policies/policy-a.js"
module.exports = (policyContext, config, { strapi }) => {
if (ctx.state.user && ctx.state.user.isActive) {
return true;
}
return false;
};
```
### Middlewares
An object with the [middlewares](/dev-docs/configurations/middlewares) the plugin provides.
**Type**: `Object`
**Example:**
```js title="./src/plugins/my-plugin/server/middlewares/your-middleware.js"
/**
* The your-middleware.js file
* declares a basic middleware function and exports it.
*/
'use strict';
module.exports = async (ctx, next) => {
console.log("your custom logic")
await next();
}
```
```js title="./src/plugins/my-plugin/server/middlewares/index.js"
/**
* The middleware function previously created
* is imported from its file and
* exported by the middlewares index.
*/
'use strict';
const yourMiddleware = require('./your-middleware');
module.exports = {
yourMiddleware
};
```
```js title="./src/plugins/my-plugin/server/register.js"
/**
* The middleware is called from
* the plugin's register lifecycle function.
*/
'use strict';
const middlewares = require('./middlewares');
module.exports = ({ strapi }) => {
strapi.server.use(middlewares.yourMiddleware);
};
```
## Usage
Once a plugin is exported and loaded into Strapi, its features are accessible in the code through getters. The Strapi instance (`strapi`) exposes both top-level getters and global getters:
- top-level getters imply chaining functions (e.g., `strapi.plugin('the-plugin-name').controller('the-controller-name'`),
- global getters are syntactic sugar that allows direct access using a feature's uid (e.g., `strapi.controller('plugin::plugin-name.controller-name')`).
```js
// Access an API or a plugin controller using a top-level getter
strapi.api['api-name'].controller('controller-name')
strapi.plugin('plugin-name').controller('controller-name')
// Access an API or a plugin controller using a global getter
strapi.controller('api::api-name.controller-name')
strapi.controller('plugin::plugin-name.controller-name')
```
Top-level getter syntax examples
```js
strapi.plugin('plugin-name').config
strapi.plugin('plugin-name').routes
strapi.plugin('plugin-name').controller('controller-name')
strapi.plugin('plugin-name').service('service-name')
strapi.plugin('plugin-name').contentType('content-type-name')
strapi.plugin('plugin-name').policy('policy-name')
strapi.plugin('plugin-name').middleware('middleware-name')
```
Global getter syntax examples
```js
strapi.controller('plugin::plugin-name.controller-name');
strapi.service('plugin::plugin-name.service-name');
strapi.contentType('plugin::plugin-name.content-type-name');
strapi.policy('plugin::plugin-name.policy-name');
strapi.middleware('plugin::plugin-name.middleware-name');
```
:::strapi Entity Service API
To interact with the content-types, use the [Entity Service API](/dev-docs/api/entity-service).
:::
# Query Engine API
Source: https://docs-v4.strapi.io/dev-docs/api/query-engine
# Query Engine API
:::prerequisites
Before diving deeper into the Query Engine API documentation, it is recommended that you read the following introductions:
- the [backend customization introduction](/dev-docs/backend-customization),
- and the [Content API introduction](/dev-docs/api/content-api).
:::
The Strapi backend provides a Query Engine API to interact with the database layer at a lower level. The Query Engine API should mostly be used by plugin developers and developers adding custom business logic to their applications.
👉 In most use cases, it's recommended to use the [Entity Service API](/dev-docs/api/entity-service/) instead of the Query Engine API.
:::strapi Entity Service API vs. Query Engine API
# Bulk Operations
Source: https://docs-v4.strapi.io/dev-docs/api/query-engine/bulk-operations
# Bulk Operations
:::caution
To avoid performance issues, bulk operations are not allowed on relations.
:::
## createMany()
Creates multiple entries.
Syntax: `createMany(parameters) => { count: number, ids: id[] }`
### Parameters
| Parameter | Type | Description |
| --------- | ---------------- | ------------------- |
| `data` | Array of objects | Array of input data |
:::caution
* MySQL will only return an array of one id containing the last inserted id, not the entire list.
* Prior to Strapi v4.9.0, `createMany()` only returns the `count`.
:::
### Example
```js
await strapi.db.query("api::blog.article").createMany({
data: [
{
title: "ABCD",
},
{
title: "EFGH",
},
],
});
// { count: 2 , ids: [1,2]}
```
## updateMany()
Updates multiple entries matching the parameters.
Syntax: `updateMany(parameters) => { count: number }`
### Parameters
| Parameter | Type | Description |
| --------- | --------------------------------------------------------- | ------------------------------------------------------- |
| `where` | [`WhereParameter`](/dev-docs/api/query-engine/filtering/) | [Filters](/dev-docs/api/query-engine/filtering/) to use |
| `data` | Object | Input data |
### Example
```js
await strapi.db.query("api::shop.article").updateMany({
where: {
price: 20,
},
data: {
price: 18,
},
});
// { count: 42 }
```
## deleteMany()
Deletes multiple entries matching the parameters.
Syntax: `deleteMany(parameters) => { count: number }`
### Parameters
| Parameter | Type | Description |
| --------- | --------------------------------------------------------- | ------------------------------------------------------- |
| `where` | [`WhereParameter`](/dev-docs/api/query-engine/filtering/) | [Filters](/dev-docs/api/query-engine/filtering/) to use |
### Example
```js
await strapi.db.query("api::blog.article").deleteMany({
where: {
title: {
$startsWith: "v3",
},
},
});
// { count: 42 }
```
## Aggregations
### count()
Counts entries matching the parameters.
Syntax: `count(parameters) => number`
#### Parameters
| Parameter | Type | Description |
| --------- | --------------------------------------------------------- | ------------------------------------------------------- |
| `where` | [`WhereParameter`](/dev-docs/api/query-engine/filtering/) | [Filters](/dev-docs/api/query-engine/filtering/) to use |
```js
const count = await strapi.db.query("api::blog.article").count({
where: {
title: {
$startsWith: "v3",
},
},
});
// 12
```
# Filtering
Source: https://docs-v4.strapi.io/dev-docs/api/query-engine/filtering
# Filtering
The [Query Engine API](/dev-docs/api/query-engine/) offers the ability to filter results found with its [findMany()](/dev-docs/api/query-engine/single-operations#findmany) method.
Results are filtered with the `where` parameter that accepts [logical operators](#logical-operators) and [attribute operators](#attribute-operators). Every operator should be prefixed with `$`.
## Logical operators
### `$and`
All nested conditions must be `true`.
**Example**
```js
const entries = await strapi.db.query('api::article.article').findMany({
where: {
$and: [
{
title: 'Hello World',
},
{
createdAt: { $gt: '2021-11-17T14:28:25.843Z' },
},
],
},
});
```
`$and` is used implicitly when passing an object with nested conditions:
```js
const entries = await strapi.db.query('api::article.article').findMany({
where: {
title: 'Hello World',
createdAt: { $gt: '2021-11-17T14:28:25.843Z' },
},
});
```
### `$or`
One or many nested conditions must be `true`.
**Example**
```js
const entries = await strapi.db.query('api::article.article').findMany({
where: {
$or: [
{
title: 'Hello World',
},
{
createdAt: { $gt: '2021-11-17T14:28:25.843Z' },
},
],
},
});
```
### `$not`
Negates the nested conditions.
**Example**
```js
const entries = await strapi.db.query('api::article.article').findMany({
where: {
$not: {
title: 'Hello World',
},
},
});
```
:::note
`$not` can be used:
- as a logical operator (e.g. in `where: { $not: { // conditions… }}`)
- or [as an attribute operator](#not-2) (e.g. in `where: { attribute-name: $not: { … } }`).
:::
:::tip
`$and`, `$or` and `$not` operators are nestable inside of another `$and`, `$or` or `$not` operator.
:::
## Attribute Operators
:::caution
Using these operators may give different results depending on the database's implementation, as the comparison is handled by the database and not by Strapi.
:::
### `$not`
Negates nested condition(s).
**Example**
```js
const entries = await strapi.db.query('api::article.article').findMany({
where: {
title: {
$not: {
$contains: 'Hello World',
},
},
},
});
```
### `$eq`
Attribute equals input value.
**Example**
```js
const entries = await strapi.db.query('api::article.article').findMany({
where: {
title: {
$eq: 'Hello World',
},
},
});
```
`$eq` can be omitted:
```js
const entries = await strapi.db.query('api::article.article').findMany({
where: {
title: 'Hello World',
},
});
```
### `$eqi`
Attribute equals input value (case-insensitive).
**Example**
```js
const entries = await strapi.db.query('api::article.article').findMany({
where: {
title: {
$eqi: 'HELLO World',
},
},
});
```
### `$ne`
Attribute does not equal input value.
**Example**
```js
const entries = await strapi.db.query('api::article.article').findMany({
where: {
title: {
$ne: 'ABCD',
},
},
});
```
### `$nei`
Attribute does not equal input value (case-insensitive).
**Example**
```js
const entries = await strapi.db.query('api::article.article').findMany({
where: {
title: {
$nei: 'abcd',
},
},
});
```
### `$in`
Attribute is contained in the input list.
**Example**
```js
const entries = await strapi.db.query('api::article.article').findMany({
where: {
title: {
$in: ['Hello', 'Hola', 'Bonjour'],
},
},
});
```
`$in` can be omitted when passing an array of values:
```js
const entries = await strapi.db.query('api::article.article').findMany({
where: {
title: ['Hello', 'Hola', 'Bonjour'],
},
});
```
### `$notIn`
Attribute is not contained in the input list.
**Example**
```js
const entries = await strapi.db.query('api::article.article').findMany({
where: {
title: {
$notIn: ['Hello', 'Hola', 'Bonjour'],
},
},
});
```
### `$lt`
Attribute is less than the input value.
**Example**
```js
const entries = await strapi.db.query('api::article.article').findMany({
where: {
rating: {
$lt: 10,
},
},
});
```
### `$lte`
Attribute is less than or equal to the input value.
**Example**
```js
const entries = await strapi.db.query('api::article.article').findMany({
where: {
rating: {
$lte: 10,
},
},
});
```
### `$gt`
Attribute is greater than the input value.
**Example**
```js
const entries = await strapi.db.query('api::article.article').findMany({
where: {
rating: {
$gt: 5,
},
},
});
```
### `$gte`
Attribute is greater than or equal to the input value.
**Example**
```js
const entries = await strapi.db.query('api::article.article').findMany({
where: {
rating: {
$gte: 5,
},
},
});
```
### `$between`
Attribute is between the 2 input values, boundaries included (e.g., `$between[1, 3]` will also return `1` and `3`).
**Example**
```js
const entries = await strapi.db.query('api::article.article').findMany({
where: {
rating: {
$between: [1, 20],
},
},
});
```
### `$contains`
Attribute contains the input value (case-sensitive).
**Example**
```js
const entries = await strapi.db.query('api::article.article').findMany({
where: {
title: {
$contains: 'Hello',
},
},
});
```
### `$notContains`
Attribute does not contain the input value (case-sensitive).
**Example**
```js
const entries = await strapi.db.query('api::article.article').findMany({
where: {
title: {
$notContains: 'Hello',
},
},
});
```
### `$containsi`
Attribute contains the input value. `$containsi` is not case-sensitive, while [$contains](#contains) is.
**Example**
```js
const entries = await strapi.db.query('api::article.article').findMany({
where: {
title: {
$containsi: 'hello',
},
},
});
```
### `$notContainsi`
Attribute does not contain the input value. `$notContainsi` is not case-sensitive, while [$notContains](#notcontains) is.
**Example**
```js
const entries = await strapi.db.query('api::article.article').findMany({
where: {
title: {
$notContainsi: 'hello',
},
},
});
```
### `$startsWith`
Attribute starts with input value.
**Example**
```js
const entries = await strapi.db.query('api::article.article').findMany({
where: {
title: {
$startsWith: 'ABCD',
},
},
});
```
### `$endsWith`
Attribute ends with input value.
**Example**
```js
const entries = await strapi.db.query('api::article.article').findMany({
where: {
title: {
$endsWith: 'ABCD',
},
},
});
```
### `$null`
Attribute is `null`.
**Example**
```js
const entries = await strapi.db.query('api::article.article').findMany({
where: {
title: {
$null: true,
},
},
});
```
### `$notNull`
Attribute is not `null`.
**Example**
```js
const entries = await strapi.db.query('api::article.article').findMany({
where: {
title: {
$notNull: true,
},
},
});
```
# Ordering & Pagination
Source: https://docs-v4.strapi.io/dev-docs/api/query-engine/order-pagination
# Ordering & Paginating
The [Query Engine API](/dev-docs/api/query-engine) offers the ability to [order](#ordering) and [paginate](#pagination) results.
## Ordering
To order results returned by the Query Engine, use the `orderBy` parameter. Results can be ordered based on a [single](#single) or on [multiple](#multiple) attributes and can also use [relational ordering](#relational-ordering).
### Single
```js
strapi.db.query('api::article.article').findMany({
orderBy: 'id',
});
// single with direction
strapi.db.query('api::article.article').findMany({
orderBy: { id: 'asc' },
});
```
### Multiple
```js
strapi.db.query('api::article.article').findMany({
orderBy: ['id', 'name'],
});
// multiple with direction
strapi.db.query('api::article.article').findMany({
orderBy: [{ title: 'asc' }, { publishedAt: 'desc' }],
});
```
### Relational ordering
```js
strapi.db.query('api::article.article').findMany({
orderBy: {
author: {
name: 'asc',
},
},
});
```
## Pagination
To paginate results returned by the Query Engine API, use the `offset` and `limit` parameters:
```js
strapi.db.query('api::article.article').findMany({
offset: 15,
limit: 10,
});
```
# Populating
Source: https://docs-v4.strapi.io/dev-docs/api/query-engine/populating
# Populating
Relations and components have a unified API for populating them.
To populate all the root level relations, use `populate: true`:
```js
strapi.db.query('api::article.article').findMany({
populate: true,
});
```
Select which data to populate by passing an array of attribute names:
```js
strapi.db.query('api::article.article').findMany({
populate: ['componentA', 'relationA'],
});
```
An object can be passed for more advanced usage:
```js
strapi.db.query('api::article.article').findMany({
populate: {
componentB: true,
dynamiczoneA: true,
relation: someLogic || true,
},
});
```
Complex populating can also be achieved by applying `where` filters and select or populate nested relations:
```js
strapi.db.query('api::article.article').findMany({
where: {
relationA: {
name: {
$contains: 'Strapi',
},
},
},
repeatableComponent: {
select: ['someAttributeName'],
orderBy: ['someAttributeName'],
populate: {
componentRelationA: true,
dynamiczoneA: true,
},
},
});
```
When dealing with polymorphic data structures (dynamic zones, polymorphic relations, etc...), it is possible to use populate fragments to have a better granularity on the populate strategy.
```js
strapi.db.query('api::article.article').findMany('api::article.article', {
populate: {
dynamicZone: {
on: {
'components.foo': {
select: ['title'],
where: { title: { $contains: 'strapi' } },
},
'components.bar': {
select: ['name'],
},
},
},
morphAuthor: {
on: {
'plugin::users-permissions.user': {
select: ['username'],
},
'api::author.author': {
select: ['name'],
},
},
},
},
});
```
# Single Operations
Source: https://docs-v4.strapi.io/dev-docs/api/query-engine/single-operations
# Single Operations
## findOne()
:::note
Only use the Query Engine's findOne if the [Entity Service findOne](/dev-docs/api/entity-service/crud#findone) can't cover your use case.
:::
Finds the first entry matching the parameters.
Syntax: `findOne(parameters) ⇒ Entry`
### Parameters
| Parameter | Type | Description |
| ---------- | -------------- | --------- |
| `select` | String, or Array of strings | [Attributes](/dev-docs/backend-customization/models#model-attributes) to return |
| `where` | [`WhereParameter`](/dev-docs/api/query-engine/filtering/) | [Filters](/dev-docs/api/query-engine/filtering/) to use |
| `offset` | Integer | Number of entries to skip |
| `orderBy` | [`OrderByParameter`](/dev-docs/api/query-engine/order-pagination/) | [Order](/dev-docs/api/query-engine/order-pagination/) definition |
| `populate` | [`PopulateParameter`](/dev-docs/api/query-engine/populating/) | Relations to [populate](/dev-docs/api/query-engine/populating/) |
### Example
```js
const entry = await strapi.db.query('api::blog.article').findOne({
select: ['title', 'description'],
where: { title: 'Hello World' },
populate: { category: true },
});
```
## findMany()
:::note
Only use the Query Engine's findMany if the [Entity Service findMany](/dev-docs/api/entity-service/crud#findmany) can't cover your use case.
:::
Finds entries matching the parameters.
Syntax: `findMany(parameters) ⇒ Entry[]`
### Parameters
| Parameter | Type | Description |
| --------- | ------------------------------ | ------------------------------------------ |
| `select` | String, or Array of strings | [Attributes](/dev-docs/backend-customization/models#model-attributes) to return |
| `where` | [`WhereParameter`](/dev-docs/api/query-engine/filtering/) | [Filters](/dev-docs/api/query-engine/filtering/) to use |
| `limit` | Integer | Number of entries to return |
| `offset` | Integer | Number of entries to skip |
| `orderBy` | [`OrderByParameter`](/dev-docs/api/query-engine/order-pagination/) | [Order](/dev-docs/api/query-engine/order-pagination/) definition |
| `populate` | [`PopulateParameter`](/dev-docs/api/query-engine/populating/) | Relations to [populate](/dev-docs/api/query-engine/populating/)
### Example
```js
const entries = await strapi.db.query('api::blog.article').findMany({
select: ['title', 'description'],
where: { title: 'Hello World' },
orderBy: { publishedAt: 'DESC' },
populate: { category: true },
});
```
## findWithCount()
Finds and counts entries matching the parameters.
Syntax: `findWithCount(parameters) => [Entry[], number]`
### Parameters
| Parameter | Type | Description |
| --------- | ------------------------------ | ------------------------------------------ |
| `select` | String, or Array of strings | [Attributes](/dev-docs/backend-customization/models#model-attributes) to return |
| `where` | [`WhereParameter`](/dev-docs/api/query-engine/filtering/) | [Filters](/dev-docs/api/query-engine/filtering/) to use |
| `limit` | Integer | Number of entries to return |
| `offset` | Integer | Number of entries to skip |
| `orderBy` | [`OrderByParameter`](/dev-docs/api/query-engine/order-pagination/) | [Order](/dev-docs/api/query-engine/order-pagination/) definition |
| `populate` | [`PopulateParameter`](/dev-docs/api/query-engine/populating/) | Relations to [populate](/dev-docs/api/query-engine/populating/)
|
### Example
```js
const [entries, count] = await strapi.db.query('api::blog.article').findWithCount({
select: ['title', 'description'],
where: { title: 'Hello World' },
orderBy: { title: 'DESC' },
populate: { category: true },
});
```
## create()
:::note
Only use the Query Engine's create if the [Entity Service create](/dev-docs/api/entity-service/crud#create) can't cover your use case.
:::
Creates one entry and returns it.
Syntax: `create(parameters) => Entry`
### Parameters
| Parameter | Type | Description |
| --------- | ------------------------------ | ------------------------------------------ |
| `select` | String, or Array of strings | [Attributes](/dev-docs/backend-customization/models#model-attributes) to return |
| `populate` | [`PopulateParameter`](/dev-docs/api/query-engine/populating/) | Relations to [populate](/dev-docs/api/query-engine/populating/) |
| `data` | Object | Input data |
### Example
```js
const entry = await strapi.db.query('api::blog.article').create({
data: {
title: 'My Article',
},
});
```
## update()
:::note
Only use the Query Engine's update if the [Entity Service update](/dev-docs/api/entity-service/crud#update) can't cover your use case.
:::
Updates one entry and returns it.
Syntax: `update(parameters) => Entry`
### Parameters
| Parameter | Type | Description |
| --------- | ------------------------------ | ------------------------------------------ |
| `select` | String, or Array of strings | [Attributes](/dev-docs/backend-customization/models#model-attributes) to return |
| `populate` | [`PopulateParameter`](/dev-docs/api/query-engine/populating/) | Relations to [populate](/dev-docs/api/query-engine/populating/)
| `where` | [`WhereParameter`](/dev-docs/api/query-engine/filtering/) | [Filters](/dev-docs/api/query-engine/filtering/) to use |
| `data` | Object | Input data |
### Example
```js
const entry = await strapi.db.query('api::blog.article').update({
where: { id: 1 },
data: {
title: 'xxx',
},
});
```
## delete()
:::note
Only use the Query Engine's delete if the [Entity Service delete](/dev-docs/api/entity-service/crud#delete) can't cover your use case.
:::
Deletes one entry and returns it.
Syntax: `delete(parameters) => Entry`
### Parameters
| Parameter | Type | Description |
| --------- | ------------------------------ | ------------------------------------------ |
| `select` | String, or Array of strings | [Attributes](/dev-docs/backend-customization/models#model-attributes) to return |
| `populate` | [`PopulateParameter`](/dev-docs/api/query-engine/populating/) | Relations to [populate](/dev-docs/api/query-engine/populating/)
| `where` | [`WhereParameter`](/dev-docs/api/query-engine/filtering/) | [Filters](/dev-docs/api/query-engine/filtering/) to use |
### Example
```js
const entry = await strapi.db.query('api::blog.article').delete({
where: { id: 1 },
});
```
# REST API reference
Source: https://docs-v4.strapi.io/dev-docs/api/rest
# REST API
The REST API allows accessing the [content-types](/dev-docs/backend-customization/models) through API endpoints. Strapi automatically creates [API endpoints](#endpoints) when a content-type is created. [API parameters](/dev-docs/api/rest/parameters) can be used when querying API endpoints to refine the results.
:::caution
All content types are private by default and need to be either made public or queries need to be authenticated with the proper permissions. See the [Quick Start Guide](/dev-docs/quick-start#step-3-set-roles--permissions), the user guide for the [Users & Permissions plugin](/user-docs/users-roles-permissions/configuring-end-users-roles), and [API tokens configuration documentation](/dev-docs/configurations/api-tokens) for more details.
:::
:::note
By default, the REST API responses only include top-level fields and does not populate any relations, media fields, components, or dynamic zones. Use the [`populate` parameter](/dev-docs/api/rest/populate-select) to populate specific fields. Ensure that the find permission is given to the field(s) for the relation(s) you populate.
:::
:::strapi Upload plugin API
The Upload plugin (which handles media found in the [Media Library](/user-docs/media-library)) has a specific API described in the [Upload plugin documentation](/dev-docs/plugins/upload).
:::
## Endpoints
For each Content-Type, the following endpoints are automatically generated:
Examples:
:::note
[Components](/dev-docs/backend-customization/models#components) don't have API endpoints.
:::
:::tip
API endpoints are prefixed with `/api` by default. This can be changed by setting a different value for the `rest.prefix` configuration parameter (see [API calls configuration](/dev-docs/configurations/api)).
:::
## Requests
Requests return a response as an object which usually includes the following keys:
- `data`: the response data itself, which could be:
- a single entry, as an object with the following keys:
- `id` (number)
- `attributes` (object)
- `meta` (object)
- a list of entries, as an array of objects
- a custom response
- `meta` (object): information about pagination, publication state, available locales, etc.
- `error` (object, _optional_): information about any [error](/dev-docs/error-handling) thrown by the request
:::note
Some plugins (including Users & Permissions and Upload) may not follow this response format.
:::
# Filters, Locale, and Publication State
Source: https://docs-v4.strapi.io/dev-docs/api/rest/filters-locale-publication
# REST API: Filtering, Locale, and Publication State
The [REST API](/dev-docs/api/rest) offers the ability to filter results found with its ["Get entries"](/dev-docs/api/rest#get-entries) method.
Using optional Strapi features can provide some more filters:
- If the [Internationalization (i18n) plugin](/dev-docs/plugins/i18n.md) is enabled on a content-type, it's possible to filter by locale.
- If the [Draft & Publish](/user-docs/content-manager/saving-and-publishing-content) is enabled, it's possible to filter based on a `live` or `preview` state.
:::tip
## Locale
:::prerequisites
- The [Internationalization (i18n) plugin](/dev-docs/plugins/i18n.md) should be installed.
- [Localization should be enabled for the content-type](/user-docs/content-type-builder/creating-new-content-type.md#creating-a-new-content-type).
:::
The `locale` API parameter can be used to get entries from a specific locale (see [i18n plugin documentation](/dev-docs/plugins/i18n.md#getting-localized-entries-with-the-locale-parameter)).
:::tip
To retrieve only draft entries, combine the `preview` publication state and the `publishedAt` fields:
`GET /api/articles?publicationState=preview&filters[publishedAt][$null]=true`
```js
const qs = require('qs');
const query = qs.stringify({
publicationState: 'preview',
filters: {
publishedAt: {
$null: true,
},
},
}, {
encodeValuesOnly: true, // prettify URL
});
await request(`/api/articles?${query}`);
```
:::
# REST API Guides
Source: https://docs-v4.strapi.io/dev-docs/api/rest/guides/intro
# REST API Guides
The [REST API reference](/dev-docs/api/rest) documentation is meant to provide a quick reference for all the endpoints and parameters available.
## Guides
The following guides, officially maintained by the Strapi Documentation team, cover dedicated topics and provide detailed explanations (guides indicated with 🧠) or step-by-step instructions (guides indicated with 🛠️) for some use cases:
## Additional resources
Additional tutorials and guides can be found in the following blog posts:
# How to populate creator fields
Source: https://docs-v4.strapi.io/dev-docs/api/rest/guides/populate-creator-fields
# 🛠️ How to populate creator fields such as `createdBy` and `updatedBy`
The creator fields `createdBy` and `updatedBy` are removed from the [REST API](/dev-docs/api/rest) response by default. These 2 fields can be returned in the REST API by activating the `populateCreatorFields` parameter at the content-type level.
:::note
The `populateCreatorFields` property is not available to the GraphQL API.
Only the following fields will be populated: `id`, `firstname`, `lastname`, `username`, `preferedLanguage`, `createdAt`, and `updatedAt`.
:::
To add `createdBy` and `updatedBy` to the API response:
1. Open the content-type `schema.json` file.
2. Add `"populateCreatorFields": true` to the `options` object:
```json
"options": {
"draftAndPublish": true,
"populateCreatorFields": true
},
```
3. Save the `schema.json`.
4. Create a new route middleware either using the [generate CLI](/dev-docs/cli.md) or by manually creating a new file in `./src/api/[content-type-name]/middlewares/[your-middleware-name].js`
5. Add the following piece of code, you can modify this example to suit your needs:
```js title="./src/api/test/middlewares/defaultTestPopulate.js"
"use strict";
module.exports = (config, { strapi }) => {
return async (ctx, next) => {
if (!ctx.query.populate) {
ctx.query.populate = ["createdBy", "updatedBy"];
}
await next();
};
};
```
6. Modify your default route factory to enable this middleware on the specific routes you want this population to apply to and replacing the content-type/middleware name with yours:
```js title="./src/api/test/routes/test.js"
"use strict";
const { createCoreRouter } = require("@strapi/strapi").factories;
module.exports = createCoreRouter("api::test.test", {
config: {
find: {
middlewares: ["api::test.default-test-populate"],
},
findOne: {
middlewares: ["api::test.default-test-populate"],
},
},
});
```
REST API requests with no `populate` parameter will include the `createdBy` or `updatedBy` fields by default.
# Understanding populate
Source: https://docs-v4.strapi.io/dev-docs/api/rest/guides/understanding-populate
# 🧠 Understanding the `populate` parameter for the REST API
When querying content-types with Strapi's [REST API](/dev-docs/api/rest), by default, responses only include top-level fields and do not include any relations, media fields, components, or dynamic zones.
Populating in the context of the Strapi REST API means including additional content with your response by returning more fields than the ones returned by default. You use the [`populate` parameter](#population) to achieve this.
:::info
Throughout this guide, examples are built with real data queried from the server included with the [FoodAdvisor](https://github.com/strapi/foodadvisor) example application. To test examples by yourself, setup FoodAdvisor, start the server in the `/api/` folder, and ensure that proper `find` permissions are given for the queried content-types before sending your queries.
:::
The present guide will cover detailed explanations for the following use cases:
- populate [all fields and relations, 1 level deep](#populate-all-relations-and-fields-1-level-deep),
- populate [some fields and relations, 1 level deep](#populate-1-level-deep-for-specific-relations),
- populate [some fields and relations, several levels deep](#populate-several-levels-deep-for-specific-relations),
- populate [components](#populate-components),
- populate [dynamic zones](#populate-dynamic-zones).
:::info
Populating several levels deep is often called "deep populate".
:::
:::strapi Advanced use case: Populating creator fields
In addition to the various ways of using the `populate` parameter in your queries, you can also build a custom controller as a workaround to populate creator fields (e.g., `createdBy` and `updatedBy`). This is explained in the dedicated [How to populate creator fields](/dev-docs/api/rest/guides/populate-creator-fields) guide.
:::
## Populate all relations and fields, 1 level deep
You can return all relations, media fields, components and dynamic zones with a single query. For relations, this will only work 1 level deep, to prevent performance issues and long response times.
To populate everything 1 level deep, add the `populate=*` parameter to your query.
The following diagram compares data returned by the [FoodAdvisor](https://github.com/strapi/foodadvisor) example application with and without populating everything 1 level deep:
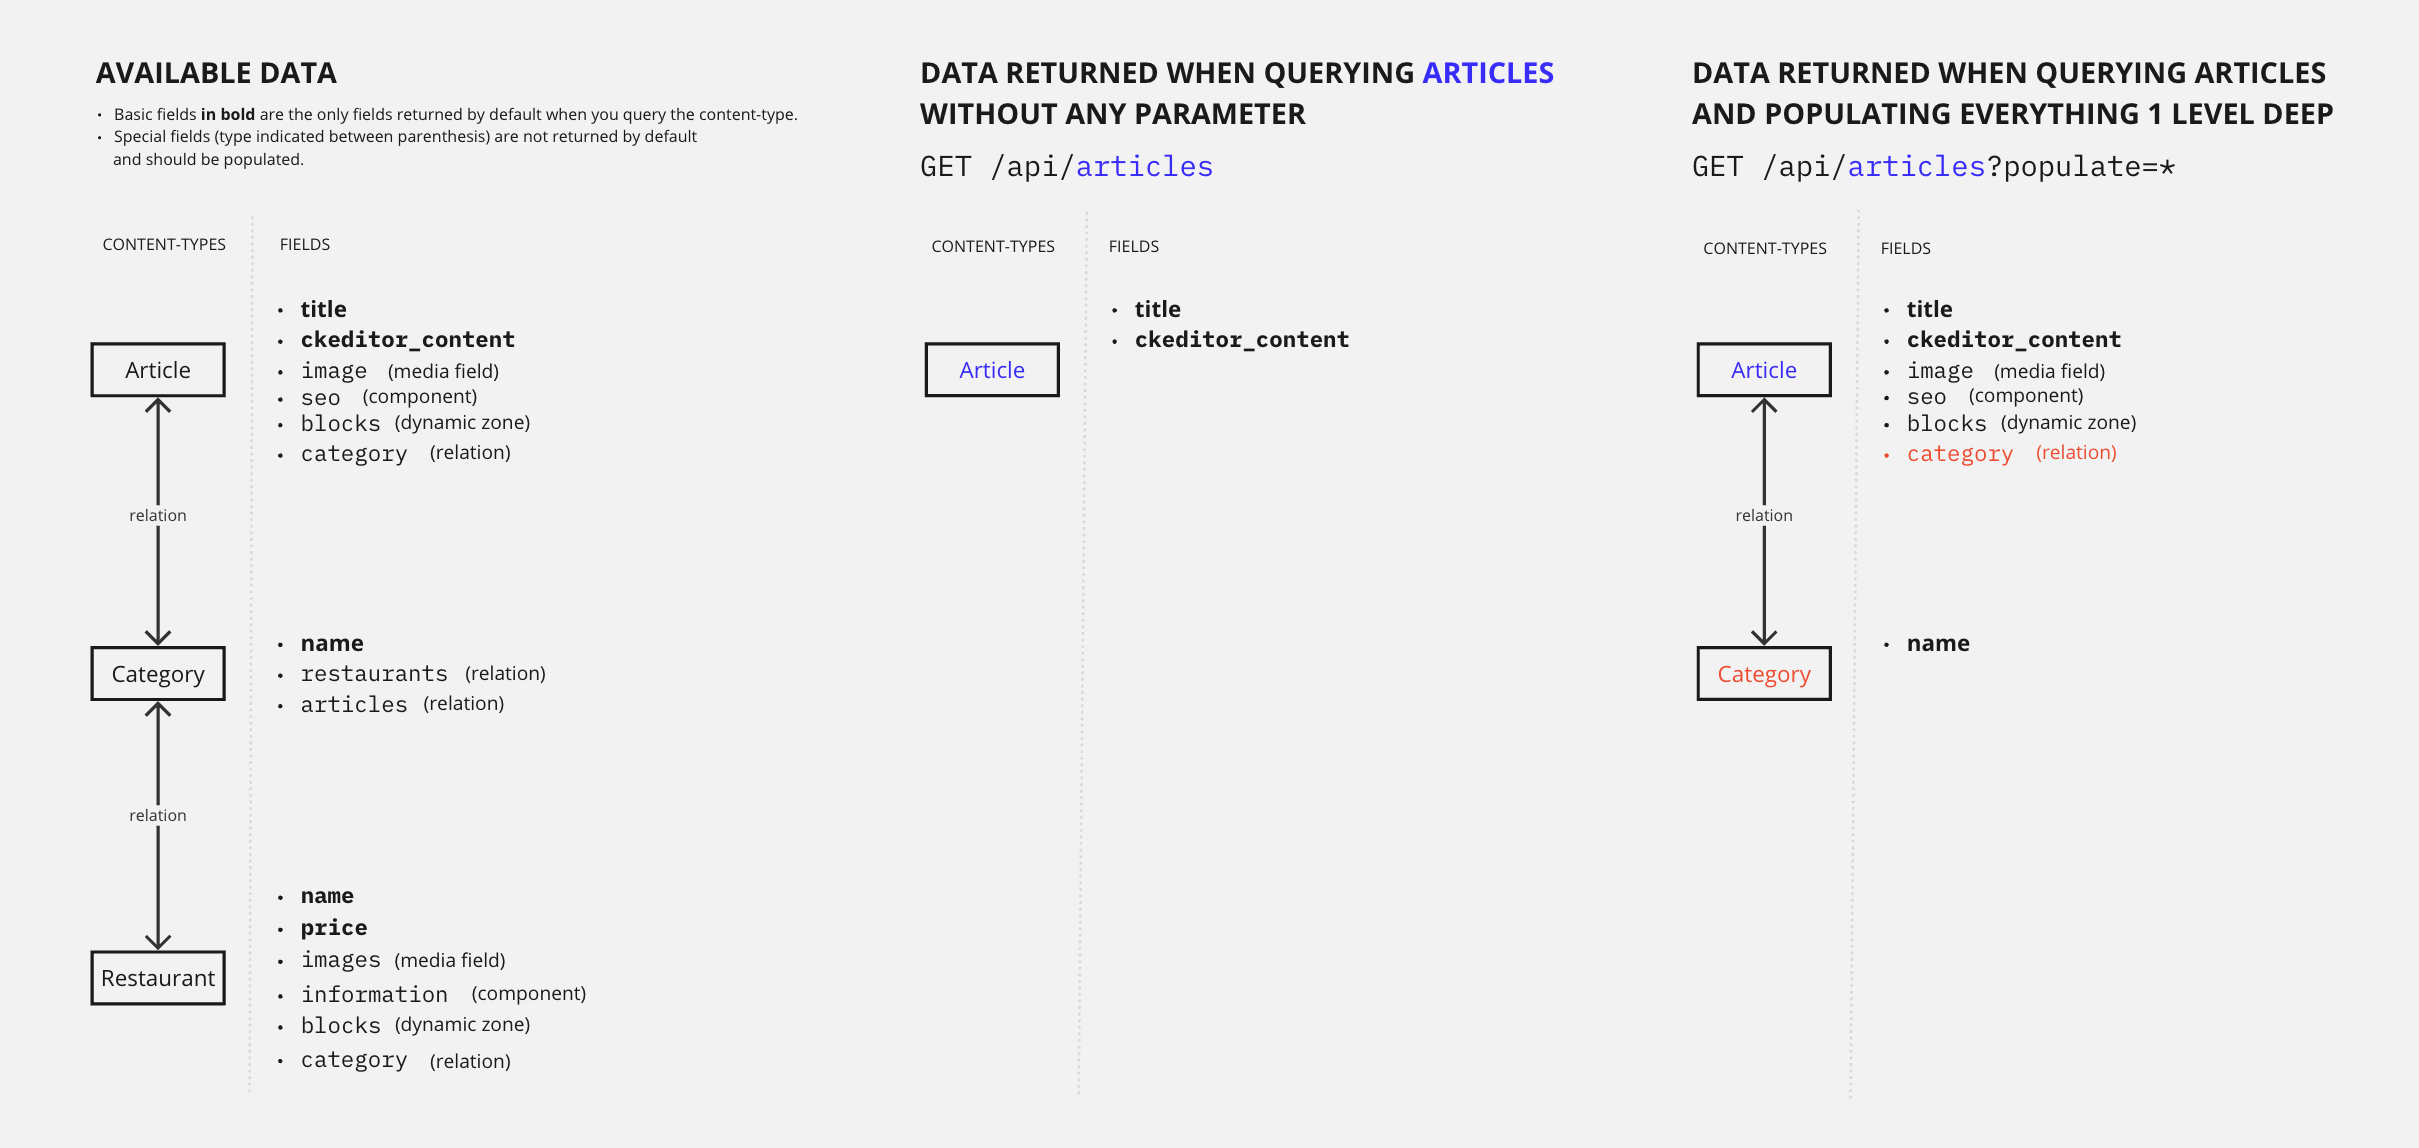
Let's compare and explain what happens with and without this query parameter:
### Example: Without `populate`
Without the populate parameter, a `GET` request to `/api/articles` only returns the default attributes and does not return any media fields, relations, components or dynamic zones.
The following example is the full response for all 4 entries from the `articles` content-types.
Notice how the response only includes the `title`, `slug`, `createdAt`, `updatedAt`, `publishedAt`, and `locale` fields, and the field content of the article as handled by the CKEditor plugin (`ckeditor_content`, truncated for brevity):
### Example: With `populate=*`
With the `populate=*` parameter, a `GET` request to `/api/articles` also returns all media fields, first-level relations, components and dynamic zones.
The following example is the full response for the first of all 4 entries from the `articles` content-types (the data from articles with ids 2, 3, and 4 is truncated for brevity).
Scroll down to see that the response size is much bigger than without populate. The response now includes additional fields (see highlighted lines) such as:
* the `image` media field (which stores all information about the article cover, including all its different formats),
* the first-level fields of the `blocks` dynamic zone and the `seo` component,
* the `category` relation and its fields,
* and even some information about the articles translated in other languages, as shown by the `localizations` object.
:::tip
To populate deeply nested components, see the [populate components](#populate-components) section.
:::
## Populate specific relations and fields
You can also populate specific relations and fields, by explicitly defining what to populate. This requires that you know the name of fields and relations to populate.
Relations and fields populated this way can be 1 or several levels deep. The following diagram compares data returned by the [FoodAdvisor](https://github.com/strapi/foodadvisor) example application when you populate [1 level deep](#populate-1-level-deep-for-specific-relations) vs. [2 levels deep](#populate-several-levels-deep-for-specific-relations):
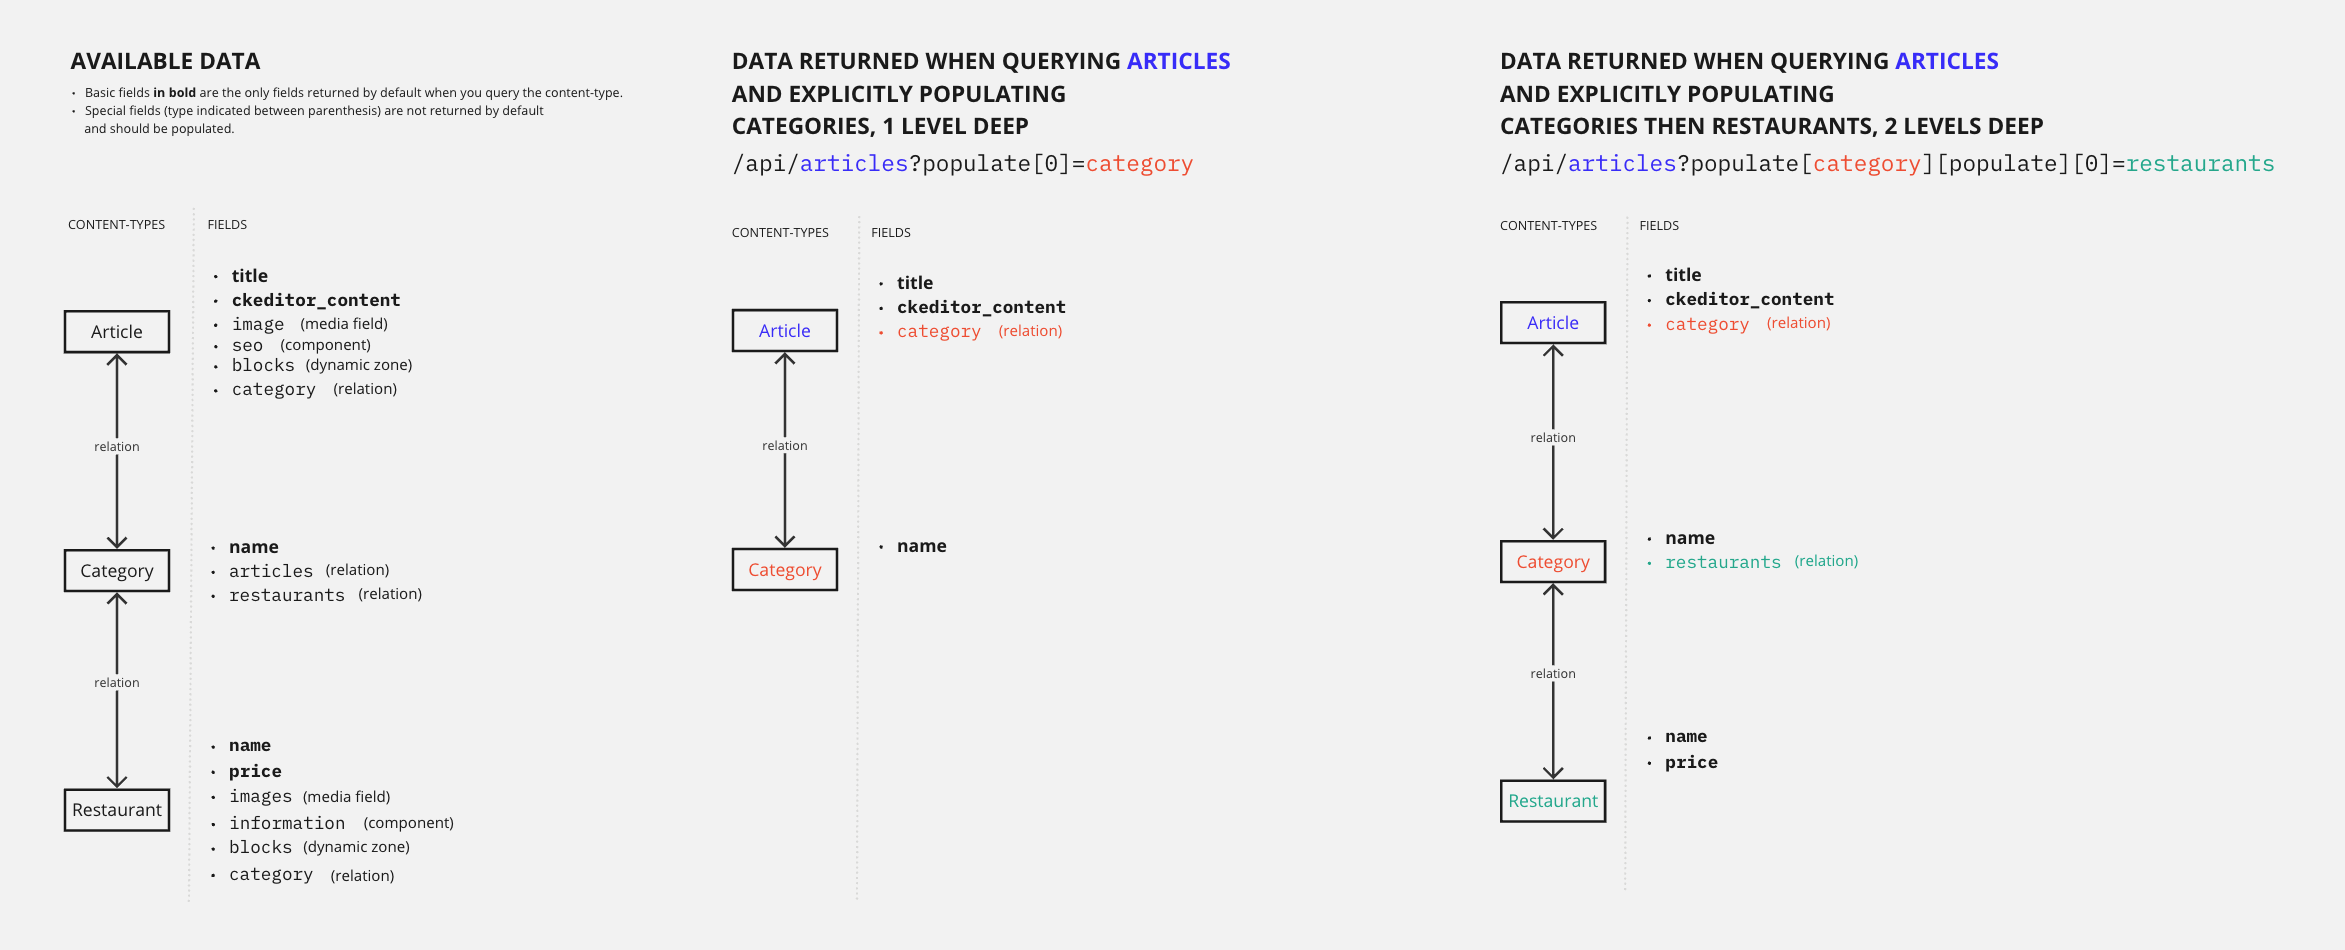
Populate as an object vs. populate as an array: Using the interactive query builder
The syntax for advanced query parameters can be quite complex to build manually. We recommend you use our [interactive query builder](/dev-docs/api/rest/interactive-query-builder) tool to generate the URL.
Using this tool, you will write clean and readable requests in a familiar (JavaScript) format, which should help you understand the differences between different queries and different ways of populating. For instance, populating 2 levels deep implies using populate as an object, while populating several relations 1 level deep implies using populate as an array:
### Populate 1 level deep for specific relations
You can populate specific relations 1 level deep by using the populate parameter as an array.
Since the REST API uses the [LHS bracket notation](https://christiangiacomi.com/posts/rest-design-principles/#lhs-brackets) (i.e., with square brackets `[]`), the parameter syntaxes to populate 1 level deep would look like the following:
| How many relations to populate | Syntax example |
|-------------------------------|--------------------|
| Only 1 relation | `populate[0]=a-relation-name` |
| Several relations | `populate[0]=relation-name&populate[1]=another-relation-name&populate[2]=yet-another-relation-name` |
Let's compare and explain what happens with and without populating relations 1 level deep when sending queries to the [FoodAdvisor](https://github.com/strapi/foodadvisor) example application:
#### Example: Without `populate`
Without the populate parameter, a `GET` request to `/api/articles` only returns the default attributes.
The following example is the full response for all 4 entries from the `articles` content-type.
Notice that the response does not include any media fields, relations, components or dynamic zones:
#### Example: With `populate[0]=category`
With `populate[0]=category` added to the request, we explicitly ask to include some information about `category`, which is a relation field that links the `articles` and the `categories` content-types.
The following example is the full response for all 4 entries from the `articles` content-type.
Notice that the response now includes additional data with the `category` field for each article (see highlighted lines):
### Populate several levels deep for specific relations
You can also populate specific relations several levels deep. For instance, when you populate a relation which itself populates another relation, you are populating 2 levels deep. Populating 2 levels deep is the example covered in this guide.
:::caution
There is no limit on the number of levels that can be populated. However, the deeper the populates, the more the request will take time to be performed.
:::
Since the REST API uses the [LHS bracket notation](https://christiangiacomi.com/posts/rest-design-principles/#lhs-brackets), (i.e., with square brackets `[]`), for instance if you want to populate a relation nested inside another relation, the parameter syntax would look like the following:
`populate[first-level-relation-to-populate][populate][0]=second-level-relation-to-populate`
:::tip
The syntax for advanced query parameters can be quite complex to build manually. We recommend you use our [interactive query builder](/dev-docs/api/rest/interactive-query-builder) tool to generate the URL. For instance, the `/api/articles?populate[category][populate][0]=restaurants` URL used in the following examples has been generated by converting the following object using our tool:
```json
{
populate: {
category: {
populate: ['restaurants'],
},
},
}
```
:::
The [FoodAdvisor](https://github.com/strapi/foodadvisor) example application includes various levels of relations between content-types. For instance:
- an `article` content-type includes a relation with the `category` content-type,
- but a `category` can also be assigned to any `restaurant` content-type.
With a single `GET` request to `/api/articles` and the appropriate populate parameters, you can return information about articles, restaurants, and categories simultaneously.
Let's compare and explain the responses returned with `populate[0]=category` (1 level deep) and `populate[category][populate][0]=restaurants` (2 levels deep) when sending queries to FoodAdvisor:
#### Example: With 1-level deep population
When we only populate 1 level deep, asking for the categories associated to articles, we can get the following example response (highlighted lines show the `category` relations field):
#### Example: With 2-level deep population
When we populate 2 levels deep, asking for the categories associated to articles, but also for restaurants associated to these categories, we can get the following example response.
Notice that we now have the `restaurants` relation field included with the response inside the `category` relation (see highlighted lines):
### Populate components
Components and dynamic zones are not included in responses by default and you need to explicitly populate each dynamic zones, components, and their nested components.
Since the REST API uses the [LHS bracket notation](https://christiangiacomi.com/posts/rest-design-principles/#lhs-brackets), (i.e., with square brackets `[]`), you need to pass all elements in a `populate` array. Nested fields can also be passed, and the parameter syntax could look like the following:
`populate[0]=a-first-field&populate[1]=a-second-field&populate[2]=a-third-field&populate[3]=a-third-field.a-nested-field&populate[4]=a-third-field.a-nested-component.a-nested-field-within-the-component`
:::tip
The syntax for advanced query parameters can be quite complex to build manually. We recommend you use our [interactive query builder](/dev-docs/api/rest/interactive-query-builder) tool to generate the URL. For instance, the `/api/articles?populate[0]=seo&populate[1]=seo.metaSocial&populate[2]=seo.metaSocial.image` URL used in the following examples has been generated by converting the following object using our tool:
```json
{
populate: [
'seoData',
'seoData.sharedImage',
'seoData.sharedImage.media',
],
},
```
:::
The [FoodAdvisor](https://github.com/strapi/foodadvisor) example application includes various components and even components nested inside other components. For instance:
- an `article` content-type includes a `seo` component
#### Example: 1st level and 2nd level component
When we populate 2 levels deep, asking both for the `seo` component and the `metaSocial` component nested inside `seo`, we can get the following example response.
Notice that we now have the `metaSocial` component-related data included with the response (see highlighted lines):
### Populate dynamic zones
Dynamic zones are highly dynamic content structures by essence.
When populating dynamic zones, you can choose between the following 2 strategies:
| Strategy name | Use case |
| ---------------------------------------------------- | ------------------------------------------------------------- |
| [Shared population](#shared-population-strategy) | Apply a unique behavior to all the dynamic zone's components. |
| [Detailed population](#detailed-population-strategy) | Explicitly define what to populate with the response. |
#### Shared population strategy
With the shared population strategy, you apply the same population to all the components of a dynamic zone.
For instance, in the [FoodAdvisor](https://github.com/strapi/foodadvisor) example application:
- A `blocks` dynamic zone exists the `article` content-type
##### Example: Populating the dynamic zone and applying a shared strategy to its components
When we populate the `blocks` dynamic zone and apply a shared population strategy to all its components with `[populate]=*`, we not only include components fields but also their 1st-level relations, as shown in the highlighted lines of the following example response:
#### Detailed population strategy
With the detailed population strategy, you can define per-component populate queries using the `on` property.
For instance, in the [FoodAdvisor](https://github.com/strapi/foodadvisor) example application:
- A `blocks` dynamic zone exists the `article` content-type
##### Example: Detailed population strategy
When we populate the `blocks` dynamic zone and apply a detailed population strategy, we explicitly define which data to populate.
In the following example response, highlighted lines show differences with the shared population strategy:
- We deeply populate the `articles` relation of the `relatedArticles` component, and even the `image` media field of the related article.
- But because we have only asked to populate everything for the `CtaCommandLine` component and have not defined anything for the `faq` component, no data from the `faq` component is returned.
# Interactive Query Builder
Source: https://docs-v4.strapi.io/dev-docs/api/rest/interactive-query-builder
# Build your query URL with Strapi's interactive tool
A wide range of parameters can be used and combined to query your content with the [REST API](/dev-docs/api/rest), which can result in long and complex query URLs.
Strapi's codebase uses [the `qs` library](https://github.com/ljharb/qs) to parse and stringify nested JavaScript objects. It's recommended to use `qs` directly to generate complex query URLs instead of creating them manually.
You can use the following interactive query builder tool to generate query URLs automatically:
1. Replace the values in the _Endpoint_ and _Endpoint Query Parameters_ fields with content that fits your needs.
2. Click the **Copy to clipboard** button to copy the automatically generated _Query String URL_ which is updated as you type.
:::info Parameters usage
Please refer to the [REST API parameters table](/dev-docs/api/rest/parameters) and read the corresponding parameters documentation pages to better understand parameters usage.
:::
:::note
The default endpoint path is prefixed with `/api/` and should be kept as-is unless you configured a different API prefix using [the `rest.prefix` API configuration option](/dev-docs/configurations/api). For instance, to query the `books` collection type using the default API prefix, type `/api/books` in the _Endpoint_ field.
:::
:::caution Disclaimer
The `qs` library and the interactive query builder provided on this page:
- might not detect all syntax errors,
- are not aware of the parameters and values available in a Strapi project,
- and do not provide autocomplete features.
Currently, these tools are only provided to transform the JavaScript object in an inline query string URL. Using the generated query URL does not guarantee that proper results will get returned with your API.
:::
# Parameters
Source: https://docs-v4.strapi.io/dev-docs/api/rest/parameters
# REST API parameters
API parameters can be used with the [REST API](/dev-docs/api/rest) to filter, sort, and paginate results and to select fields and relations to populate. Additionally, specific parameters related to optional Strapi features can be used, like the publication state and locale of a content-type.
The following API parameters are available:
| Operator | Type | Description |
| ------------------ | ------------- | ----------------------------------------------------- |
| `populate` | String or Object | [Populate relations, components, or dynamic zones](/dev-docs/api/rest/populate-select#population) |
| `fields` | Array | [Select only specific fields to display](/dev-docs/api/rest/populate-select#field-selection) |
| `filters` | Object | [Filter the response](/dev-docs/api/rest/filters-locale-publication#filtering) |
| `locale` | String or Array | [Select one or multiple locales](/dev-docs/api/rest/filters-locale-publication#locale) |
| `publicationState` | String | [Select the Draft & Publish state](/dev-docs/api/rest/filters-locale-publication#publication-state)
Only accepts the following values:
`live`(default)
`preview`
|
| `sort` | String or Array | [Sort the response](/dev-docs/api/rest/sort-pagination.md#sorting) |
| `pagination` | Object | [Page through entries](/dev-docs/api/rest/sort-pagination.md#pagination) |
Query parameters use the [LHS bracket syntax](https://christiangiacomi.com/posts/rest-design-principles/#lhs-brackets) (i.e. they are encoded using square brackets `[]`).
:::tip
A wide range of REST API parameters can be used and combined to query your content, which can result in long and complex query URLs. 👉 You can use Strapi's [interactive query builder](/dev-docs/api/rest/interactive-query-builder) tool to build query URLs more conveniently. 🤗
:::
:::warning
In Strapi 4.13+, sending invalid query parameters will result in an error status instead of ignoring them. Please ensure that you are only querying fields that:
- are in the correct format for the parameter
- are not private or password fields
- you have read permission on
If you need your API to have the old behavior of ignoring invalid parameters, you will need to customize your controller to only sanitize and not validate.
:::
# Populate and Select
Source: https://docs-v4.strapi.io/dev-docs/api/rest/populate-select
# REST API: Population & Field Selection
The [REST API](/dev-docs/api/rest) by default does not populate any relations, media fields, components, or dynamic zones. Use the [`populate` parameter](#population) to populate specific fields and the [`select` parameter](#field-selection) to return only specific fields with the query results. Ensure that the find permission is given to the field(s) for the relation(s) you populate.
:::tip
## Population
The REST API by default does not populate any type of fields, so it will not populate relations, media fields, components, or dynamic zones unless you pass a `populate` parameter to populate various field types.
The `populate` parameter can be used alone or [in combination with with multiple operators](#combining-population-with-other-operators) to have much more control over the population.
:::caution
The `find` permission must be enabled for the content-types that are being populated. If a role doesn't have access to a content-type it will not be populated (see [User Guide](/user-docs/users-roles-permissions/configuring-end-users-roles#editing-a-role) for additional information on how to enable `find` permissions for content-types).
:::
:::note
It's currently not possible to return just an array of ids with a request.
:::
:::strapi Populating guides
The [REST API guides](/dev-docs/api/rest/guides/intro) section includes more detailed information about various possible use cases for the populate parameter:
- The [Understanding populate](/dev-docs/api/rest/guides/understanding-populate) guide explains in details how populate works, with diagrams, comparisons, and real-world examples.
- The [How to populate creator fields](/dev-docs/api/rest/guides/populate-creator-fields) guide provides step-by-step instructions on how to add `createdBy` and `updatedBy` fields to your queries responses.
The Strapi Blog also includes a tutorial on [how to populate and filter data with your queries](https://strapi.io/blog/demystifying-strapi-s-populate-and-filtering).
:::
The following table sums up possible populate use cases and their associated parameter syntaxes, and links to sections of the Understanding populate guide which includes more detailed explanations:
| Use case | Example parameter syntax | Detailed explanations to read |
|-----------| ---------------|-----------------------|
| Populate everything, 1 level deep, including media fields, relations, components, and dynamic zones | `populate=*`| [Populate all relations and fields, 1 level deep](/dev-docs/api/rest/guides/understanding-populate#populate-all-relations-and-fields-1-level-deep) |
| Populate one relation, 1 level deep | `populate[0]=a-relation-name`| [Populate 1 level deep for specific relations](/dev-docs/api/rest/guides/understanding-populate#populate-1-level-deep-for-specific-relations) |
| Populate several relations, 1 level deep | `populate[0]=relation-name&populate[1]=another-relation-name&populate[2]=yet-another-relation-name`| [Populate 1 level deep for specific relations](/dev-docs/api/rest/guides/understanding-populate#populate-1-level-deep-for-specific-relations) |
| Populate some relations, several levels deep | `populate[first-level-relation-to-populate][populate][0]=second-level-relation-to-populate`| [Populate several levels deep for specific relations](/dev-docs/api/rest/guides/understanding-populate#populate-several-levels-deep-for-specific-relations) |
| Populate a component | `populate[0]=component-name`| [Populate components](/dev-docs/api/rest/guides/understanding-populate#populate-components) |
| Populate a component and one of its nested components | `populate[0]=component-name&populate[1]=component-name.nested-component-name`| [Populate components](/dev-docs/api/rest/guides/understanding-populate#populate-components) |
| Populate a dynamic zone (only its first-level elements) | `populate[0]=dynamic-zone-name`| [Populate dynamic zones](/dev-docs/api/rest/guides/understanding-populate#populate-dynamic-zones) |
| Populate a dynamic zone and its nested elements and relations, using a unique, shared population strategy | `populate[dynamic-zone-name][populate]=*`| [Populate dynamic zones](/dev-docs/api/rest/guides/understanding-populate#shared-population-strategy) |
| Populate a dynamic zone and its nested elements and relations, using a precisely defined, detailed population strategy | `populate[dynamic-zone-name][on][dynamic-zone-name.component-name][populate][relation-name][populate][0]=field-name`| [Populate dynamic zones](/dev-docs/api/rest/guides/understanding-populate#detailed-population-strategy) |
:::tip
The easiest way to build complex queries with multiple-level population is to use our [interactive query builder](/dev-docs/api/rest/interactive-query-builder) tool.
:::
### Combining Population with other operators
By utilizing the `populate` operator it is possible to combine other operators such as [field selection](/dev-docs/api/rest/populate-select#field-selection), [filters](/dev-docs/api/rest/filters-locale-publication), and [sort](/dev-docs/api/rest/sort-pagination) in the population queries.
:::caution
The population and pagination operators cannot be combined.
:::
#### Populate with field selection
`fields` and `populate` can be combined.
```js
const qs = require('qs');
const query = qs.stringify(
{
populate: {
categories: {
sort: ['name:asc'],
filters: {
name: {
$eq: 'Cars',
},
},
},
},
},
{
encodeValuesOnly: true, // prettify URL
}
);
await request(`/api/articles?${query}`);
```
# Relations
Source: https://docs-v4.strapi.io/dev-docs/api/rest/relations
# Managing relations through the REST API
Defining relations between content-types (that are designated as entities in the database layers) is connecting entities with each other.
Relations between content-types can be managed through the [admin panel](/user-docs/content-manager/managing-relational-fields#managing-multiple-choices-relational-fields) or through [REST](/dev-docs/api/rest) requests sent to the Content API.
Relations can be connected, disconnected or set through the Content API by passing parameters in the body of the request:
| Parameter name | Description | Type of update |
|-----------------|------------------|----------------|
| [`connect`](#connect) | Connects new entities.
Can be used in combination with `disconnect`.
Can be used with [positional arguments](#relations-reordering) to define an order for relations. | Partial
| [`disconnect`](#disconnect) | Disconnects entities.
Can be used in combination with `connect`. | Partial
| [`set`](#set) | Set entities to a specific set. Using `set` will overwrite all existing connections to other entities.
Cannot be used in combination with `connect` or `disconnect`. | Full
## `connect`
Using `connect` in the body of a request performs a partial update, connecting the specified relations.
`connect` accepts either a shorthand or a longhand syntax. In the following examples, numbers refers to entity ids:
| Syntax type | Syntax example |
| ------------|----------------|
| shorthand | `connect: [2, 4]`
| longhand | ```connect: [{ id: 2 }, { id: 4 }]``` |
You can also use the longhand syntax to [reorder relations](#relations-reordering).
`connect` can be used in combination with [`disconnect`](#disconnect).
:::caution
`connect` can not be used for media attributes (see [Upload plugin documentation](/dev-docs/plugins/upload#examples) for more details).
:::
### Relations reordering
Positional arguments can be passed to the longhand syntax of `connect` to define the order of relations.
The longhand syntax accepts an array of objects, each object containing the `id` of the entry to be connected and an optional `position` object to define where to connect the relation.
:::note Different syntaxes for different relations
The syntaxes described in this documentation are useful for one-to-many, many-to-many and many-ways relations. For one-to-one, many-to-one and one-way relations, the syntaxes are also supported but only the last relation will be used, so it's preferable to use a shorter format (e.g.: `{ data: { category: 2 } }`, see [REST API documentation](/dev-docs/api/rest#requests)).
:::
To define the `position` for a relation, pass one of the following 4 different positional attributes:
| Parameter name and syntax | Description | Type |
| ------------------------- | ---------------------------------------------------------------------- | ---------- |
| `before: id` | Positions the relation before the given `id`. | Entry `id` |
| `after: id` | Positions the relation after the given `id`. | Entry `id` |
| `start: true` | Positions the relation at the start of the existing list of relations. | Boolean |
| `end: true` | Positions the relation at the end of the existing list of relations. | Boolean |
The `position` argument is optional and defaults to `position: { end: true }`.
:::note Sequential order
Since `connect` is an array, the order of operations is important as they will be treated sequentially (see combined example below).
:::
:::caution
The same relation should not be connected more than once, otherwise it would return a Validation error by the API.
:::
Omitting the `position` argument (as in `id: 9`) defaults to `position: { end: true }`. All other relations are positioned relative to another existing `id` (using `after` or `before`) or relative to the list of relations (using `start` or `end`). Operations are treated sequentially in the order defined in the `connect` array, so the resulting database record will be the following:
```json
categories: [
{ id: 10 },
{ id: 1 },
{ id: 6 },
{ id: 7 },
{ id: 2 },
{ id: 8 },
{ id: 9 }
]
```
## `disconnect`
Using `disconnect` in the body of a request performs a partial update, disconnecting the specified relations.
`disconnect` accepts either a shorthand or a longhand syntax. In the following examples, numbers refers to entity ids:
| Syntax type | Syntax example |
| ------------|----------------|
| shorthand | `disconnect: [2, 4]`
| longhand | ```disconnect: [{ id: 2 }, { id: 4 }]``` |
`disconnect` can be used in combination with [`connect`](#connect).
## `set`
Using `set` performs a full update, replacing all existing relations with the ones specified, in the order specified.
`set` accepts a shorthand or a longhand syntax. In the following examples, numbers refers to entity ids:
| Syntax type | Syntax example |
| ----------- | ------------------------------- |
| shorthand | `set: [2, 4]` |
| longhand | ```set: [{ id: 2 }, { id: 4 }]``` |
As `set` replaces all existing relations, it should not be used in combination with other parameters. To perform a partial update, use [`connect`](#connect) and [`disconnect`](#disconnect).
:::note Omitting set
Omitting any parameter is equivalent to using `set`. For instance, the following 3 syntaxes are all equivalent:
- `data: { categories: { set: [{ id: 2 }, { id: 4 }] }}`
- `data: { categories: { set: [2, 4] }}`
- `data: { categories: [2, 4] }` (as used in the [REST API documentation](/dev-docs/api/rest#update-an-entry))
:::
# Sort and Pagination
Source: https://docs-v4.strapi.io/dev-docs/api/rest/sort-pagination
# REST API: Sort & Pagination
Entries that are returned by queries to the [REST API](/dev-docs/api/rest) can be sorted and paginated.
:::tip
## Pagination
Queries can accept `pagination` parameters. Results can be paginated:
- either by [page](#pagination-by-page) (i.e., specifying a page number and the number of entries per page)
- or by [offset](#pagination-by-offset) (i.e., specifying how many entries to skip and to return)
:::note
Pagination methods can not be mixed. Always use either `page` with `pageSize` **or** `start` with `limit`.
:::
### Pagination by page
To paginate results by page, use the following parameters:
| Parameter | Type | Description | Default |
| ----------------------- | ------- | ------------------------------------------------------------------------- | ------- |
| `pagination[page]` | Integer | Page number | 1 |
| `pagination[pageSize]` | Integer | Page size | 25 |
| `pagination[withCount]` | Boolean | Adds the total numbers of entries and the number of pages to the response | true |
### Pagination by offset
To paginate results by offset, use the following parameters:
| Parameter | Type | Description | Default |
| ----------------------- | ------- | -------------------------------------------------------------- | ------- |
| `pagination[start]` | Integer | Start value (i.e. first entry to return) | 0 |
| `pagination[limit]` | Integer | Number of entries to return | 25 |
| `pagination[withCount]` | Boolean | Toggles displaying the total number of entries to the response | `true` |
:::tip
The default and maximum values for `pagination[limit]` can be [configured in the `./config/api.js`](/dev-docs/configurations/api) file with the `api.rest.defaultLimit` and `api.rest.maxLimit` keys.
:::
# Back-end customization
Source: https://docs-v4.strapi.io/dev-docs/backend-customization
# Back-end customization
:::strapi Disambiguation: Strapi back end
As a headless CMS, the Strapi software as a whole can be considered as the "back end" of your website or application.
But the Strapi software itself includes 2 different parts:
- The **back-end** part of Strapi is an HTTP server that Strapi runs. Like any HTTP server, the Strapi back end receives requests and send responses. Your content is stored in a database, and the Strapi back end interacts with the database to create, retrieve, update, and delete content.
- The **front-end** part of Strapi is called the admin panel. The admin panel presents a graphical user interface to help you structure and manage the content.
Throughout this developer documentation, 'back end' refers _exclusively_ to the back-end part of Strapi.
The [User Guide](/user-docs/intro) explains how to use the admin panel and the [admin panel customization section](/dev-docs/admin-panel-customization) details the various customization options available for the admin panel.
:::
The Strapi back end runs an HTTP server based on [Koa](https://koajs.com/), a back-end JavaScript framework.
Like any HTTP server, the Strapi back end receives requests and send responses. You can send requests to the Strapi back end to create, retrieve, update, or delete data through the [REST](/dev-docs/api/rest) or [GraphQL](/dev-docs/api/graphql) APIs.
A request can travel through the Strapi back end as follows:
1. The Strapi server receives a [request](/dev-docs/backend-customization/requests-responses).
2. The request hits [global middlewares](/dev-docs/backend-customization/middlewares) that are run in a sequential order.
3. The request hits a [route](/dev-docs/backend-customization/routes). By default, Strapi generates route files for all the content-types that you create (see [REST API documentation](/dev-docs/api/rest)), and more routes can be added and configured.
4. [Route policies](/dev-docs/backend-customization/policies) act as a read-only validation step that can block access to a route. [Route middlewares](/dev-docs/backend-customization/routes#middlewares) can control the request flow and mutate the request itself before moving forward.
5. [Controllers](/dev-docs/backend-customization/controllers) execute code once a route has been reached. [Services](/dev-docs/backend-customization/services) are optional, additional code that can be used to build custom logic reusable by controllers.
6. The code executed by the controllers and services interacts with the [models](/dev-docs/backend-customization/models) that are a representation of the content data structure stored in the database. Interacting with the data represented by the models is handled by the [Entity Service](/dev-docs/api/entity-service) and [Query Engine](/dev-docs/api/query-engine).
7. The server returns a [response](/dev-docs/backend-customization/requests-responses). The response can travel back through route middlewares and global middlewares before being sent.
Both global and route middlewares include an asynchronous callback function, `await next()`. Depending on what is returned by the middleware, the request will either go through a shorter or longer path through the back end:
* If a middleware returns nothing, the request will continue travelling through the various core elements of the back end (i.e., controllers, services, and the other layers that interact with the database).
* If a middleware returns before calling `await next()`, a response will be immediately sent, skipping the rest of the core elements. Then it will go back down the same chain it came up.
:::info
Please note that all customizations described in the pages of this section are only for the REST API. [GraphQL customizations](/dev-docs/plugins/graphql#customization) are described in the GraphQL plugin documentation.
:::
:::tip Learn by example
If you prefer learning by reading examples and understanding how they can be used in real-world use cases, the [Examples cookbook](/dev-docs/backend-customization/examples) section is another way at looking how the Strapi back end customization works.
:::
## Interactive diagram
The following diagram represents how requests travel through the Strapi back end. You can click on any shape to jump to the relevant page in the documentation.
```mermaid
graph TB
request[Request] ---> globalMiddlewareA(("Global middleware before await next()"))
globalMiddlewareA --"Call next()"--> routePolicy{Route policy}
globalMiddlewareA --"Returns before next() Goes back up in the middleware chain"-->globalMiddlewareB
routePolicy --Returns true--> routeMiddlewareA(("Route middleware before await next()"))
routePolicy --Returns false or an error-->globalMiddlewareB
routeMiddlewareA --"Returns before next() Goes back up in the middleware chain"-->routeMiddlewareB
routeMiddlewareA --"Call next()"--> controllerA{{Controller}}
controllerA --"Call Service(s)"--> serviceA{{Service}}
controllerA --"Don't call Service(s)" --> routeMiddlewareB
serviceA --"Call Entity Service" --> entityService{{Entity Service}}
serviceA --"Don't call Entity Service" --> controllerB
entityService --"Call Query Engine"--> queryEngine{{Query Engine}}
entityService --"Don't call Query Engine" --> serviceB
queryEngine --> lifecyclesBefore[/Lifecycle beforeX\]
lifecyclesBefore[/Lifecycle beforeX\] --> database[(Database)]
database --> lifecyclesAfter[\Lifecycle afterX/]
lifecyclesAfter --> serviceB{{"Service after Entity Service call"}}
serviceB --> controllerB{{"Controller after service call"}}
controllerB --> routeMiddlewareB(("Route middleware after await next()"))
routeMiddlewareB --> globalMiddlewareB(("Global middleware after await next()"))
globalMiddlewareB --> response[Response]
linkStyle 3 stroke:green,color:green
linkStyle 4 stroke:red,color:red
linkStyle 2 stroke:purple,color:purple
linkStyle 5 stroke:purple,color:purple
click request "/dev-docs/backend-customization/requests-responses"
click globalMiddlewareA "/dev-docs/backend-customization/middlewares"
click globalMiddlewareB "/dev-docs/backend-customization/middlewares"
click routePolicy "/dev-docs/backend-customization/routes"
click routeMiddlewareA "/dev-docs/backend-customization/routes"
click routeMiddlewareB "/dev-docs/backend-customization/routes"
click controllerA "/dev-docs/backend-customization/controllers"
click controllerB "/dev-docs/backend-customization/controllers"
click serviceA "/dev-docs/backend-customization/services"
click serviceB "/dev-docs/backend-customization/services"
click entityService "/dev-docs/api/entity-service/"
click lifecyclesBefore "/dev-docs/backend-customization/models#lifecycle-hooks"
click queryEngine "/dev-docs/api/query-engine/"
click lifecyclesAfter "/dev-docs/backend-customization/models#lifecycle-hooks"
click response "/dev-docs/backend-customization/requests-responses"
click queryEngine "/dev-docs/api/query-engine"
```
# Controllers
Source: https://docs-v4.strapi.io/dev-docs/backend-customization/controllers
const imgStyle = {width: '100%', margin: '0'}
const captionStyle = {fontSize: '12px'}
# Controllers
Controllers are JavaScript files that contain a set of methods, called actions, reached by the client according to the requested [route](/dev-docs/backend-customization/routes). Whenever a client requests the route, the action performs the business logic code and sends back the [response](/dev-docs/backend-customization/requests-responses). Controllers represent the C in the model-view-controller (MVC) pattern.
In most cases, the controllers will contain the bulk of a project's business logic. But as a controller's logic becomes more and more complicated, it's a good practice to use [services](/dev-docs/backend-customization/services) to organize the code into re-usable parts.
The diagram represents a simplified version of how a request travels through the Strapi back end, with controllers highlighted. The backend customization introduction page includes a complete, interactive diagram.
:::caution
Before deciding to customize core controllers, please consider creating custom route middlewares (see [routes documentation](/dev-docs/backend-customization/routes)).
:::
## Implementation
Controllers can be [generated or added manually](#adding-a-new-controller). Strapi provides a `createCoreController` factory function that automatically generates core controllers and allows building custom ones or [extend or replace the generated controllers](#extending-core-controllers).
### Adding a new controller
A new controller can be implemented:
- with the [interactive CLI command `strapi generate`](/dev-docs/cli)
- or manually by creating a JavaScript file:
- in `./src/api/[api-name]/controllers/` for API controllers (this location matters as controllers are auto-loaded by Strapi from there)
- or in a folder like `./src/plugins/[plugin-name]/server/controllers/` for plugin controllers, though they can be created elsewhere as long as the plugin interface is properly exported in the `strapi-server.js` file (see [Server API for Plugins documentation](/dev-docs/api/plugins/server-api))
Each controller action can be an `async` or `sync` function.
Every action receives a context object (`ctx`) as a parameter. `ctx` contains the [request context](/dev-docs/backend-customization/requests-responses#requests) and the [response context](/dev-docs/backend-customization/requests-responses#responses).
Example: GET /hello route calling a basic controller
A specific `GET /hello` [route](/dev-docs/backend-customization/routes) is defined, the name of the router file (i.e. `index`) is used to call the controller handler (i.e. `index`). Every time a `GET /hello` request is sent to the server, Strapi calls the `index` action in the `hello.js` controller, which returns `Hello World!`:
:::note
When a new [content-type](/dev-docs/backend-customization/models#content-types) is created, Strapi builds a generic controller with placeholder code, ready to be customized.
:::
:::tip Tips
- To see a possible advanced usage for custom controllers, read the [services and controllers](/dev-docs/backend-customization/examples/services-and-controllers) page of the backend customization examples cookbook.
- If you want to implement unit testing to your controllers, this [blog post](https://strapi.io/blog/automated-testing-for-strapi-api-with-jest-and-supertest) should get you covered.
:::
### Sanitization and Validation in controllers
Sanitization means that the object is “cleaned” and returned.
Validation means an assertion is made that the data is already clean and throws an error if something is found that shouldn't be there.
In Strapi:
- validation is applied on query parameters,
- and only sanitization is applied to input data (create and update body data).
:::warning
It's strongly recommended you sanitize (v4.8.0+) and/or validate (v4.13.0+) your incoming request query utilizing the new `sanitizeQuery` and `validateQuery` functions to prevent the leaking of private data.
:::
#### Sanitization when utilizing controller factories
Within the Strapi factories the following functions are exposed that can be used for sanitization and validation:
| Function Name | Parameters | Description |
| ---------------- | -------------------------- | ------------------------------------------------------------------------------------ |
| `sanitizeQuery` | `ctx` | Sanitizes the request query |
| `sanitizeOutput` | `entity`/`entities`, `ctx` | Sanitizes the output data where entity/entities should be an object or array of data |
| `sanitizeInput` | `data`, `ctx` | Sanitizes the input data |
| `validateQuery` | `ctx` | Validates the request query (throws an error on invalid params) |
| `validateInput` | `data`, `ctx` | (EXPERIMENTAL) Validates the input data (throws an error on invalid data) |
These functions automatically inherit the sanitization settings from the model and sanitize the data accordingly based on the content-type schema and any of the content API authentication strategies, such as the Users & Permissions plugin or API tokens.
:::warning
Because these methods use the model associated with the current controller, if you query data that is from another model (i.e., doing a find for "menus" within a "restaurant" controller method), you must instead use the `@strapi/utils` tools, such as `sanitize.contentAPI.query` described in [Sanitizing Custom Controllers](#sanitize-validate-custom-controllers), or else the result of your query will be sanitized against the wrong model.
:::
#### Sanitization and validation when building custom controllers {#sanitize-validate-custom-controllers}
Within custom controllers, there are 5 primary functions exposed via the `@strapi/utils` package that can be used for sanitization and validation:
| Function Name | Parameters | Description |
| ---------------------------- | ----------------------------- | ----------------------------------------------------------------------------------------------------------------------------------------------------- |
| `sanitize.contentAPI.input` | `data`, `schema`, `auth` | Sanitizes the request input including non-writable fields, removing restricted relations, and other nested "visitors" added by plugins |
| `sanitize.contentAPI.output` | `data`, `schema`, `auth` | Sanitizes the response output including restricted relations, private fields, passwords, and other nested "visitors" added by plugins |
| `sanitize.contentAPI.query` | `ctx.query`, `schema`, `auth` | Sanitizes the request query including filters, sort, fields, and populate |
| `validate.contentAPI.query` | `ctx.query`, `schema`, `auth` | Validates the request query including filters, sort, fields (currently not populate) |
| `validate.contentAPI.input` | `data`, `schema`, `auth` | (EXPERIMENTAL) Validates the request input including non-writable fields, removing restricted relations, and other nested "visitors" added by plugins |
:::note
Depending on the complexity of your custom controllers, you may need additional sanitization that Strapi cannot currently account for, especially when combining the data from multiple sources.
:::
### Extending core controllers
Default controllers and actions are created for each content-type. These default controllers are used to return responses to API requests (e.g. when `GET /api/articles/3` is accessed, the `findOne` action of the default controller for the "Article" content-type is called). Default controllers can be customized to implement your own logic. The following code examples should help you get started.
:::tip
An action from a core controller can be replaced entirely by [creating a custom action](#adding-a-new-controller) and naming the action the same as the original action (e.g. `find`, `findOne`, `create`, `update`, or `delete`).
:::
:::tip
When extending a core controller, you do not need to re-implement any sanitization as it will already be handled by the core controller you are extending. Where possible it's strongly recommended to extend the core controller instead of creating a custom controller.
:::
Collection type examples
:::tip
The [backend customization examples cookbook](/dev-docs/backend-customization/examples) shows how you can overwrite a default controller action, for instance for the [`create` action](/dev-docs/backend-customization/examples/services-and-controllers#custom-controller).
:::
Single type examples
## Usage
Controllers are declared and attached to a route. Controllers are automatically called when the route is called, so controllers usually do not need to be called explicitly. However, [services](/dev-docs/backend-customization/services) can call controllers, and in this case the following syntax should be used:
```js
// access an API controller
strapi.controller("api::api-name.controller-name");
// access a plugin controller
strapi.controller("plugin::plugin-name.controller-name");
```
:::tip
To list all the available controllers, run `yarn strapi controllers:list`.
:::
# Backend Customization Examples Cookbook
Source: https://docs-v4.strapi.io/dev-docs/backend-customization/examples
# Backend customization: An examples cookbook using FoodAdvisor
The present section of the documentation is intended for developers who would like to get a deeper understanding of the Strapi back end customization possibilities.
The section is a collection of examples that demonstrate how the core components of the back-end server of Strapi can be used in a real-world project. Front-end code that interacts with the back end may also be part of some examples, but displayed in collapsed blocks by default since front-end code examples are not the main focus of this cookbook.
Examples are meant to extend the features of [FoodAdvisor](https://github.com/strapi/foodadvisor), the official Strapi demo application. FoodAdvisor builds a ready-made restaurants directory powered by a Strapi back end (included in the `/api` folder) and renders a [Next.js](https://nextjs.org/)-powered front-end website (included in the `/client` folder).
:::prerequisites
- 👀 You have read the [Quick Start Guide](/dev-docs/quick-start) and/or understood that Strapi is a **headless CMS** that helps you create a data structure with the [Content-Type Builder](/user-docs/content-type-builder) and add some content through the [Content Manager](/user-docs/content-manager), then exposes the content through APIs.
- 👀 You have read the [back-end customization introduction](/dev-docs/backend-customization) to get a general understanding of what routes, policies, middlewares, controllers, and services are in Strapi.
- 👷 If you want to test and play with the code examples by yourself, ensure you have cloned the [FoodAdvisor](https://github.com/strapi/foodadvisor) repository, setup the project, and started both the front-end and back-end servers. The Strapi admin panel should be accessible from [`localhost:1337/admin`](http://localhost:1337/admin) and the Next.js-based FoodAdvisor front-end website should be running on [`localhost:3000`](http://localhost:3000).
:::
This section can be read from start to finish, or you might want to jump directly to a specific page to understand how a given core element from the Strapi back end can be used to solve a real-world use case example:
| I want to understand… | Dedicated page |
|------------|---------------|
| How to authenticate my queries | [Authentication flow with JWT](/dev-docs/backend-customization/examples/authentication) |
| How and when to use custom controllers and services | [Custom controllers and services examples](/dev-docs/backend-customization/examples/services-and-controllers) |
| How to use custom policies and send custom errors | [Custom policies examples](/dev-docs/backend-customization/examples/policies) |
| How to configure and use custom routes | [Custom routes examples](/dev-docs/backend-customization/examples/routes) |
| How and when to use custom global middlewares | [Custom middleware example](/dev-docs/backend-customization/examples/middlewares) |
# Authentication flow with JWT
Source: https://docs-v4.strapi.io/dev-docs/backend-customization/examples/authentication
# Examples cookbook: Authentication flow with JWT
:::prerequisites
This page is part of the back end customization examples cookbook. Please ensure you've read its [introduction](/dev-docs/backend-customization/examples).
:::
**💭 Context:**
Out of the box, the front-end website of [FoodAdvisor](https://github.com/strapi/foodadvisor) does not provide any log in functionality. Logging in is done by accessing Strapi's admin panel at [`localhost:1337/admin`](http://localhost:1337/admin`).
**🧑💻 Code example:**
:::prerequisites
The code example in this section uses the [formik](https://formik.org/) package. Install it using `yarn add formik` or `npm install formik` and restart the dev server.
:::
To achieve this, in the `/client` folder of the [FoodAdvisor](https://github.com/strapi/foodadvisor) project, you could create a `pages/auth/login.js` file that contains the following example code. Highlighted lines show the request sent to the `/auth/local` route provided by Strapi's Users & Permissions plugin:
```jsx title="/client/pages/auth/login.js" {21-27}
const Login = () => {
const { handleSubmit, handleChange } = useFormik({
initialValues: {
identifier: '',
password: '',
},
onSubmit: async (values) => {
/**
* API URLs in Strapi are by default prefixed with /api,
* but because the API prefix can be configured
* with the rest.prefix property in the config/api.js file,
* we use the getStrapiURL() method to build the proper full auth URL.
**/
const res = await fetch(getStrapiURL('/auth/local'), {
method: 'POST',
headers: {
'Content-Type': 'application/json',
},
body: JSON.stringify(values),
});
/**
* Gets the JWT from the server response
*/
const { jwt } = await res.json();
/**
* Stores the JWT in the localStorage of the browser.
* A better implementation would be to do this with an authentication context provider
* or something more sophisticated, but it's not the purpose of this tutorial.
*/
localStorage.setItem('token', jwt);
},
});
/**
* The following code renders a basic login form
* accessible from the localhost:3000/auth/login page.
*/
return (
);
};
```
:::strapi What's next?
Learn more about how custom [services and controllers](/dev-docs/backend-customization/examples/services-and-controllers) can help you tweak a Strapi-based application.
:::
# Custom middlewares
Source: https://docs-v4.strapi.io/dev-docs/backend-customization/examples/middlewares
# Examples cookbook: Custom global middlewares
:::prerequisites
This page is part of the back end customization examples cookbook. Please ensure you've read its [introduction](/dev-docs/backend-customization/examples).
:::
Out of the box, [FoodAdvisor](https://github.com/strapi/foodadvisor) does not provide any custom middlewares that could use incoming requests and perform some additional logic before executing the controller code.
There are 2 types of middlewares in Strapi: **route middlewares** control access to a route while **global middlewares** have a wider scope (see reference documentation for [middlewares customization](/dev-docs/backend-customization/middlewares)).
Custom route middlewares could be used instead of policies to control access to an endpoint (see [policies cookbook](/dev-docs/backend-customization/examples/policies)) and could modify the context before passing it down to further core elements of the Strapi server. This page will _not_ cover custom route middlewares but rather illustrate a more elaborated usage for **custom global middlewares**.
## Populating an analytics dashboard in Google Sheets with a custom middleware
**💭 Context:**
In essence, a middleware gets executed between a request arriving at the server and the controller function getting executed. So, for instance, a middleware is a good place to perform some analytics.
**🧑💻 Code example:**
1. In the `/api` folder of the [FoodAdvisor](https://github.com/strapi/foodadvisor) project, create a `/restaurant/middlewares/utils.js` file with the following example code:
Example utility functions that could be used to read, write and update a Google spreadsheet:
The following code allows reading, writing, and updating a Google spreadsheet given an API Key read from a JSON file and a spreadsheet ID retrieved from the URL:

Additional information can be found in the official [Google Sheets API documentation](https://developers.google.com/sheets/api/reference/rest/v4/spreadsheets.values?hl=es-419).
```jsx title="src/api/restaurant/middlewares/utils.js"
const { google } = require('googleapis');
const createGoogleSheetClient = async ({
keyFile,
sheetId,
tabName,
range,
}) => {
async function getGoogleSheetClient() {
const auth = new google.auth.GoogleAuth({
keyFile,
scopes: ['https://www.googleapis.com/auth/spreadsheets'],
});
const authClient = await auth.getClient();
return google.sheets({
version: 'v4',
auth: authClient,
});
}
const googleSheetClient = await getGoogleSheetClient();
const writeGoogleSheet = async (data) => {
googleSheetClient.spreadsheets.values.append({
spreadsheetId: sheetId,
range: `${tabName}!${range}`,
valueInputOption: 'USER_ENTERED',
insertDataOption: 'INSERT_ROWS',
resource: {
majorDimension: 'ROWS',
values: data,
},
});
};
const updateoogleSheet = async (cell, data) => {
googleSheetClient.spreadsheets.values.update({
spreadsheetId: sheetId,
range: `${tabName}!${cell}`,
valueInputOption: 'USER_ENTERED',
resource: {
majorDimension: 'ROWS',
values: data,
},
});
};
const readGoogleSheet = async () => {
const res = await googleSheetClient.spreadsheets.values.get({
spreadsheetId: sheetId,
range: `${tabName}!${range}`,
});
return res.data.values;
};
return {
writeGoogleSheet,
updateoogleSheet,
readGoogleSheet,
};
};
module.exports = {
createGoogleSheetClient,
};
```
2. In the `/api` folder of the FoodAdvisor project, create a custom `analytics` middleware with the following code:
```jsx title="src/api/restaurant/middlewares/analytics.js"
'use strict';
const { createGoogleSheetClient } = require('./utils');
const serviceAccountKeyFile = './gs-keys.json';
// Replace the sheetId value with the corresponding id found in your own URL
const sheetId = '1P7Oeh84c18NlHp1Zy-5kXD8zgpoA1WmvYL62T4GWpfk';
const tabName = 'Restaurants';
const range = 'A2:C';
const VIEWS_CELL = 'C';
const transformGSheetToObject = (response) =>
response.reduce(
(acc, restaurant) => ({
...acc,
[restaurant[0]]: {
id: restaurant[0],
name: restaurant[1],
views: restaurant[2],
cellNum: Object.keys(acc).length + 2 // + 2 because we need to consider the header and that the initial length is 0, so our first real row would be 2,
},
}),
{}
);
module.exports = (config, { strapi }) => {
return async (context, next) => {
// Generating google sheet client
const { readGoogleSheet, updateoogleSheet, writeGoogleSheet } =
await createGoogleSheetClient({
keyFile: serviceAccountKeyFile,
range,
sheetId,
tabName,
});
// Get the restaurant ID from the params in the URL
const restaurantId = context.params.id;
const restaurant = await strapi.entityService.findOne(
'api::restaurant.restaurant',
restaurantId
);
// Read the spreadsheet to get the current data
const restaurantAnalytics = await readGoogleSheet();
/**
* The returned data comes in the shape [1, "Mint Lounge", 23],
* and we need to transform it into an object: {id: 1, name: "Mint Lounge", views: 23, cellNum: 2}
*/
const requestedRestaurant =
transformGSheetToObject(restaurantAnalytics)[restaurantId];
if (requestedRestaurant) {
await updateoogleSheet(
`${VIEWS_CELL}${requestedRestaurant.cellNum}:${VIEWS_CELL}${requestedRestaurant.cellNum}`,
[[Number(requestedRestaurant.views) + 1]]
);
} else {
/** If we don't have the restaurant in the spreadsheet already,
* we create it with 1 view.
*/
const newRestaurant = [[restaurant.id, restaurant.name, 1]];
await writeGoogleSheet(newRestaurant);
}
// Call next to continue with the flow and get to the controller
await next();
};
};
```
3. Configure the routes for the "Restaurants" content-type to execute the custom `analytics` middleware whenever a restaurant page is queried. To do so, use the following code:
```jsx title="src/api/restaurant/routes/restaurant.js"
'use strict';
const { createCoreRouter } = require('@strapi/strapi').factories;
module.exports = createCoreRouter('api::restaurant.restaurant', {
config: {
findOne: {
auth: false,
policies: [],
middlewares: ['api::restaurant.analytics'],
},
},
});
```
# Custom policies
Source: https://docs-v4.strapi.io/dev-docs/backend-customization/examples/policies
# Examples cookbook: Custom policies
:::prerequisites
This page is part of the back end customization examples cookbook. Please ensure you've read its [introduction](/dev-docs/backend-customization/examples).
:::
Out of the box, [FoodAdvisor](https://github.com/strapi/foodadvisor) does not use any custom policies or route middlewares that could control access to content type endpoints.
In Strapi, controlling access to a content-type endpoint can be done either with a policy or route middleware:
- policies are read-only and allow a request to pass or return an error,
- while route middlewares can perform additional logic.
In our example, let's use a policy.
## Creating a custom policy
**💭 Context:**
Let's say we would like to customize the backend of [FoodAdvisor](https://github.com/strapi/foodadvisor) to prevent restaurant owners from creating fake reviews for their businesses using a [form previously created](/dev-docs/backend-customization/examples/services-and-controllers#rest-api-queries-from-the-front-end) on the front-end website.
**🧑💻 Code example:**
In the `/api` folder of the [FoodAdvisor](https://github.com/strapi/foodadvisor) project, create a new `src/api/review/policies/is-owner-review.js` file with the following code:
```jsx title="src/api/review/policies/is-owner-review.js"
module.exports = async (policyContext, config, { strapi }) => {
const { body } = policyContext.request;
const { user } = policyContext.state;
// Return an error if there is no authenticated user with the request
if (!user) {
return false;
}
/**
* Queries the Restaurants collection type
* using the Entity Service API
* to retrieve information about the restaurant's owner.
*/
const [restaurant] = await strapi.entityService.findMany(
'api::restaurant.restaurant',
{
filters: {
slug: body.restaurant,
},
populate: ['owner'],
}
);
if (!restaurant) {
return false;
}
/**
* If the user submitting the request is the restaurant's owner,
* we don't allow the review creation.
*/
if (user.id === restaurant.owner.id) {
return false;
}
return true;
};
```
:::caution
Policies or route middlewares should be declared in the configuration of a route to actually control access. Read more about routes in the [reference documentation](/dev-docs/backend-customization/routes) or see an example in the [routes cookbook](/dev-docs/backend-customization/examples/routes).
:::
## Sending custom errors through policies
**💭 Context:**
Out of the box, [FoodAdvisor](https://github.com/strapi/foodadvisor) sends a default error when a policy refuses access to a route. Let's say we want to customize the error sent when the [previously created custom policy](#creating-a-custom-policy) does not allow creating a review.
**🧑💻 Code example:**
In the `/api` folder of the [FoodAdvisor](https://github.com/strapi/foodadvisor) project, update the [previously created `is-owner-review` custom policy](#creating-a-custom-policy) as follows (highlighted lines are the only modified lines):
```jsx title="src/api/review/policies/is-owner-review.js" showLineNumbers
const { errors } = require('@strapi/utils');
const { PolicyError } = errors;
module.exports = async (policyContext, config, { strapi }) => {
const { body } = policyContext.request;
const { user } = policyContext.state;
// Return an error if there is no authenticated user with the request
if (!user) {
return false;
}
/**
* Queries the Restaurants collection type
* using the Entity Service API
* to retrieve information about the restaurant's owner.
*/
const filteredRestaurants = await strapi.entityService.findMany(
'api::restaurant.restaurant',
{
filters: {
slug: body.restaurant,
},
populate: ['owner'],
}
);
const restaurant = filteredRestaurants[0];
if (!restaurant) {
return false;
}
/**
* If the user submitting the request is the restaurant's owner,
* we don't allow the review creation.
*/
if (user.id === restaurant.owner.id) {
// highlight-start
/**
* Throws a custom policy error
* instead of just returning false
* (which would result into a generic Policy Error).
*/
const error = new ApplicationError(
"The owner of the restaurant cannot submit reviews",
{
policy: "is-owner-review",
errCode: "RESTAURANT_OWNER_REVIEW", // can be useful for identifying different errors on the front end
}
);
error.name = "OwnerReviewError";
throw error;
// highlight-end
}
return true;
};
```
Responses sent with default policy error vs. custom policy error:
### Using custom errors on the front end
**💭 Context:**
Out of the box, the Next.js-powered front-end website provided with [FoodAdvisor](https://github.com/strapi/foodadvisor) does not display errors or success messages on the front-end website when accessing content. For instance, the website will not inform the user when adding a new review with a [previously created form](/dev-docs/backend-customization/examples/services-and-controllers#rest-api-queries-from-the-front-end) is not possible.
**🎯 Goals**:
- Catch the error on the front-end website and display it within a notification.
- Send another notification in case the policy allows the creation of a new review.
**🧑💻 Code example:**
In the `/client` folder of the [FoodAdvisor](https://github.com/strapi/foodadvisor) project, you could update the [previously created `new-review` component](/dev-docs/backend-customization/examples/services-and-controllers#rest-api-queries-from-the-front-end) as follows (modified lines are highlighted):
Example front-end code to display toast notifications for custom errors or successful review creation:
```jsx title="/client/components/pages/restaurant/RestaurantContent/Reviews/new-review.js" showLineNumbers
// highlight-start
/**
* A notification will be displayed on the front-end using React Hot Toast
* (See https://github.com/timolins/react-hot-toast).
* React Hot Toast should be added to your project's dependencies;
* Use yarn or npm to install it and it will be added to your package.json file.
*/
class UnauthorizedError extends Error {
constructor(message) {
super(message);
}
}
// highlight-end
const NewReview = () => {
const router = useRouter();
const { handleSubmit, handleChange, values } = useFormik({
initialValues: {
note: '',
content: '',
},
onSubmit: async (values) => {
// highlight-start
/**
* The previously added code is wrapped in a try/catch block.
*/
try {
// highlight-end
const res = await fetch(getStrapiURL('/reviews'), {
method: 'POST',
body: JSON.stringify({
restaurant: router.query.slug,
...values,
}),
headers: {
Authorization: `Bearer ${localStorage.getItem('token')}`,
'Content-Type': 'application/json',
},
});
// highlight-start
const { data, error } = await res.json();
/**
* If the Strapi backend server returns an error,
* we use the custom error message to throw a custom error.
* If the request is a success, we display a success message.
* In both cases, a toast notification is displayed on the front-end.
*/
if (error) {
throw new UnauthorizedError(error.message);
}
toast.success('Review created!');
return data;
} catch (err) {
toast.error(err.message);
console.error(err);
}
},
// highlight-end
});
return (
Write your review
);
};
```
:::strapi What's next?
Learn more about how to configure [custom routes](/dev-docs/backend-customization/examples/routes) to use your custom policies, and how these custom routes can be used to tweak a Strapi-based application.
:::
# Custom routes
Source: https://docs-v4.strapi.io/dev-docs/backend-customization/examples/routes
# Examples cookbook: Custom routes
:::prerequisites
This page is part of the back end customization examples cookbook. Please ensure you've read its [introduction](/dev-docs/backend-customization/examples).
:::
**💭 Context:**
Out of the box, [FoodAdvisor](https://github.com/strapi/foodadvisor) does not control access to its content-type endpoints.
Let's say we [previously created a policy](/dev-docs/backend-customization/examples/policies) to restrict access to the "Reviews" content-type to some conditions, for instance to prevent a restaurant's owner to create a review for their restaurants. We must now enable the policy on the route we use to create reviews.
**🧑💻 Code example:**
In the `/api` folder of the [FoodAdvisor](https://github.com/strapi/foodadvisor) project, replace the content of the `api/src/api/review/routes/review.js` file with the following code:
```jsx title="src/api/review/routes/review.js"
'use strict';
const { createCoreRouter } = require('@strapi/strapi').factories;
module.exports = createCoreRouter('api::review.review', {
config: {
create: {
auth: false, // set the route to bypass the normal Strapi authentication system
policies: ['is-owner-review'], // set the route to use a custom policy
middlewares: [],
},
},
});
```
:::strapi What's next?
Learn more about how to configure [custom middlewares](/dev-docs/backend-customization/examples/middlewares) to perform additional actions that extend your Strapi-based application.
:::
# Custom services and controllers
Source: https://docs-v4.strapi.io/dev-docs/backend-customization/examples/services-and-controllers
# Examples cookbook: Custom services and controllers
:::prerequisites
This page is part of the back end customization examples cookbook. Please ensure you've read its [introduction](/dev-docs/backend-customization/examples).
:::
From the front-end website of [FoodAdvisor](https://github.com/strapi/foodadvisor), you can browse a list of restaurants accessible at [`localhost:3000/restaurants`](http://localhost:3000/restaurants). Clicking on any restaurant from the list will use the code included in the `/client` folder to display additional information about this restaurant. The content displayed on a restaurant page was created within Strapi's Content Manager and is retrieved by querying Strapi's REST API which uses code included in the `/api` folder.
This page will teach about the following advanced topics:
| Topic | Section |
|------|---------|
| Create a component that interacts with the backend of Strapi | [REST API queries from the front-end](#rest-api-queries-from-the-front-end) |
| Understand how services and controllers can play together | [Controllers vs. services](#controllers-vs-services) |
| Create custom services |
A [custom service](#custom-service-creating-a-review) that only uses the Entity Service API
Another more [advanced custom service](#custom-service-sending-an-email-to-the-restaurant-owner) that uses both Entity Service API and a Strapi plugin
|
| Use services in a controller | [Custom controller](#custom-controller) |
### REST API queries from the front end
**🧑💻 Code example:**
In the `/client` folder of the [FoodAdvisor](https://github.com/strapi/foodadvisor) project, you could use the following code examples to:
- create a new `pages/restaurant/RestaurantContent/Reviews/new-review.js` file,
- and update the existing `components/pages/restaurant/RestaurantContent/Reviews/reviews.js`.
Example front-end code to add a component for writing reviews and display it on restaurants pages:
1. Create a new file in the `/client` folder to add a new component for writing reviews with the following code:
```jsx title='/client/components/pages/restaurant/RestaurantContent/Reviews/new-review.js'
import { Button, Input, Textarea } from '@nextui-org/react';
import { useFormik } from 'formik';
import { useRouter } from 'next/router';
import React from 'react';
import { getStrapiURL } from '../../../../../utils';
const NewReview = () => {
const router = useRouter();
const { handleSubmit, handleChange, values } = useFormik({
initialValues: {
note: '',
content: '',
},
onSubmit: async (values) => {
/**
* Queries Strapi REST API to reach the reviews endpoint
* using the JWT previously stored in localStorage to authenticate
*/
const res = await fetch(getStrapiURL('/reviews'), {
method: 'POST',
body: JSON.stringify({
restaurant: router.query.slug,
...values,
}),
headers: {
Authorization: `Bearer ${localStorage.getItem('token')}`,
'Content-Type': 'application/json',
},
});
},
});
/**
* Renders the form
*/
return (
Write your review
);
};
export default NewReview;
```
2. Display the new form component on any restaurants page by adding the highlighted lines (7, 8, and 13) to the code used to render restaurant's information:
```jsx title='/client/components/pages/restaurant/RestaurantContent/Reviews/reviews.js' showLineNumbers
import React from 'react';
import delve from 'dlv';
import { formatDistance } from 'date-fns';
import { getStrapiMedia } from '../../../../../utils';
// highlight-start
import { Textarea } from '@nextui-org/react';
import NewReview from './new-review';
// highlight-end
const Reviews = ({ reviews }) => {
return (
// highlight-next-line
**🧑💻 Code example:**
To create such a service, in the `/api` folder of the [FoodAdvisor](https://github.com/strapi/foodadvisor) project, replace the content of the `src/api/review/services/review.js` file with the following code:
```jsx title="src/api/review/services/review.js"
const { createCoreService } = require('@strapi/strapi').factories;
module.exports = createCoreService('api::review.review', ({ strapi }) => ({
async create(ctx) {
const user = ctx.state.user;
const { body } = ctx.request;
/**
* Queries the Restaurants collection type
* using the Entity Service API
* to retrieve information about the restaurant.
*/
const restaurants = await strapi.entityService.findMany(
'api::restaurant.restaurant',
{
filters: {
slug: body.restaurant,
},
}
);
/**
* Creates a new entry for the Reviews collection type
* and populates data with information about the restaurant's owner
* using the Entity Service API.
*/
const newReview = await strapi.entityService.create('api::review.review', {
data: {
note: body.note,
content: body.content,
restaurant: restaurants[0].id,
author: user.id,
},
populate: ['restaurant.owner'],
});
return newReview;
},
}));
```
:::tip Tips
- In a controller's code, the `create` method from this service can be called with `strapi.service('api::review.review').create(ctx)` where `ctx` is the request's [context](/dev-docs/backend-customization/requests-responses).
- The provided example code does not cover error handling. You should consider handling errors, for instance when the restaurant does not exist. Additional information can be found in the [Error handling](/dev-docs/error-handling) documentation.
:::
### Custom Service: Sending an email to the restaurant owner
**💭 Context:**
Out of the box, [FoodAdvisor](https://github.com/strapi/foodadvisor) does not provide any automated email service feature.
Let's create an `email.js` service file to send an email. We could use it in a [custom controller](#custom-controller) to notify the restaurant owner whenever a new review is created on the front-end website.
:::callout 🤗 Optional service
This service is an advanced code example using the [Email](/dev-docs/plugins/email) plugin and requires understanding how [plugins](/dev-docs/plugins) and [providers](/dev-docs/providers) work with Strapi. If you don't need an email service to notify the restaurant's owner, you can skip this part and jump next to the custom [controller](#custom-controller) example.
:::
**🧑💻 Code example:**
To create such a service, in the `/api` folder of the [FoodAdvisor](https://github.com/strapi/foodadvisor) project, create a new `src/api/email/services/email.js` file with the following code:
```jsx title="src/api/email/services/email.js"
const { createCoreService } = require('@strapi/strapi').factories;
module.exports = createCoreService('api::email.email', ({ strapi }) => ({
async send({ to, subject, html }) {
/**
* Retrieves email configuration data
* stored in the Email single type
* using the Entity Service API.
*/
const emailConfig = await strapi.entityService.findOne(
'api::email.email',
1
);
/**
* Sends an email using:
* - parameters to pass when invoking the service
* - the 'from' address previously retrieved with the email configuration
*/
await strapi.plugins['email'].services.email.send({
to,
subject,
html,
from: emailConfig.from,
});
},
}));
```
:::tip
In a controller's code, the `send` method from this email service can be called with `strapi.service('api::email.email).send(parameters)` where `parameters` is an object with the email's related information (recipient's address, subject, and email body).
:::
### Custom controller
**💭 Context:**
By default, controllers files in Strapi includes basic boilerplate code that use the `createCoreController` factory function. This exposes basic methods to create, retrieve, update, and delete content when reaching the requested endpoint. The default code for the controllers can be customized to perform any business logic.
Let's customize the default controller for the "Reviews" collection type of [FoodAdvisor](https://github.com/strapi/foodadvisor) with the following scenario: upon a `POST` request to the `/reviews` endpoint, the controller calls previously created services to both [create a review](#custom-service-creating-a-review) and [send an email](#custom-service-sending-an-email-to-the-restaurant-owner) to the restaurant's owner.
**🧑💻 Code example:**
In the `/api` folder of the [FoodAdvisor](https://github.com/strapi/foodadvisor) project, replace the content of the `src/api/review/controllers/review.js` file with one of the following code examples, depending on whether you previously created just [one custom service](#custom-service-creating-a-review) or both custom services for the review creation and the [email notification](#custom-service-sending-an-email-to-the-restaurant-owner):
:::strapi What's next?
Learn more about how [custom policies](/dev-docs/backend-customization/examples/policies) can help you tweak a Strapi-based application and restrict access to some resources based on specific conditions.
:::
# Middlewares
Source: https://docs-v4.strapi.io/dev-docs/backend-customization/middlewares
const imgStyle = {width: '100%', margin: '0'}
const captionStyle = {fontSize: '12px'}
# Middlewares customization
:::strapi Different types of middlewares
In Strapi, 2 middleware concepts coexist:
- **Global middlewares** are [configured and enabled](/dev-docs/configurations/middlewares) for the entire Strapi server application. These middlewares can be applied at the application level or at the API level. The present documentation describes how to implement them. Plugins can also add global middlewares (see [Server API documentation](/dev-docs/api/plugins/server-api)).
- **Route middlewares** have a more limited scope and are configured and used as middlewares at the route level. They are described in the [routes documentation](/dev-docs/backend-customization/routes#middlewares).
:::
The diagram represents a simplified version of how a request travels through the Strapi back end, with global middlewares highlighted. The backend customization introduction page includes a complete, interactive diagram.
## Implementation
A new application-level or API-level middleware can be implemented:
- with the [interactive CLI command `strapi generate`](/dev-docs/cli#strapi-generate)
- or manually by creating a JavaScript file in the appropriate folder (see [project structure](/dev-docs/project-structure)):
- `./src/middlewares/` for application-level middlewares
- `./src/api/[api-name]/middlewares/` for API-level middlewares
- `./src/plugins/[plugin-name]/middlewares/` for [plugin middlewares](/dev-docs/api/plugins/server-api#middlewares)
Middlewares working with the REST API are functions like the following:
Globally scoped custom middlewares should be added to the [middlewares configuration file](/dev-docs/configurations/middlewares#loading-order) or Strapi won't load them.
API level and plugin middlewares can be added into the specific router that they are relevant to like the following:
```js title="./src/api/[api-name]/routes/[collection-name].js or ./src/plugins/[plugin-name]/server/routes/index.js"
module.exports = {
routes: [
{
method: "GET",
path: "/[collection-name]",
handler: "[controller].find",
config: {
middlewares: ["[middleware-name]"],
// See the usage section below for middleware naming conventions
},
},
],
};
```
Example of a custom timer middleware
The GraphQL plugin also allows [implementing custom middlewares](/dev-docs/plugins/graphql#middlewares), with a different syntax.
:::tip
To see a possible advanced usage for custom global middlewares, read the [middlewares](/dev-docs/backend-customization/examples/middlewares) page of the backend customization examples cookbook.
:::
## Usage
Middlewares are called different ways depending on their scope:
- use `global::middleware-name` for application-level middlewares
- use `api::api-name.middleware-name` for API-level middlewares
- use `plugin::plugin-name.middleware-name` for plugin middlewares
:::tip
To list all the registered middlewares, run `yarn strapi middlewares:list`.
:::
### Restricting content access with an "is-owner policy"
It is often required that the author of an entry is the only user allowed to edit or delete the entry. In previous versions of Strapi, this was known as an "is-owner policy". With Strapi v4, the recommended way to achieve this behavior is to use a middleware.
Proper implementation largely depends on your project's needs and custom code, but the most basic implementation could be achieved with the following procedure:
1. From your project's folder, create a middleware with the Strapi CLI generator, by running the `yarn strapi generate` (or `npm run strapi generate`) command in the terminal.
2. Select `middleware` from the list, using keyboard arrows, and press Enter.
3. Give the middleware a name, for instance `isOwner`.
4. Choose `Add middleware to an existing API` from the list.
5. Select which API you want the middleware to apply.
6. Replace the code in the `/src/api/[your-api-name]/middlewares/isOwner.js` file with the following, replacing `api::restaurant.restaurant` in line 22 with the identifier corresponding to the API you choose at step 5 (e.g., `api::blog-post.blog-post` if your API name is `blog-post`):
```js showLineNumbers title="src/api/blog-post/middlewares/isOwner.js"
"use strict";
/**
* `isOwner` middleware
*/
module.exports = (config, { strapi }) => {
// Add your own logic here.
return async (ctx, next) => {
const user = ctx.state.user;
const entryId = ctx.params.id ? ctx.params.id : undefined;
let entry = {};
/**
* Gets all information about a given entry,
* populating every relations to ensure
* the response includes author-related information
*/
if (entryId) {
entry = await strapi.entityService.findOne(
// highlight-start
// replace the next line with your proper content-type identifier
"api::restaurant.restaurant",
// highlight-end
entryId,
{ populate: "*" }
);
}
/**
* Compares user id and entry author id
* to decide whether the request can be fulfilled
* by going forward in the Strapi backend server
*/
if (user.id !== entry.author.id) {
return ctx.unauthorized("This action is unauthorized.");
} else {
return next();
}
};
};
```
7. Ensure the middleware is configured to apply on some routes. In the `config` object found in the `src/api/[your-api–name]/routes/[your-content-type-name].js` file, define the methods (`find`, `findOne`, `read`, `update`, `delete`) for which you would like the middleware to apply, and declare the `isOwner` middleware for these routes.
For instance, if you wish to allow GET (i.e., `find` and `findOne` methods) and POST (i.e., `create` method) requests to any user for the `restaurant` content-type in the `restaurant` API, but would like to restrict PUT (i.e., `update` method) and DELETE requests only to the user who created the entry, you could use the following code in the `src/api/restaurant/routes/restaurant.js` file:
```js title="src/api/restaurant/routes/restaurant.js"
/**
* restaurant router
*/
const { createCoreRouter } = require("@strapi/strapi").factories;
module.exports = createCoreRouter("api::restaurant.restaurant", {
config: {
update: {
middlewares: ["api::restaurant.is-owner"],
},
delete: {
middlewares: ["api::restaurant.is-owner"],
},
},
});
```
:::info
You can find more information about route middlewares in the [routes documentation](/dev-docs/backend-customization/routes).
:::
# Models
Source: https://docs-v4.strapi.io/dev-docs/backend-customization/models
# Models
As Strapi is a headless Content Management System (CMS), creating a data structure for the content is one of the most important aspects of using the software. Models define a representation of the data structure.
There are 2 different types of models in Strapi:
- content-types, which can be collection types or single types, depending on how many entries they manage,
- and components that are data structures re-usable in multiple content-types.
If you are just starting out, it is convenient to generate some models with the [Content-type Builder](/user-docs/content-type-builder) directly in the admin panel. The user interface takes over a lot of validation tasks and showcases all the options available to create the content's data structure. The generated model mappings can then be reviewed at the code level using this documentation.
## Model creation
Content-types and components models are created and stored differently.
### Content-types
Content-types in Strapi can be created:
- with the [Content-type Builder in the admin panel](/user-docs/content-type-builder/introduction-to-content-types-builder.md),
- or with [Strapi's interactive CLI `strapi generate`](/dev-docs/cli#strapi-generate) command.
The content-types use the following files:
- `schema.json` for the model's [schema](#model-schema) definition. (generated automatically, when creating content-type with either method)
- `lifecycles.js` for [lifecycle hooks](#lifecycle-hooks). This file must be created manually.
These models files are stored in `./src/api/[api-name]/content-types/[content-type-name]/`, and any JavaScript or JSON file found in these folders will be loaded as a content-type's model (see [project structure](/dev-docs/project-structure)).
:::note
In [TypeScript](/dev-docs/typescript.md)-enabled projects, schema typings can be generated using the `ts:generate-types` command (e.g., `npm run strapi ts:generate-types` or `yarn strapi ts:generate-types`).
:::
### Components
Component models can't be created with CLI tools. Use the [Content-type Builder](/user-docs/content-type-builder) or create them manually.
Components models are stored in the `./src/components` folder. Every component has to be inside a subfolder, named after the category the component belongs to (see [project structure](/dev-docs/project-structure)).
## Model schema
The `schema.json` file of a model consists of:
- [settings](#model-settings), such as the kind of content-type the model represents or the table name in which the data should be stored,
- [information](#model-information), mostly used to display the model in the admin panel and access it through the REST and GraphQL APIs,
- [attributes](#model-attributes), which describe the data structure of the model,
- and [options](#model-options) used to defined specific behaviors on the model.
### Model settings
General settings for the model can be configured with the following parameters:
| Parameter | Type | Description |
| -------------------------------------------- | ------ | ---------------------------------------------------------------------------------------------------------------------- |
| `collectionName` | String | Database table name in which the data should be stored |
| `kind`
_Optional, only for content-types_ | String | Defines if the content-type is:
a collection type (`collectionType`)
or a single type (`singleType`)
|
```json
// ./src/api/[api-name]/content-types/restaurant/schema.json
{
"kind": "collectionType",
"collectionName": "Restaurants_v1",
}
```
### Model information
The `info` key in the model's schema describes information used to display the model in the admin panel and access it through the Content API. It includes the following parameters:
| Parameter | Type | Description |
| -------------- | ------ | ------------------------------------------------------------------------------------------------------------------------------------------- |
| `displayName` | String | Default name to use in the admin panel |
| `singularName` | String | Singular form of the content-type name. Used to generate the API routes and databases/tables collection.
Should be kebab-case. |
| `pluralName` | String | Plural form of the content-type name. Used to generate the API routes and databases/tables collection.
Should be kebab-case. |
| `description` | String | Description of the model |
```json title="./src/api/[api-name]/content-types/restaurant/schema.json"
"info": {
"displayName": "Restaurant",
"singularName": "restaurant",
"pluralName": "restaurants",
"description": ""
},
```
### Model attributes
The data structure of a model consists of a list of attributes. Each attribute has a `type` parameter, which describes its nature and defines the attribute as a simple piece of data or a more complex structure used by Strapi.
Many types of attributes are available:
- scalar types (e.g. strings, dates, numbers, booleans, etc.),
- Strapi-specific types, such as:
- `media` for files uploaded through the [Media library](/user-docs/content-type-builder/configuring-fields-content-type.md#media)
- `relation` to describe a [relation](#relations) between content-types
- `customField` to describe [custom fields](#custom-fields) and their specific keys
- `component` to define a [component](#components-1) (i.e. a data structure usable in multiple content-types)
- `dynamiczone` to define a [dynamic zone](#dynamic-zones) (i.e. a flexible space based on a list of components)
- and the `locale` and `localizations` types, only used by the [Internationalization (i18n) plugin](/dev-docs/plugins/i18n.md)
The `type` parameter of an attribute should be one of the following values:
| Type categories | Available types |
|------|-------|
| String types |
`string`
`text`
`richtext`
`enumeration`
`email`
`password`
[`uid`](#uid-type)
|
| Date types |
`date`
`time`
`datetime`
`timestamp`
|
| Number types |
`integer`
`biginteger`
`float`
`decimal`
|
| Other generic types |
`boolean`
`json`
|
| Special types unique to Strapi |
`media`
[`relation`](#relations)
[`customField`](#custom-fields)
[`component`](#components)
[`dynamiczone`](#dynamic-zones)
|
| Internationalization (i18n)-related types
_Can only be used if the [i18n plugin](/dev-docs/plugins/i18n.md) is installed_|
`locale`
`localizations`
|
:::caution
Never name a custom attribute `locale` because it could interfere with, and break, the [i18n](/dev-docs/plugins/i18n) feature.
:::
#### Validations
Basic validations can be applied to attributes using the following parameters:
| Parameter | Type | Description | Default |
| -------------- | ------- | --------------------------------------------------------------------------------------------------------- | ------- |
| `required` | Boolean | If `true`, adds a required validator for this property | `false` |
| `max` | Integer | Checks if the value is greater than or equal to the given maximum | - |
| `min` | Integer | Checks if the value is less than or equal to the given minimum | - |
| `minLength` | Integer | Minimum number of characters for a field input value | - |
| `maxLength` | Integer | Maximum number of characters for a field input value | - |
| `private` | Boolean | If `true`, the attribute will be removed from the server response.
💡 This is useful to hide sensitive data. | `false` |
| `configurable` | Boolean | If `false`, the attribute isn't configurable from the Content-type Builder plugin. | `true` |
```json title="./src/api/[api-name]/content-types/restaurant/schema.json"
{
// ...
"attributes": {
"title": {
"type": "string",
"minLength": 3,
"maxLength": 99,
"unique": true
},
"description": {
"default": "My description",
"type": "text",
"required": true
},
"slug": {
"type": "uid",
"targetField": "title"
}
// ...
}
}
```
#### Database validations and settings
:::caution 🚧 This API is considered experimental.
These settings should be reserved to an advanced usage, as they might break some features. There are no plans to make these settings stable.
:::
Database validations and settings are custom options passed directly onto the `tableBuilder` Knex.js function during schema migrations. Database validations allow for an advanced degree of control for setting custom column settings. The following options are set in a `column: {}` object per attribute:
| Parameter | Type | Description | Default |
| ------------- | ------- | --------------------------------------------------------------------------------------------- | ------- |
| `name` | string | Changes the name of the column in the database | - |
| `defaultTo` | string | Sets the database `defaultTo`, typically used with `notNullable` | - |
| `notNullable` | boolean | Sets the database `notNullable`, ensures that columns cannot be null | `false` |
| `unsigned` | boolean | Only applies to number columns, removes the ability to go negative but doubles maximum length | `false` |
| `unique` | boolean | Enforces database level unique, caution when using with draft & publish feature | `false` |
| `type` | string | Changes the database type, if `type` has arguments, you should pass them in `args` | - |
| `args` | array | Arguments passed into the Knex.js function that changes things like `type` | `[]` |
```json title="./src/api/[api-name]/content-types/restaurant/schema.json"
{
// ...
"attributes": {
"title": {
"type": "string",
"minLength": 3,
"maxLength": 99,
"unique": true,
"column": {
"unique": true // enforce database unique also
}
},
"description": {
"default": "My description",
"type": "text",
"required": true,
"column": {
"defaultTo": "My description", // set database level default
"notNullable": true // enforce required at database level, even for drafts
}
},
"rating": {
"type": "decimal",
"default": 0,
"column": {
"defaultTo": 0,
"type": "decimal", // using the native decimal type but allowing for custom precision
"args": [
6,1 // using custom precision and scale
]
}
}
// ...
}
}
```
#### `uid` type
The `uid` type is used to automatically prefill the field value in the admin panel with a unique identifier (UID) (e.g. slugs for articles) based on 2 optional parameters:
- `targetField` (string): If used, the value of the field defined as a target is used to auto-generate the UID.
- `options` (string): If used, the UID is generated based on a set of options passed to [the underlying `uid` generator](https://github.com/sindresorhus/slugify). The resulting `uid` must match the following regular expression pattern: `/^[A-Za-z0-9-_.~]*$`.
#### Relations
Relations link content-types together. Relations are explicitly defined in the [attributes](#model-attributes) of a model with `type: 'relation'` and accept the following additional parameters:
| Parameter | Description |
| --------------------------- | ----------------------------------------------------------------------------------------------------------------------------------------------- |
| `relation` | The type of relation among these values:
`oneToOne`
`oneToMany`
`manyToOne`
`manyToMany`
|
| `target` | Accepts a string value as the name of the target content-type |
| `mappedBy` and `inversedBy`
_Optional_ | In bidirectional relations, the owning side declares the `inversedBy` key while the inversed side declares the `mappedBy` key |
#### Custom fields
[Custom fields](/dev-docs/custom-fields.md) extend Strapi’s capabilities by adding new types of fields to content-types. Custom fields are explicitly defined in the [attributes](#model-attributes) of a model with `type: customField`.
Custom fields' attributes also accept:
Custom fields' attributes also show the following specificities:
- a `customField` attribute whose value acts as a unique identifier to indicate which registered custom field should be used. Its value follows:
- either the `plugin::plugin-name.field-name` format if a plugin created the custom field
- or the `global::field-name` format for a custom field specific to the current Strapi application
- and additional parameters depending on what has been defined when registering the custom field (see [custom fields documentation](/dev-docs/custom-fields.md)).
```json title="./src/api/[apiName]/[content-type-name]/content-types/schema.json"
{
// …
"attributes": {
"attributeName": { // attributeName would be replaced by the actual attribute name
"type": "customField",
"customField": "plugin::color-picker.color",
"options": {
"format": "hex"
}
}
}
// …
}
```
#### Components
Component fields create a relation between a content-type and a component structure. Components are explicitly defined in the [attributes](#model-attributes) of a model with `type: 'component'` and accept the following additional parameters:
| Parameter | Type | Description |
| ------------ | ------- | ---------------------------------------------------------------------------------------- |
| `repeatable` | Boolean | Could be `true` or `false` depending on whether the component is repeatable or not |
| `component` | String | Define the corresponding component, following this format: `.` |
```json title="./src/api/[apiName]/restaurant/content-types/schema.json"
{
"attributes": {
"openinghours": {
"type": "component",
"repeatable": true,
"component": "restaurant.openinghours"
}
}
}
```
#### Dynamic zones
Dynamic zones create a flexible space in which to compose content, based on a mixed list of [components](#components-2).
Dynamic zones are explicitly defined in the [attributes](#model-attributes) of a model with `type: 'dynamiczone'`. They also accept a `components` array, where each component should be named following this format: `.`.
```json title="./src/api/[api-name]/content-types/article/schema.json"
{
"attributes": {
"body": {
"type": "dynamiczone",
"components": ["article.slider", "article.content"]
}
}
}
```
### Model options
The `options` key is used to define specific behaviors and accepts the following parameter:
| Parameter | Type | Description |
|---------------------|------------------|--------------------------------------------------------------------------------------------------------------------------------------------------------------------------------------------------------------------------------------------------------------------------------------------------------------------|
| `privateAttributes` | Array of strings | Allows treating a set of attributes as private, even if they're not actually defined as attributes in the model. It could be used to remove them from API responses timestamps.
The `privateAttributes` defined in the model are merged with the `privateAttributes` defined in the global Strapi configuration. |
| `draftAndPublish` | Boolean | Enables the draft and publish feature.
Default value: `true` (`false` if the content-type is created from the interactive CLI). |
```json title="./src/api/[api-name]/content-types/restaurant/schema.json"
{
"options": {
"privateAttributes": ["id", "createdAt"],
"draftAndPublish": true
}
}
```
## Lifecycle hooks
Lifecycle hooks are functions that get triggered when Strapi queries are called. They are triggered automatically when managing content through the administration panel or when developing custom code using `queries`·
Lifecycle hooks can be customized declaratively or programmatically.
:::caution
Lifecycles hooks are not triggered when using directly the [knex](https://knexjs.org/) library instead of Strapi functions.
:::
:::tip
Please refer to the [error handling](/dev-docs/error-handling#services-and-models-lifecycles) documentation to learn how to throw errors from lifecycle hooks.
:::
### Available lifecycle events
The following lifecycle events are available:
- `beforeCreate`
- `beforeCreateMany`
- `afterCreate`
- `afterCreateMany`
- `beforeUpdate`
- `beforeUpdateMany`
- `afterUpdate`
- `afterUpdateMany`
- `beforeDelete`
- `beforeDeleteMany`
- `afterDelete`
- `afterDeleteMany`
- `beforeCount`
- `afterCount`
- `beforeFindOne`
- `afterFindOne`
- `beforeFindMany`
- `afterFindMany`
### Hook `event` object
Lifecycle hooks are functions that take an `event` parameter, an object with the following keys:
| Key | Type | Description |
| -------- | ----------------- | ---------------------------------------------------------------------------------------------------------------------------------------------------------------- |
| `action` | String | Lifecycle event that has been triggered (see [list](#available-lifecycle-events)) |
| `model` | Array of strings (uid) | An array of uids of the content-types whose events will be listened to. If this argument is not supplied, events are listened on all content-types. |
| `params` | Object | Accepts the following parameters:
`data`
`select`
`where`
`orderBy`
`limit`
`offset`
`populate`
|
| `result` | Object | _Optional, only available with `afterXXX` events_
Contains the result of the action. |
| `state` | Object | Query state, can be used to share state between `beforeXXX` and `afterXXX` events of a query. |
### Declarative and programmatic usage
To configure a content-type lifecycle hook, create a `lifecycles.js` file in the `./src/api/[api-name]/content-types/[content-type-name]/` folder.
Each event listener is called sequentially. They can be synchronous or asynchronous.
#### Declarative usage
#### Programmatic usage
Using the database layer API, it's also possible to register a subscriber and listen to events programmatically:
```js title="./src/index.js"
module.exports = {
async bootstrap({ strapi }) {
// registering a subscriber
strapi.db.lifecycles.subscribe({
models: [], // optional;
beforeCreate(event) {
const { data, where, select, populate } = event.params;
event.state = 'doStuffAfterWards';
},
afterCreate(event) {
if (event.state === 'doStuffAfterWards') {
}
const { result, params } = event;
// do something to the result
},
});
// generic subscribe for generic handling
strapi.db.lifecycles.subscribe((event) => {
if (event.action === 'beforeCreate') {
// do something
}
});
}
}
```
# Policies
Source: https://docs-v4.strapi.io/dev-docs/backend-customization/policies
const imgStyle = {width: '100%', margin: '0'}
const captionStyle = {fontSize: '12px'}
# Policies
Policies are functions that execute specific logic on each request before it reaches the [controller](/dev-docs/backend-customization/controllers). They are mostly used for securing business logic.
Each [route](/dev-docs/backend-customization/routes) of a Strapi project can be associated to an array of policies. For example, a policy named `is-admin` could check that the request is sent by an admin user, and restrict access to critical routes.
Policies can be global or scoped. [Global policies](#global-policies) can be associated to any route in the project. Scoped policies only apply to a specific [API](#api-policies) or [plugin](#plugin-policies).
The diagram represents a simplified version of how a request travels through the Strapi back end, with policies and routes highlighted. The backend customization introduction page includes a complete, interactive diagram.
## Implementation
A new policy can be implemented:
- with the [interactive CLI command `strapi generate`](/dev-docs/cli#strapi-generate)
- or manually by creating a JavaScript file in the appropriate folder (see [project structure](/dev-docs/project-structure)):
- `./src/policies/` for global policies
- `./src/api/[api-name]/policies/` for API policies
- `./src/plugins/[plugin-name]/policies/` for plugin policies
Global policy implementation example:
`policyContext` is a wrapper around the [controller](/dev-docs/backend-customization/controllers) context. It adds some logic that can be useful to implement a policy for both REST and GraphQL.
:::tip
To see a possible advanced usage for route policies, read the [policies](/dev-docs/backend-customization/examples/policies) page of the backend customization examples cookbook.
:::
Policies can be configured using a `config` object:
## Usage
To apply policies to a route, add them to its configuration object (see [routes documentation](/dev-docs/backend-customization/routes#policies)).
Policies are called different ways depending on their scope:
- use `global::policy-name` for [global policies](#global-policies)
- use `api::api-name.policy-name` for [API policies](#api-policies)
- use `plugin::plugin-name.policy-name` for [plugin policies](#plugin-policies)
:::tip
To list all the available policies, run `yarn strapi policies:list`.
:::
### Global policies
Global policies can be associated to any route in a project.
### Plugin policies
[Plugins](/dev-docs/plugins) can add and expose policies to an application. For example, the [Users & Permissions plugin](/user-docs/users-roles-permissions) comes with policies to ensure that the user is authenticated or has the rights to perform an action:
### API policies
API policies are associated to the routes defined in the API where they have been declared.
To use a policy in another API, reference it with the following syntax: `api::[apiName].[policyName]`:
# Requests and Responses
Source: https://docs-v4.strapi.io/dev-docs/backend-customization/requests-responses
const imgStyle = {width: '100%', margin: '0'}
const captionStyle = {fontSize: '12px'}
# Requests and Responses
The Strapi back end server is based on [Koa](https://koajs.com/). When you send requests through the [REST API](/dev-docs/api/rest), a context object (`ctx`) is passed to every element of the Strapi back end (e.g., [policies](/dev-docs/backend-customization/policies), [controllers](/dev-docs/backend-customization/controllers), [services](/dev-docs/backend-customization/services)).
`ctx` includes 3 main objects:
- [`ctx.request`](#ctxrequest) for information about the request sent by the client making an API request,
- [`ctx.state`](#ctxstate) for information about the state of the request within the Strapi back end,
- and [`ctx.response`](#ctxresponse) for information about the response that the server will return.
:::tip
The request's context can also be accessed from anywhere in the code with the [`strapi.requestContext` function](#accessing-the-request-context-anywhere).
:::
:::info
In addition to the concepts and parameters described in the following documentation, you might find additional information in the [Koa request documentation](http://koajs.com/#request), [Koa Router documentation](https://github.com/koajs/router/blob/master/API.md) and [Koa response documentation](http://koajs.com/#response).
:::
The diagram represents a simplified version of how a request travels through the Strapi back end, with requests and responses highlighted. The backend customization introduction page includes a complete, interactive diagram.
## `ctx.request`
The `ctx.request` object contains the following parameters:
| Parameter | Description | Type |
| --------------------- | -------------------------------------------------------------------------------------------- | -------- |
| `ctx.request.body` | Parsed version of the body. | `Object` |
| `ctx.request.files` | Files sent with the request. | `Array` |
| `ctx.request.headers` | Headers sent with the request. | `Object` |
| `ctx.request.host` | Host part of the URL, including the port. | `String` |
| `ctx.request.hostname`| Host part of the URL, excluding the port. | `String` |
| `ctx.request.href` | Complete URL of the requested resource, including the protocol, domain, port (if specified), path, and query parameters. | `String` |
| `ctx.request.ip` | IP of the person sending the request.| `String` |
| `ctx.request.ips` | When `X-Forwarded-For` is present and `app.proxy` is enabled, an array of IPs is returned, ordered from upstream to downstream.
For example if the value were "client, proxy1, proxy2", you would receive the `["client", "proxy1", "proxy2"]` array. | `Array` |
| `ctx.request.method` | Request method (e.g., `GET`, `POST`). | `String` |
| `ctx.request.origin` | URL part before the first `/`. | `String` |
| `ctx.request.params` | Parameters sent in the URL.
For example, if the internal URL is `/restaurants/:id`, whatever you replace `:id` in the real request becomes accessible through `ctx.request.params.id`. | `Object` |
| `ctx.request.path` | Path of the requested resource, excluding the query parameters. | `String` |
| `ctx.request.protocol`| Protocol being used (e.g., `https` or `http`). | `String` |
| `ctx.request.query` | Strapi-specific [query parameters](#ctxrequestquery). | `Object` |
| `ctx.request.subdomains`| Subdomains included in the URL.
For example, if the domain is `tobi.ferrets.example.com`, the value is the following array: `["ferrets", "tobi"]`. | `Array` |
| `ctx.request.url` | Path and query parameters of the requested resource, excluding the protocol, domain, and port. | `String` |
Differences between protocol, origin, url, href, path, host, and hostname :
Given an API request sent to the `https://example.com:1337/api/restaurants?id=123` URL, here is what different parameters of the `ctx.request` object return:
| Parameter | Returned value |
| ---------- | ------------------------------------------------- |
| `ctx.request.href` | `https://example.com:1337/api/restaurants?id=123` |
| `ctx.request.protocol` | `https` |
| `ctx.request.host` | `localhost:1337` |
| `ctx.request.hostname` | `localhost` |
| `ctx.request.origin` | `https://example.com:1337` |
| `ctx.request.url` | `/api/restaurants?id=123` |
| `ctx.request.path` | `/api/restaurants` |
### `ctx.request.query`
`ctx.request` provides a `query` object that gives access to Strapi query parameters. The following table lists available parameters with a short description and a link to the relevant REST API documentation section (see [REST API parameters](/dev-docs/api/rest/parameters) for more information):
| Parameter | Description | Type |
| -------------------------------------| --------------------------------------------------------------------------------------------------------------------------- | -------------------- |
| `ctx.request.query` `ctx.query` | The whole query object. | `Object` |
| `ctx.request.query.sort` | Parameters to [sort the response](/dev-docs/api/rest/sort-pagination.md#sorting) | `String` or `Array` |
| `ctx.request.query.filters` | Parameters to [filter the response](/dev-docs/api/rest/filters-locale-publication#filtering) | `Object` |
| `ctx.request.query.populate` | Parameters to [populate relations, components, or dynamic zones](/dev-docs/api/rest/populate-select#population) | `String` or `Object` |
| `ctx.request.query.fields` | Parameters to [select only specific fields to return with the response](/dev-docs/api/rest/populate-select#field-selection) | `Array` |
| `ctx.request.query.pagination` | Parameter to [page through entries](/dev-docs/api/rest/sort-pagination.md#pagination) | `Object` |
| `ctx.request.query.publicationState` | Parameter to [select the Draft & Publish state](/dev-docs/api/rest/filters-locale-publication#publication-state) | `String` |
| `ctx.request.query.locale` | Parameter to [select one or multiple locales](/dev-docs/api/rest/filters-locale-publication#locale) | `String` or `Array` |
## `ctx.state`
The `ctx.state` object gives access to the state of the request within the Strapi back end, including specific values about the [user](#ctxstateuser), [authentication](#ctxstateauth), [route](#ctxstateroute):
| Parameter | Description | Type |
| ---------------------------|---------------------------------------------------------------------------- | -------- |
| `ctx.state.isAuthenticated`| Returns whether the current user is authenticated in any way. | `Boolean` |
### `ctx.state.user`
The `ctx.state.user` object gives access to information about the user performing the request and includes the following parameters:
| Parameter | Description | Type |
| ----------| -------------------------------------------------------------------------------------------- | -------- |
| `ctx.state.user`| User's information. Only one relation is populated. | `Object` |
| `ctx.state.user.role`| The user's role | `Object` |
### `ctx.state.auth`
The `ctx.state.auth` object gives access to information related to the authentication and includes the following parameters:
| Parameter | Description | Type |
| ------------------------------| -------------------------------------------------------------------------------------------- | -------- |
| `ctx.state.auth.strategy` | Information about the currently used authentication strategy ([Users & Permissions plugin](/dev-docs/plugins/users-permissions) or [API tokens](/dev-docs/configurations/api-tokens)) | `Object` |
| `ctx.state.auth.strategy.name`| Name of the currently used strategy | `String` |
| `ctx.state.auth.credentials` | The user's credentials | `String` |
### `ctx.state.route`
The `ctx.state.route` object gives access to information related to the current route and includes the following parameters:
| Parameter | Description | Type |
| ----------| -------------------------------------------------------------------------------------------- | -------- |
| `ctx.state.route.method`| Method used to access the current route. | `String` |
| `ctx.state.route.path`| Path of the current route. | `String` |
| `ctx.state.route.config`| Configuration information about the current route. | `Object` |
| `ctx.state.route.handler`| Handler (controller) of the current route. | `Object` |
| `ctx.state.route.info`| Additional information about the current route, such as the apiName and the API request type. | `Object` |
| `ctx.state.route.info.apiName`| Name of the used API. | `String` |
| `ctx.state.route.info.type`| Type of the used API. | `String` |
## `ctx.response`
The `ctx.response` object gives access to information related to the response that the server will return and includes the following parameters:
| Parameter | Description | Type |
| ----------| -------------------------------------------------------------------------------------------- | -------- |
| `ctx.response.body`| Body of the response. | `Any` |
| `ctx.response.status` | Status code of the response. | `Integer` |
| `ctx.response.message`| Status message of the response.
By default, `response.message` is associated with `response.status`. | `String` |
| `ctx.response.header` `ctx.response.headers`| Header(s) sent with the response. | `Object` |
| `ctx.response.length`| [`Content-Length`](https://developer.mozilla.org/en-US/docs/Web/HTTP/Headers/Content-Length) header value as a number when present, or deduces it from `ctx.body` when possible; otherwise, returns `undefined`. | `Integer` |
| `ctx.response.redirect` `ctx.response.redirect(url, [alt])` | Performs a `302` redirect to the URL. The string "back" is special-cased to provide Referrer support; when Referrer is not present, alt or "/" is used.
`ctx.response.attachment([filename], [options])` | Sets [`Content-Disposition`](https://developer.mozilla.org/en-US/docs/Web/HTTP/Headers/Content-Disposition) header to "attachment" to signal the client to prompt for download. Optionally specify the filename of the download and some [options](https://github.com/jshttp/content-disposition#options). | `Function` |
| `ctx.response.type`| [`Content-Type`](https://developer.mozilla.org/en-US/docs/Web/HTTP/Headers/Content-Type) header, void of parameters such as "charset". | `String` |
| `ctx.response.lastModified`| [`Last-Modified`](https://developer.mozilla.org/en-US/docs/Web/HTTP/Headers/Last-Modified) header as a Date, if it exists. | `DateTime` |
| `ctx.response.etag`| Sets the [`ETag`](https://developer.mozilla.org/en-US/docs/Web/HTTP/Headers/ETag) of a response including the wrapped "s. There is no corresponding `response.etag` getter. | `String` |
## Accessing the request context anywhere
:::callout ✨ New in v4.3.9
The `strapi.requestContext` works with Strapi v4.3.9+.
:::
Strapi exposes a way to access the current request context from anywhere in the code (e.g. lifecycle functions).
You can access the request as follows:
```js
const ctx = strapi.requestContext.get();
```
You should only use this inside of functions that will be called in the context of an HTTP request.
```js
// correct
const service = {
myFunction() {
const ctx = strapi.requestContext.get();
console.log(ctx.state.user);
},
};
// incorrect
const ctx = strapi.requestContext.get();
const service = {
myFunction() {
console.log(ctx.state.user);
},
};
```
**Example:**
```js title="./api/test/content-types/article/lifecycles.js"
module.exports = {
beforeUpdate() {
const ctx = strapi.requestContext.get();
console.log('User info in service: ', ctx.state.user);
},
};
```
:::note
Strapi uses a Node.js feature called [AsyncLocalStorage](https://nodejs.org/docs/latest-v16.x/api/async_context.html#class-asynclocalstorage) to make the context available anywhere.
:::
# Routes
Source: https://docs-v4.strapi.io/dev-docs/backend-customization/routes
const imgStyle = {width: '100%', margin: '0'}
const captionStyle = {fontSize: '12px'}
# Routes
Requests sent to Strapi on any URL are handled by routes. By default, Strapi generates routes for all the content-types (see [REST API documentation](/dev-docs/api/rest)). Routes can be [added](#implementation) and configured:
- with [policies](#policies), which are a way to block access to a route,
- and with [middlewares](#middlewares), which are a way to control and change the request flow and the request itself.
Once a route exists, reaching it executes some code handled by a controller (see [controllers documentation](/dev-docs/backend-customization/controllers)). To view all existing routes and their hierarchal order, you can run `yarn strapi routes:list` (see [CLI reference](/dev-docs/cli)).
The diagram represents a simplified version of how a request travels through the Strapi back end, with routes highlighted. The backend customization introduction page includes a complete, interactive diagram.
## Implementation
Implementing a new route consists in defining it in a router file within the `./src/api/[apiName]/routes` folder (see [project structure](/dev-docs/project-structure)).
There are 2 different router file structures, depending on the use case:
- configuring [core routers](#configuring-core-routers)
- or creating [custom routers](#creating-custom-routers).
### Configuring core routers
Core routers (i.e. `find`, `findOne`, `create`, `update`, and `delete`) correspond to [default routes](/dev-docs/api/rest#endpoints) automatically created by Strapi when a new [content-type](/dev-docs/backend-customization/models#model-creation) is created.
Strapi provides a `createCoreRouter` factory function that automatically generates the core routers and allows:
- passing in configuration options to each router
- and disabling some core routers to [create custom ones](#creating-custom-routers).
A core router file is a JavaScript file exporting the result of a call to `createCoreRouter` with the following parameters:
| Parameter | Description | Type |
| ----------| -------------------------------------------------------------------------------------------- | -------- |
| `prefix` | Allows passing in a custom prefix to add to all routers for this model (e.g. `/test`) | `String` |
| `only` | Core routes that will only be loaded
Anything not in this array is ignored. | `Array` | -->
| `except` | Core routes that should not be loaded
This is functionally the opposite of the `only` parameter. | `Array` |
| `config` | Configuration to handle [policies](#policies), [middlewares](#middlewares) and [public availability](#public-routes) for the route | `Object` |
Generic implementation example:
This only allows a `GET` request on the `/restaurants` path from the core `find` [controller](/dev-docs/backend-customization/controllers) without authentication.
:::tip
To see a possible usage for custom routes, read the [routes](/dev-docs/backend-customization/examples/routes) page of the backend customization examples cookbook.
:::
### Creating custom routers
Creating custom routers consists in creating a file that exports an array of objects, each object being a route with the following parameters:
| Parameter | Description | Type |
| -------------------------- | -------------------------------------------------------------------------------- | -------- |
| `method` | Method associated to the route (i.e. `GET`, `POST`, `PUT`, `DELETE` or `PATCH`) | `String` |
| `path` | Path to reach, starting with a forward-leading slash (e.g. `/articles`)| `String` |
| `handler` | Function to execute when the route is reached. Should follow this syntax: `.` | `String` |
| `config`
_Optional_ | Configuration to handle [policies](#policies), [middlewares](#middlewares) and [public availability](#public-routes) for the route
| `Object` |
Dynamic routes can be created using parameters and regular expressions. These parameters will be exposed in the `ctx.params` object. For more details, please refer to the [PathToRegex](https://github.com/pillarjs/path-to-regexp) documentation.
:::caution
Routes files are loaded in alphabetical order. To load custom routes before core routes, make sure to name custom routes appropriately (e.g. `01-custom-routes.js` and `02-core-routes.js`).
:::
Example of a custom router using URL parameters and regular expressions for routes
In the following example, the custom routes file name is prefixed with `01-` to make sure the route is reached before the core routes.
## Configuration
Both [core routers](#configuring-core-routers) and [custom routers](#creating-custom-routers) have the same configuration options. The routes configuration is defined in a `config` object that can be used to handle [policies](#policies) and [middlewares](#middlewares) or to [make the route public](#public-routes).
### Policies
[Policies](/dev-docs/backend-customization/policies) can be added to a route configuration:
- by pointing to a policy registered in `./src/policies`, with or without passing a custom configuration
- or by declaring the policy implementation directly, as a function that takes `policyContext` to extend [Koa's context](https://koajs.com/#context) (`ctx`) and the `strapi` instance as arguments (see [policies documentation](/dev-docs/backend-customization/routes))
### Middlewares
[Middlewares](/dev-docs/backend-customization/middlewares) can be added to a route configuration:
- by pointing to a middleware registered in `./src/middlewares`, with or without passing a custom configuration
- or by declaring the middleware implementation directly, as a function that takes [Koa's context](https://koajs.com/#context) (`ctx`) and the `strapi` instance as arguments:
### Public routes
By default, routes are protected by Strapi's authentication system, which is based on [API tokens](/dev-docs/configurations/api-tokens) or on the use of the [Users & Permissions plugin](/user-docs/plugins/strapi-plugins#users-permissions-plugin).
In some scenarios, it can be useful to have a route publicly available and control the access outside of the normal Strapi authentication system. This can be achieved by setting the `auth` configuration parameter of a route to `false`:
# Services
Source: https://docs-v4.strapi.io/dev-docs/backend-customization/services
const imgStyle = {width: '100%', margin: '0'}
const captionStyle = {fontSize: '12px'}
# Services
Services are a set of reusable functions. They are particularly useful to respect the "don’t repeat yourself" (DRY) programming concept and to simplify [controllers](/dev-docs/backend-customization/controllers.md) logic.
The diagram represents a simplified version of how a request travels through the Strapi back end, with services highlighted. The backend customization introduction page includes a complete, interactive diagram.
## Implementation
Services can be [generated or added manually](#adding-a-new-service). Strapi provides a `createCoreService` factory function that automatically generates core services and allows building custom ones or [extend or replace the generated services](#extending-core-services).
### Adding a new service
A new service can be implemented:
- with the [interactive CLI command `strapi generate`](/dev-docs/cli#strapi-generate)
- or manually by creating a JavaScript file in the appropriate folder (see [project structure](/dev-docs/project-structure.md)):
- `./src/api/[api-name]/services/` for API services
- or `./src/plugins/[plugin-name]/services/` for [plugin services](/dev-docs/api/plugins/server-api#services).
To manually create a service, export a factory function that returns the service implementation (i.e. an object with methods). This factory function receives the `strapi` instance:
:::strapi Entity Service API
To get started creating your own services, see Strapi's built-in functions in the [Entity Service API](/dev-docs/api/entity-service) documentation.
:::
Example of a custom email service (using Nodemailer)
The goal of a service is to store reusable functions. A `sendNewsletter` service could be useful to send emails from different functions in our codebase that have a specific purpose:
The service is now available through the `strapi.service('api::restaurant.restaurant').sendNewsletter(...args)` global variable. It can be used in another part of the codebase, like in the following controller:
:::note
When a new [content-type](/dev-docs/backend-customization/models.md#content-types) is created, Strapi builds a generic service with placeholder code, ready to be customized.
:::
:::tip
To see a possible advanced usage for custom services, read the [services and controllers](/dev-docs/backend-customization/examples/services-and-controllers) page of the backend customization examples cookbook.
:::
### Extending core services
Core services are created for each content-type and could be used by [controllers](/dev-docs/backend-customization/controllers.md) to execute reusable logic through a Strapi project. Core services can be customized to implement your own logic. The following code examples should help you get started.
:::tip
A core service can be replaced entirely by [creating a custom service](#adding-a-new-service) and naming it the same as the core service (e.g. `find`, `findOne`, `create`, `update`, or `delete`).
:::
Collection type examplesSingle type examples
:::note
The `find()` method from core services can use both types of pagination, by page of by offset (see [REST API](/dev-docs/api/rest/sort-pagination#pagination)).
:::
## Usage
Once a service is created, it's accessible from [controllers](/dev-docs/backend-customization/controllers.md) or from other services:
```js
// access an API service
strapi.service('api::apiName.serviceName').FunctionName();
// access a plugin service
strapi.service('plugin::pluginName.serviceName').FunctionName();
```
In the syntax examples above, `serviceName` is the name of the service file for API services or the name used to export the service file to `services/index.js` for plugin services.
:::tip
To list all the available services, run `yarn strapi services:list`.
:::
# Webhooks
Source: https://docs-v4.strapi.io/dev-docs/backend-customization/webhooks
# Webhooks
Webhook is a construct used by an application to notify other applications that an event occurred. More precisely, webhook is a user-defined HTTP callback. Using a webhook is a good way to tell third party providers to start some processing (CI, build, deployment ...).
The way a webhook works is by delivering information to a receiving application through HTTP requests (typically POST requests).
## User content-type webhooks
To prevent from unintentionally sending any user's information to other applications, Webhooks will not work for the User content-type.
If you need to notify other applications about changes in the Users collection, you can do so by creating [Lifecycle hooks](/dev-docs/backend-customization/models#lifecycle-hooks) using the `./src/index.js` example.
## Available configurations
You can set webhook configurations inside the file `./config/server`.
- `webhooks`
- `defaultHeaders`: You can set default headers to use for your webhook requests. This option is overwritten by the headers set in the webhook itself.
**Example configuration**
## Securing your webhooks
Most of the time, webhooks make requests to public URLs, therefore it is possible that someone may find that URL and send it wrong information.
To prevent this from happening you can send a header with an authentication token. Using the Admin panel you would have to do it for every webhook.
Another way is to define `defaultHeaders` to add to every webhook requests.
You can configure these global headers by updating the file at `./config/server`:
If you are developing the webhook handler yourself you can now verify the token by reading the headers.
## Available events
By default Strapi webhooks can be triggered by the following events:
| Name | Description |
| ----------------- | ----------------------------------------------------- |
| [`entry.create`](#entrycreate) | Triggered when a Content Type entry is created. |
| [`entry.update`](#entryupdate) | Triggered when a Content Type entry is updated. |
| [`entry.delete`](#entrydelete) | Triggered when a Content Type entry is deleted. |
| [`entry.publish`](#entrypublish) | Triggered when a Content Type entry is published.\* |
| [`entry.unpublish`](#entryunpublish) | Triggered when a Content Type entry is unpublished.\* |
| [`media.create`](#mediacreate) | Triggered when a media is created. |
| [`media.update`](#mediaupdate) | Triggered when a media is updated. |
| [`media.delete`](#mediadelete) | Triggered when a media is deleted. |
| [`review-workflows.updateEntryStage`](#review-workflowsupdateentrystage) | Triggered when content is moved between review stages (see [Review Workflows](/user-docs/settings/review-workflows)). This event is only available with the edition of Strapi. |
| [`releases.publish`](#releasespublish-) | Triggered when a Release is published (see [Releases](/user-docs/releases/introduction)). This event is only available with the edition of Strapi and the plan for Strapi Cloud. |
\*only when `draftAndPublish` is enabled on this Content Type.
## Payloads
:::tip NOTE
Private fields and passwords are not sent in the payload.
:::
### Headers
When a payload is delivered to your webhook's URL, it will contain specific headers:
| Header | Description |
| ---------------- | ------------------------------------------ |
| `X-Strapi-Event` | Name of the event type that was triggered. |
### `entry.create`
This event is triggered when a new entry is created.
**Example payload**
```json
{
"event": "entry.create",
"createdAt": "2020-01-10T08:47:36.649Z",
"model": "address",
"entry": {
"id": 1,
"geolocation": {},
"city": "Paris",
"postal_code": null,
"category": null,
"full_name": "Paris",
"createdAt": "2020-01-10T08:47:36.264Z",
"updatedAt": "2020-01-10T08:47:36.264Z",
"cover": null,
"images": []
}
}
```
### `entry.update`
This event is triggered when an entry is updated.
**Example payload**
```json
{
"event": "entry.update",
"createdAt": "2020-01-10T08:58:26.563Z",
"model": "address",
"entry": {
"id": 1,
"geolocation": {},
"city": "Paris",
"postal_code": null,
"category": null,
"full_name": "Paris",
"createdAt": "2020-01-10T08:47:36.264Z",
"updatedAt": "2020-01-10T08:58:26.210Z",
"cover": null,
"images": []
}
}
```
### `entry.delete`
This event is triggered when an entry is deleted.
**Example payload**
```json
{
"event": "entry.delete",
"createdAt": "2020-01-10T08:59:35.796Z",
"model": "address",
"entry": {
"id": 1,
"geolocation": {},
"city": "Paris",
"postal_code": null,
"category": null,
"full_name": "Paris",
"createdAt": "2020-01-10T08:47:36.264Z",
"updatedAt": "2020-01-10T08:58:26.210Z",
"cover": null,
"images": []
}
}
```
### `entry.publish`
This event is triggered when an entry is published.
**Example payload**
```json
{
"event": "entry.publish",
"createdAt": "2020-01-10T08:59:35.796Z",
"model": "address",
"entry": {
"id": 1,
"geolocation": {},
"city": "Paris",
"postal_code": null,
"category": null,
"full_name": "Paris",
"createdAt": "2020-01-10T08:47:36.264Z",
"updatedAt": "2020-01-10T08:58:26.210Z",
"publishedAt": "2020-08-29T14:20:12.134Z",
"cover": null,
"images": []
}
}
```
### `entry.unpublish`
This event is triggered when an entry is unpublished.
**Example payload**
```json
{
"event": "entry.unpublish",
"createdAt": "2020-01-10T08:59:35.796Z",
"model": "address",
"entry": {
"id": 1,
"geolocation": {},
"city": "Paris",
"postal_code": null,
"category": null,
"full_name": "Paris",
"createdAt": "2020-01-10T08:47:36.264Z",
"updatedAt": "2020-01-10T08:58:26.210Z",
"publishedAt": null,
"cover": null,
"images": []
}
}
```
### `media.create`
This event is triggered when you upload a file on entry creation or through the media interface.
**Example payload**
```json
{
"event": "media.create",
"createdAt": "2020-01-10T10:58:41.115Z",
"media": {
"id": 1,
"name": "image.png",
"hash": "353fc98a19e44da9acf61d71b11895f9",
"sha256": "huGUaFJhmcZRHLcxeQNKblh53vtSUXYaB16WSOe0Bdc",
"ext": ".png",
"mime": "image/png",
"size": 228.19,
"url": "/uploads/353fc98a19e44da9acf61d71b11895f9.png",
"provider": "local",
"provider_metadata": null,
"createdAt": "2020-01-10T10:58:41.095Z",
"updatedAt": "2020-01-10T10:58:41.095Z",
"related": []
}
}
```
### `media.update`
This event is triggered when you replace a media or update the metadata of a media through the media interface.
**Example payload**
```json
{
"event": "media.update",
"createdAt": "2020-01-10T10:58:41.115Z",
"media": {
"id": 1,
"name": "image.png",
"hash": "353fc98a19e44da9acf61d71b11895f9",
"sha256": "huGUaFJhmcZRHLcxeQNKblh53vtSUXYaB16WSOe0Bdc",
"ext": ".png",
"mime": "image/png",
"size": 228.19,
"url": "/uploads/353fc98a19e44da9acf61d71b11895f9.png",
"provider": "local",
"provider_metadata": null,
"createdAt": "2020-01-10T10:58:41.095Z",
"updatedAt": "2020-01-10T10:58:41.095Z",
"related": []
}
}
```
### `media.delete`
This event is triggered only when you delete a media through the media interface.
**Example payload**
```json
{
"event": "media.delete",
"createdAt": "2020-01-10T11:02:46.232Z",
"media": {
"id": 11,
"name": "photo.png",
"hash": "43761478513a4c47a5fd4a03178cfccb",
"sha256": "HrpDOKLFoSocilA6B0_icA9XXTSPR9heekt2SsHTZZE",
"ext": ".png",
"mime": "image/png",
"size": 4947.76,
"url": "/uploads/43761478513a4c47a5fd4a03178cfccb.png",
"provider": "local",
"provider_metadata": null,
"createdAt": "2020-01-07T19:34:32.168Z",
"updatedAt": "2020-01-07T19:34:32.168Z",
"related": []
}
}
```
### `review-workflows.updateEntryStage`
This event is only available with the edition of Strapi. The event is triggered when content is moved to a new review stage (see [Review Workflows](/user-docs/settings/review-workflows)).
**Example payload**
```json
{
"event": "review-workflows.updateEntryStage",
"createdAt": "2023-06-26T15:46:35.664Z",
"model": "model",
"uid": "uid",
"entity": {
"id": 2
},
"workflow": {
"id": 1,
"stages": {
"from": {
"id": 1,
"name": "Stage 1"
},
"to": {
"id": 2,
"name": "Stage 2"
}
}
}
}
```
:::caution Payload format for Strapi v4.11.4+
The payload format for the `review-workflows.updateEntryStage` webhook changed between Strapi v4.11.3 and Strapi v4.11.4. Please notice the payload format differences in the following examples and update your integration code accordingly:
Payload formats for Strapi v4.11.3 vs. Strapi v4.11.4
In Strapi v4.11.3 the webhook payload has the following structure:
```json
{
"event": "review-workflows.updateEntryStage",
"createdAt": "2023-06-30T11:40:00.658Z",
"model": "model",
"uid": "uid",
"entry": {
"entityId": 2,
"workflow": {
"id": 1,
"stages": {
"from": 1,
"to": 2
}
}
}
}
```
In Strapi v4.11.4 the webhook payload has the following structure:
```json
{
"event": "review-workflows.updateEntryStage",
"createdAt": "2023-06-26T15:46:35.664Z",
"model": "model",
"uid": "uid",
"entity": {
"id": 2
},
"workflow": {
"id": 1,
"stages": {
"from": {
"id": 1,
"name": "Stage 1"
},
"to": {
"id": 2,
"name": "Stage 2"
}
}
}
}
```
:::
### `releases.publish`
The event is triggered when a [release](/user-docs/releases/introduction) is published.
**Example payload**
```json
{
"event": "releases.publish",
"createdAt": "2024-02-21T16:45:36.877Z",
"isPublished": true,
"release": {
"id": 2,
"name": "Fall Winter highlights",
"releasedAt": "2024-02-21T16:45:36.873Z",
"scheduledAt": null,
"timezone": null,
"createdAt": "2024-02-21T15:16:22.555Z",
"updatedAt": "2024-02-21T16:45:36.875Z",
"actions": {
"count": 1
}
}
}
# Command Line Interface
Source: https://docs-v4.strapi.io/dev-docs/cli
# Command Line Interface (CLI)
Strapi comes with a full featured Command Line Interface (CLI) which lets you scaffold and manage your project in seconds. The CLI works with both the `yarn` and `npm` package managers.
:::caution
Interactive commands such as `strapi admin:create-user` don't display prompts with `npm`. A fix for the `npm` package manager is anticipated by March 2023. In the meantime, consider using the `yarn` package manager.
:::
:::note
It is recommended to install Strapi locally only, which requires prefixing all of the following `strapi` commands with the package manager used for the project setup (e.g `npm run strapi help` or `yarn strapi help`) or a dedicated node package executor (e.g. `npx strapi help`).
To pass options with `npm` use the syntax: `npm run strapi -- --